Webstore Header
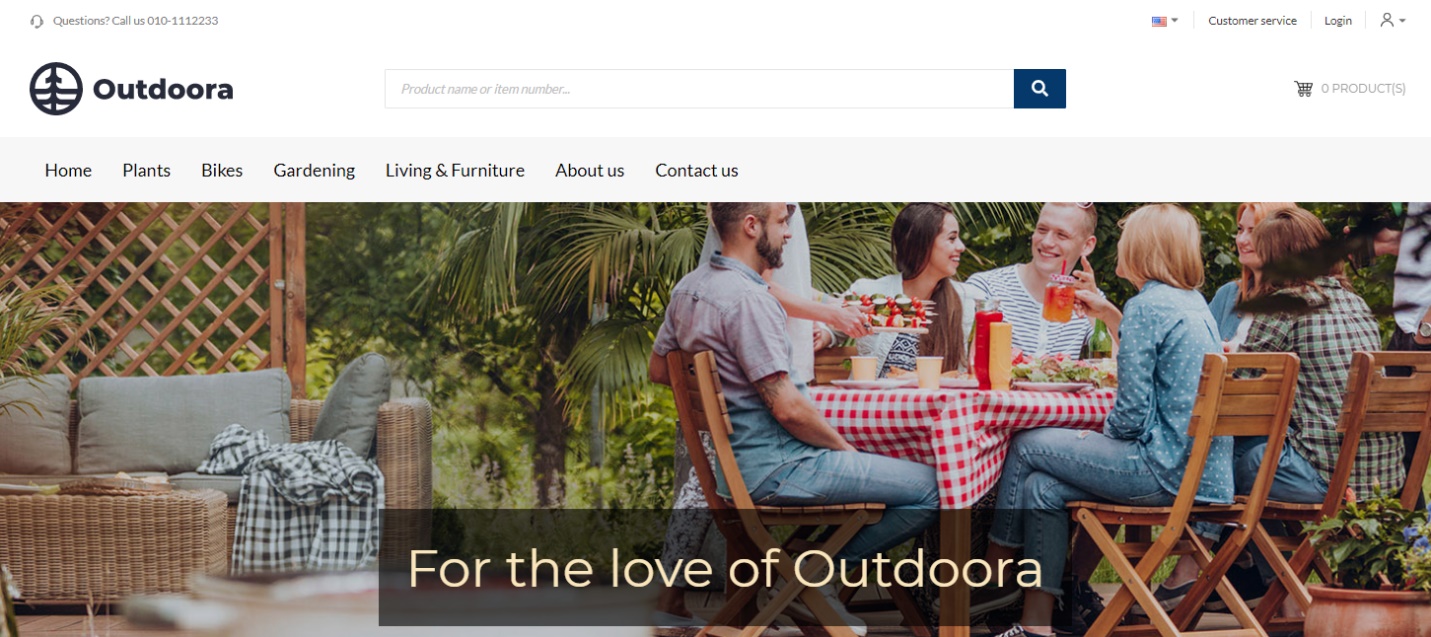
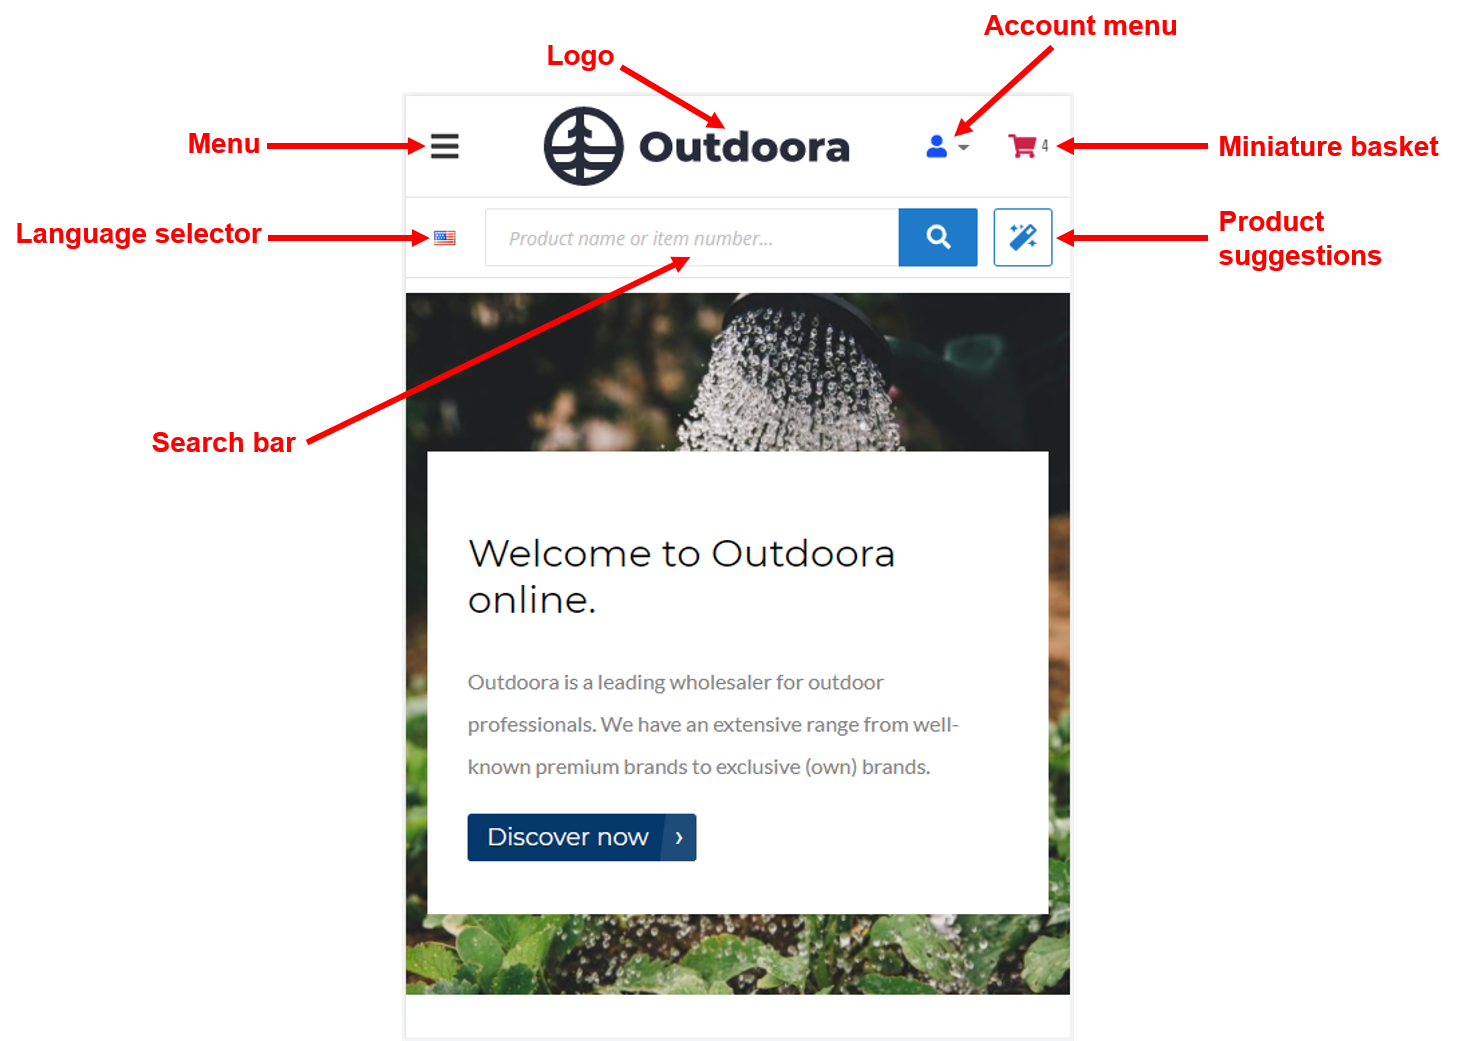
A webstore header is the top section of the web page and it is a must for every online store. Header is the first thing a visitor sees at your webstore and it plays a crucial role in grabbing the users’ attention and establishing a connection with the webstore visitors. Header should provide basic information about a webstore so that visitors can understand what it offers.
Various elements can be a part of header. Nevertheless, as a rule, the following core elements are present in the header:
-
Logo or brand identifier
-
My account / Login
-
Search bar
-
Shopping cart
-
Navigation (Cascading or multi column main menu)
-
Language selection in case of a multi-lingual webstore
-
Contact information
With the possibilities Sana Commerce Cloud provides, you can change the order of the webstore header elements the way you need, add and remove different elements. In Sana Admin click: Design & Layout > Headers.
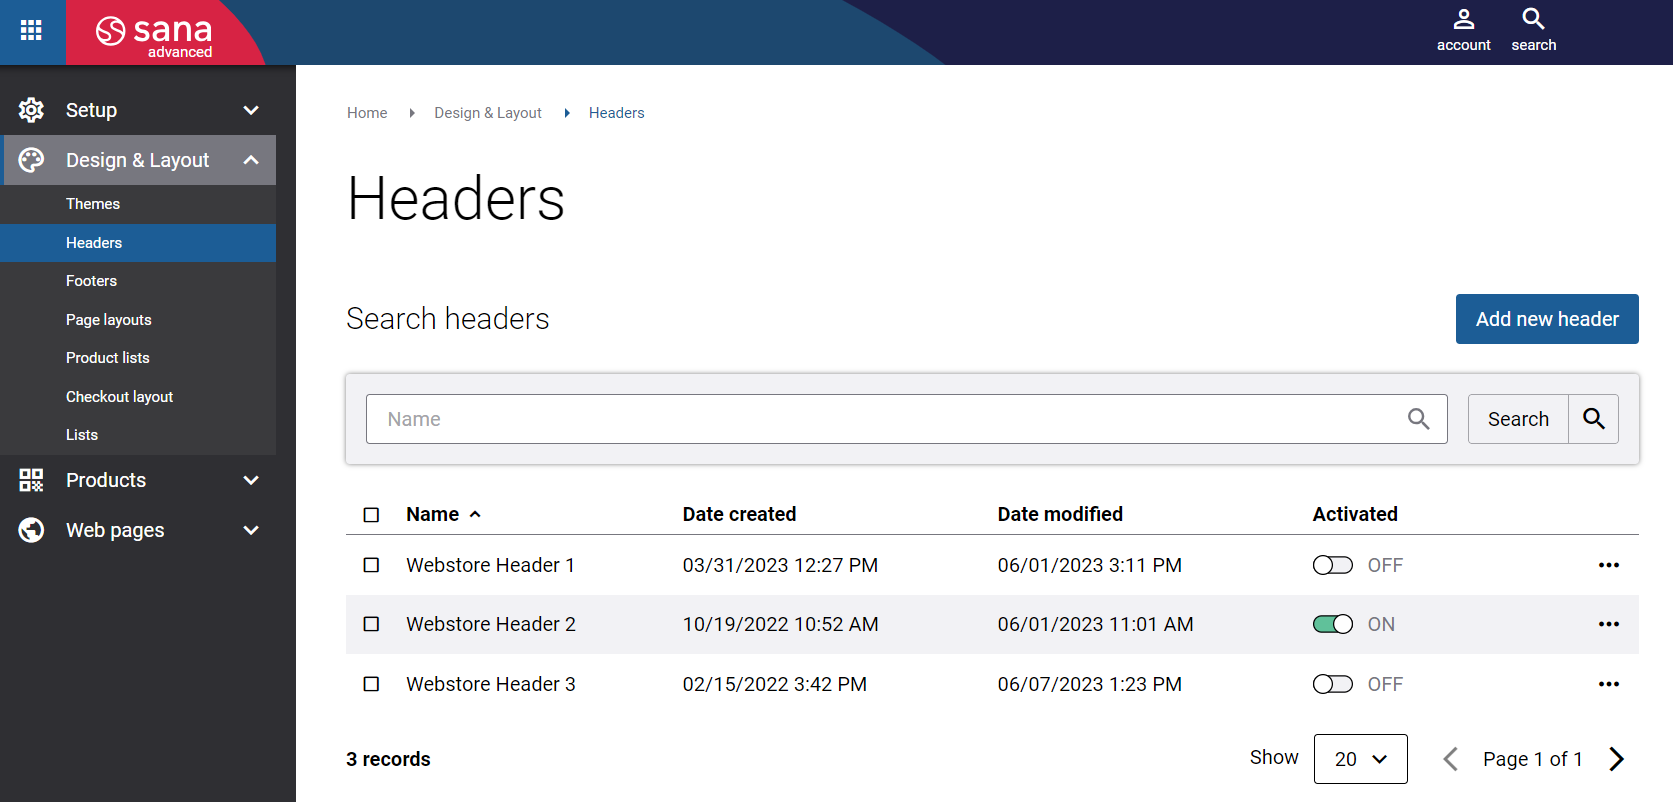
Here you can create webstore headers. If you have a multi-store solution, the list of headers is shared with all available webstores.
To apply the header to your webstore, you need to enable the Activated option. You can create as many headers with different layouts as you need, but only one header can be active.
Also, active header cannot be deleted. In case you have several webstores and the header is not active for the webstore you are currently working with, but it is active for some other webstore, you will not be able to delete this header as well.
You can also duplicate the webstore header and reuse it to create other headers. If you have several webstores and want to create a similar header, there is no need to do it from scratch. You can duplicate the existing header, make some changes to it and use the duplicated header for another webstore.
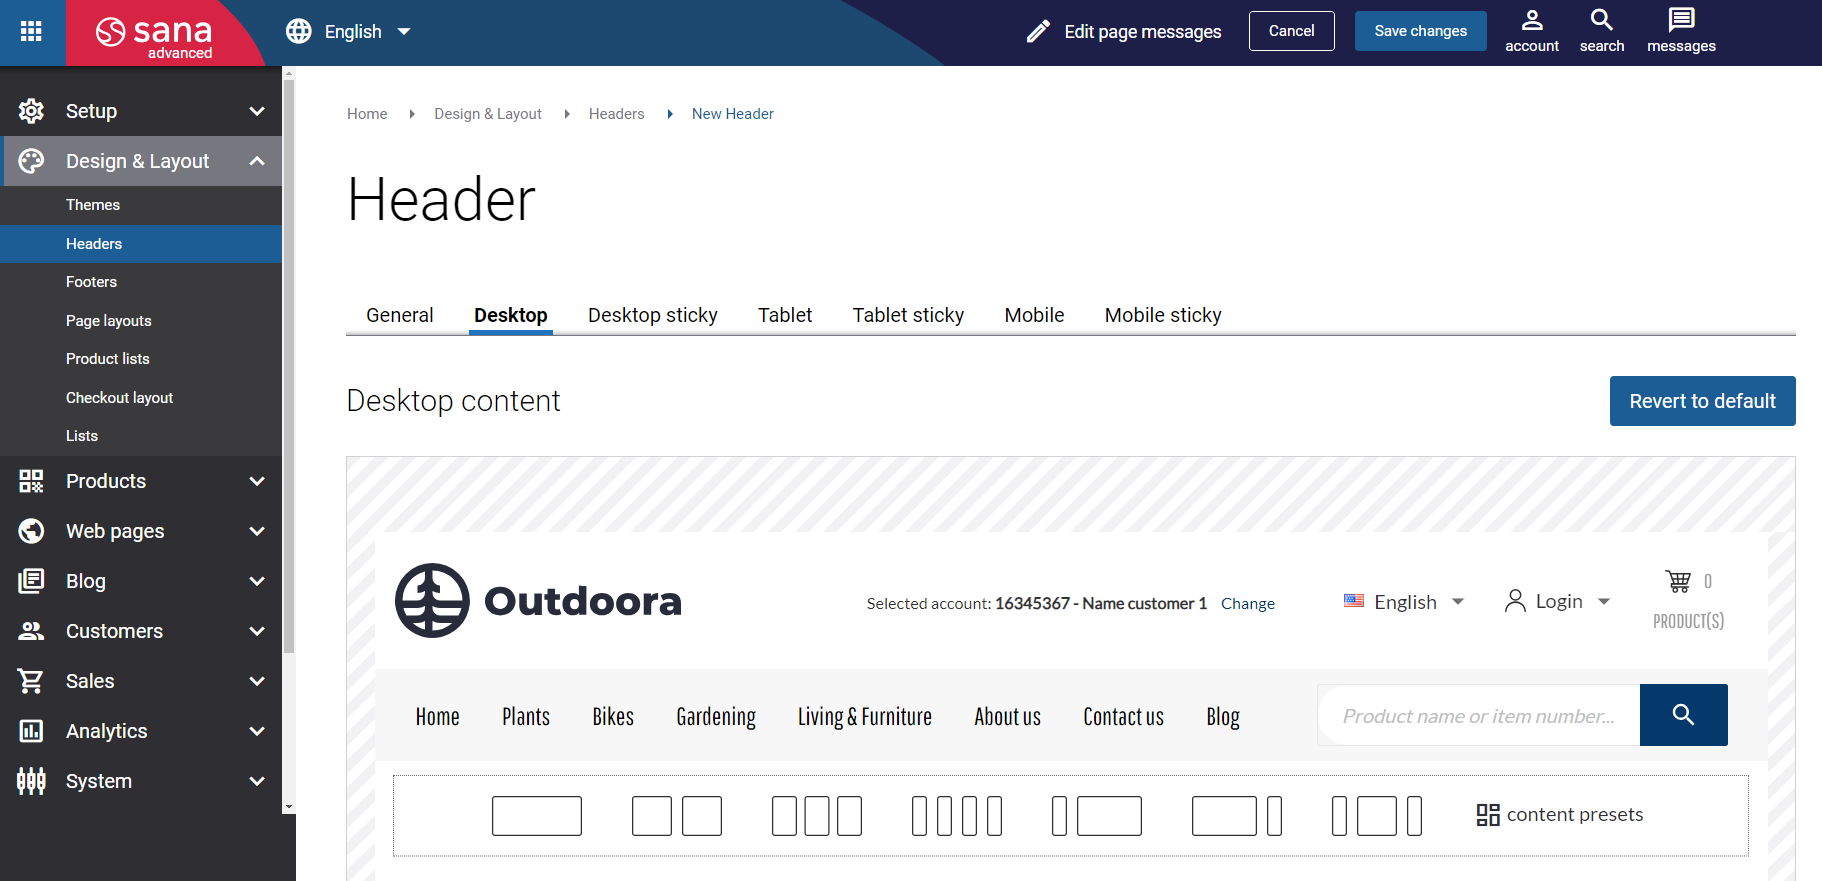
To create the header, click on the button New header and select a header template.
A header template is a predefined header variation that can be used by content editors and design managers to easily create a nice-looking header. Using header templates, you can simplify and speed up the process of creating content and design for your webstore. When creating a header, you must choose a header template you like and then modify it the way you want. If you hover over a header template, you can see a preview how a header template look likes in the different layouts: desktop, tablet and mobile.
Sana Commerce Cloud comes with a few header templates out-of-the-box. Below you can see the list of all header templates available in Sana.
-
Default
-
2-row header with centered search
-
2-row header with combined elements
-
2-row header with right-aligned search bar
-
3-row header with USP bar

You can create headers for the desktop, tablet and mobile layouts. Three separate templates are used to create headers for the desktop, tablet and mobile layouts. Each template consists of different content elements.
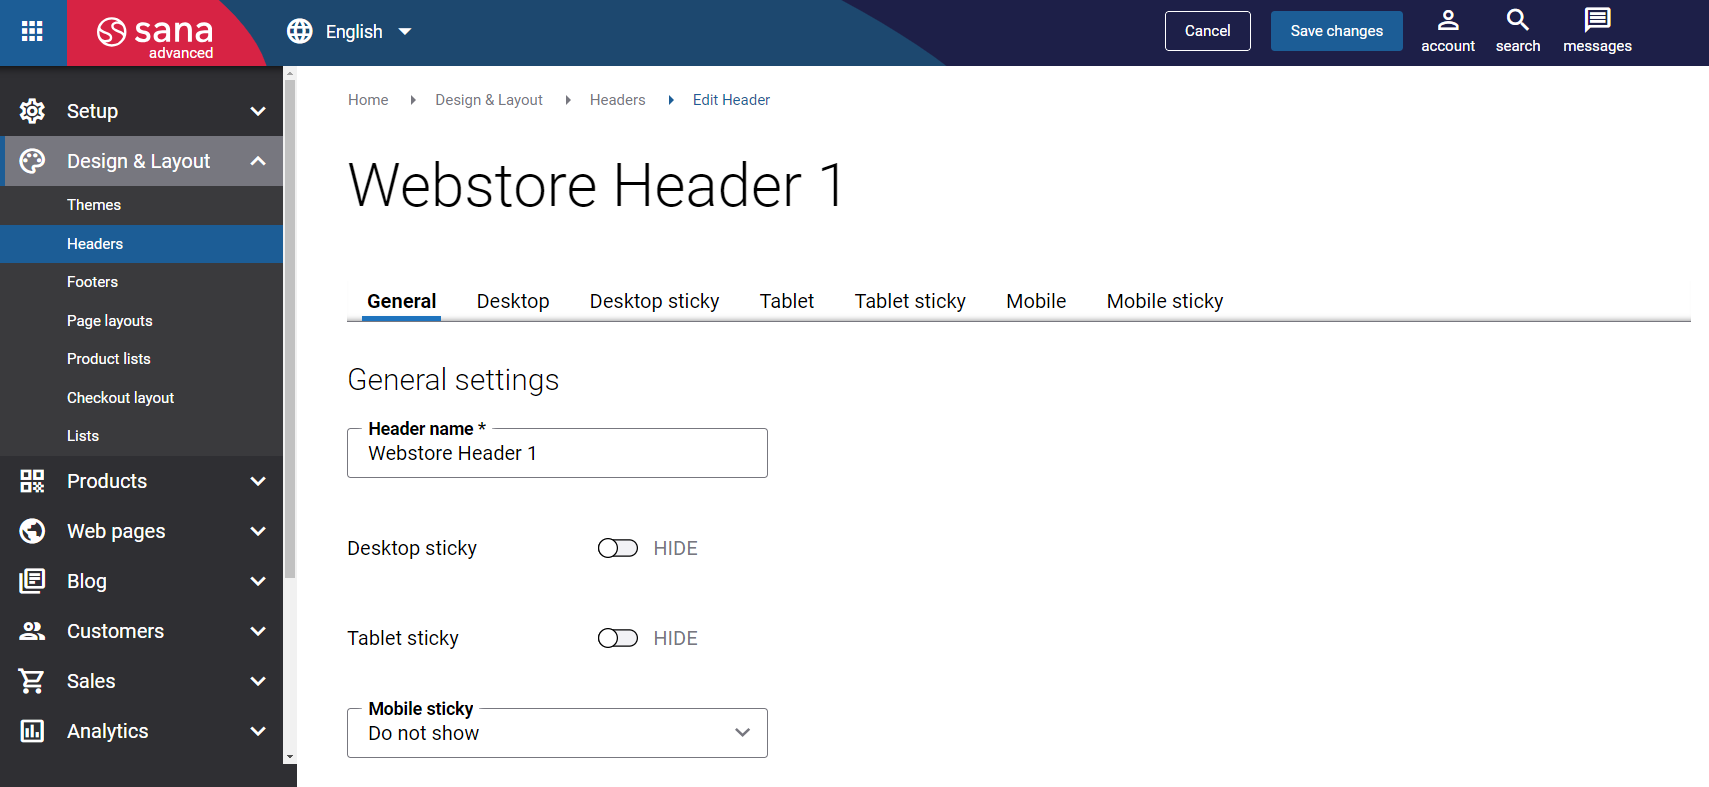
General
On the General tab, enter the name of the header.
Desktop
On the Desktop tab, you can modify a header for the desktop layout. Here, you can see the header which you can use as a template to create your own header. The webstore header that is used in your webstore for the desktop layout is loaded.
The template presented on the Desktop tab consists of rows, columns and content elements. Using this template, you can customize the header to fit your business needs.
The following content elements are used to create the webstore desktop header:
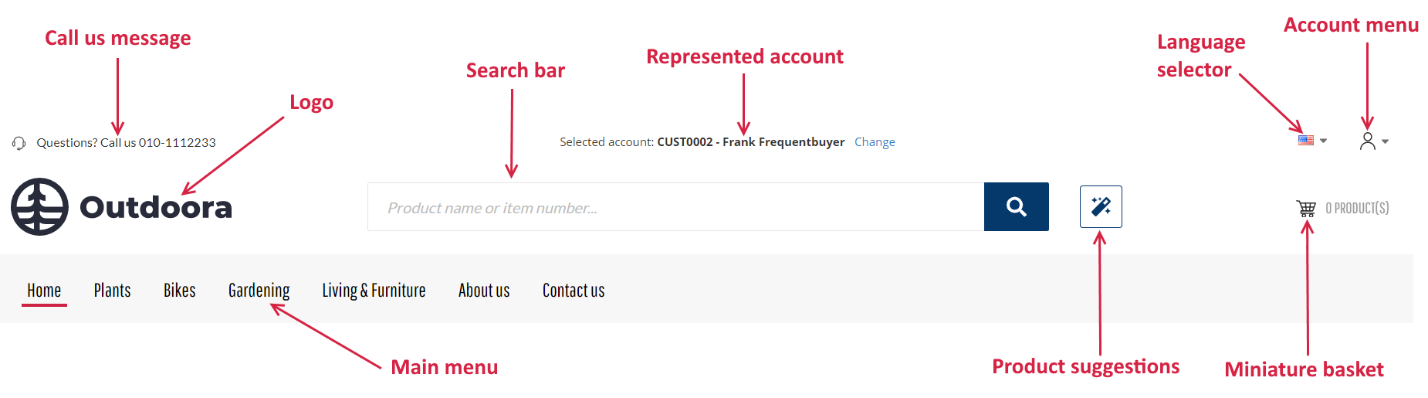
These are the standard content elements which are available in Sana out-of-the-box.
You can add content elements to columns and re-arrange them by dragging and dropping. Also, you can remove or add content elements.
Using column and row settings, you can edit webstore header. Besides, you can configure each content element separately. There are specific settings which are available for some content elements and you can use Advanced settings available for all content elements to style them.
You can also revert any changes you have made to the header. Using the Revert to default button, you revert your changes, and start from scratch with the header template you selected.
In case you need to change the look of some header element or you want to configure it, you can do this using different Sana Admin settings. See the table below to find out how to change header icons and configure the settings for some header elements in Sana Admin.
|
Desktop header element |
Where to configure the desktop header element in Sana Admin? |
|---|---|
|
Miniature basket |
You can change the Miniature basket icon in Themes. In Sana Admin click: Design & Layout > Themes. Click Edit on your webstore theme and open Icons tab. Find the Shopping cart miniature icon. |
|
Cascading menu |
The Cascading menu, Multi column menu and Mega menu content elements are used to add navigation created in Sana Admin to the webstore header for the desktop layout. To create the main menu in Sana Admin click: Setup > Navigation. You can also change the background color of the main menu using the Background color field in the row settings. |
|
Multi column menu |
|
|
Mega menu |
|
|
Language selector |
You can define how language name and country flag icon should be presented in the webstore header using the Language selector content element settings. The country flag icons shown in the webstore header are retrieved from the language packs. For more information, see Languages. |
|
Logo |
You can change your webstore logo in Themes. In Sana Admin click: Design & Layout > Themes. Click Edit on your webstore theme and open Branding tab. Use the Default logo field to change the webstore logo. |
|
Search bar |
You can enter the text which will be shown inside the search bar. You can do this in the header template using the Search bar content element settings. You can also change the Search bar icon in Themes. In Sana Admin click: Design & Layout > Themes. Click Edit on your webstore theme and open Icons tab. Find the Search button icon. |
|
Account menu |
You can specify how account menu text and icon should be shown in the webstore header. You can do this using the Account menu content element settings. You can also change the Account menu icon in Themes. In Sana Admin click: Design & Layout > Themes. Click Edit on your webstore theme and open Icons tab. Find the User menu icon. |
|
Call us message |
You can change the Call us message icon in Themes. In Sana Admin click: Design & Layout > Themes. Click Edit on your webstore theme and open Icons tab. Find the Phone icon. You can change the text using the Page elements & messages. In Sana Admin click: Setup > Page elements & messages. To find the necessary text use the CallUsIfHaveQuestions ID. The phone number of your webstore can be set in the Store information. In Sana Admin click: Setup > Basics > Store information. |
|
Product suggestions |
Product suggestions are used to offer your customers the products which they might be interested to buy. The Product suggestions content element is shown in the header template only if product suggestions are completely configured in Sana Admin. It adds only the product suggestions button. To learn how to set up product suggestions in Sana Admin, see the Product Suggestions article. You can also change the Product suggestions icon in Themes. In Sana Admin click: Design & Layout > Themes. Click Edit on your webstore theme and open Icons tab. Find the Product suggestions icon. |
|
Represented account |
Represented account content element allows shop accounts with one to multi relation or sales agents see who they represent right in the webstore header. Also, using a link in the Represented account content element a shop account or a sales agent can go to the Represent an account page. For more information, see Shop Account Relation. You can change the Represented account text and link text either in the Page elements & messages or using In-site editor. |
Tablet
On the Tablet tab, you can modify a header for the tablet layout. Here, you can see the header which you can use as a template to create your own header. The webstore header that is used in your webstore for the tablet layout is loaded.
The template presented on the Tablet tab consists of rows, columns and content elements. Using this template, you can customize the header to fit your business needs.
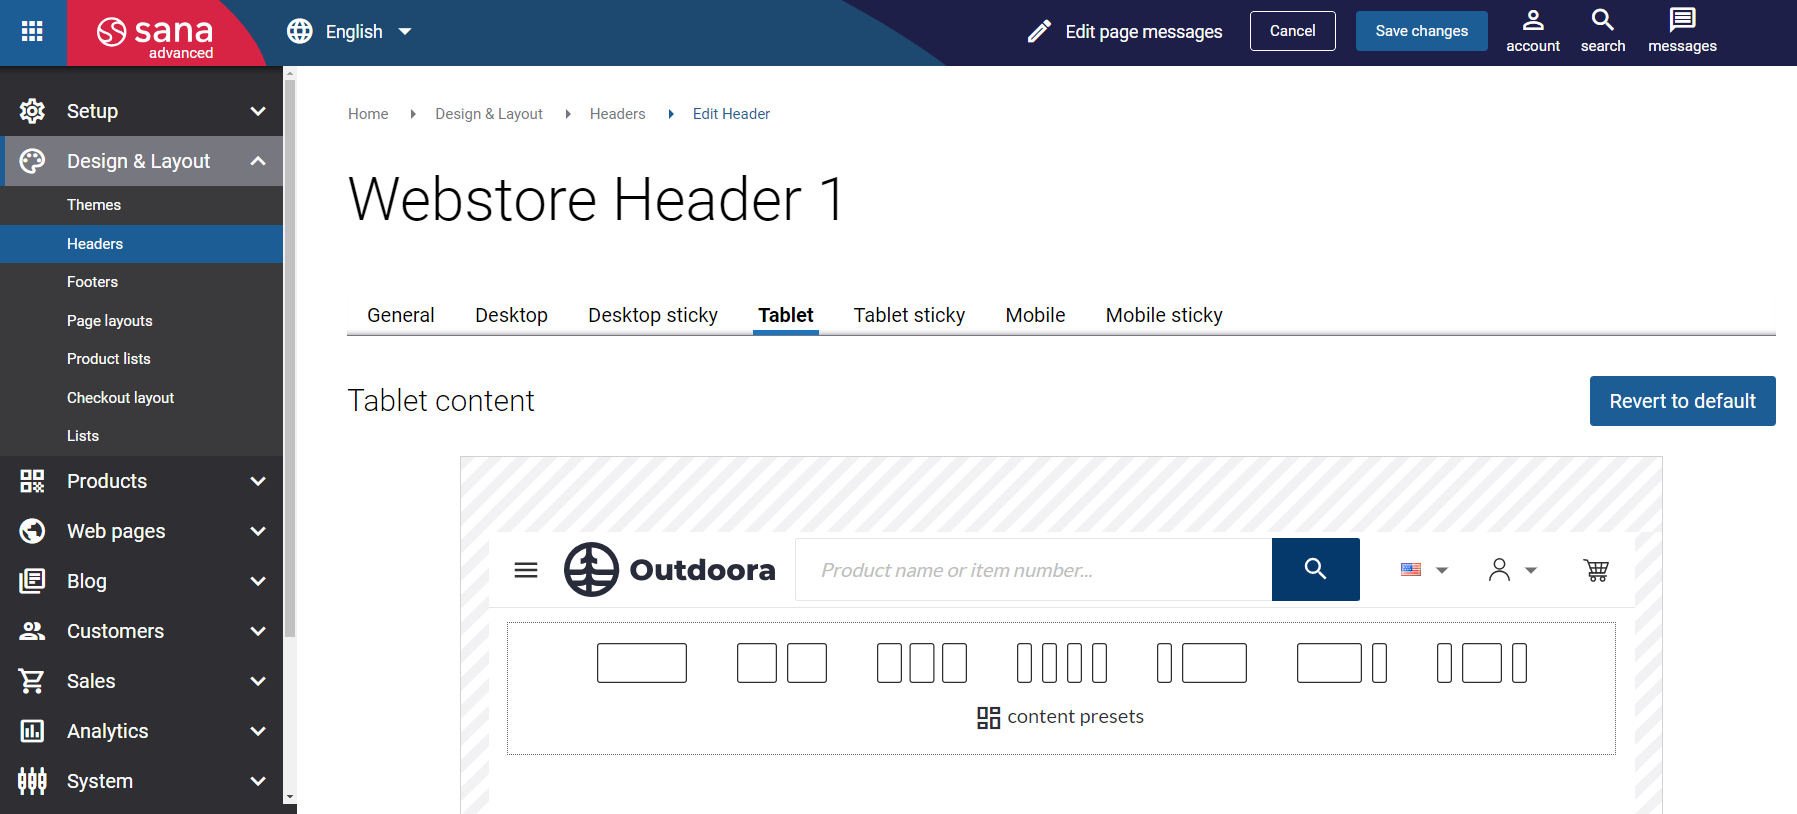
The following content elements are used to create the webstore tablet header:
These are the standard content elements which are available in Sana out-of-the-box.
You can add content elements to columns and re-arrange them by dragging and dropping. Also, you can remove or add content elements.
Using column and row settings, you can edit webstore header. Besides, you can configure each content element separately. There are specific settings which are available for some content elements and you can use Advanced settings available for all content elements to style them.
You can also revert any changes you have made to the header. Using the Revert to default button, you revert your changes, and start from scratch with the header template you selected.
In case you need to change the look of some header element or you want to configure it, you can do this using different Sana Admin settings. See the table below to find out how to change header icons and configure the settings for some header elements in Sana Admin.
|
Tablet header element |
Where to configure the tablet header element in Sana Admin? |
|---|---|
|
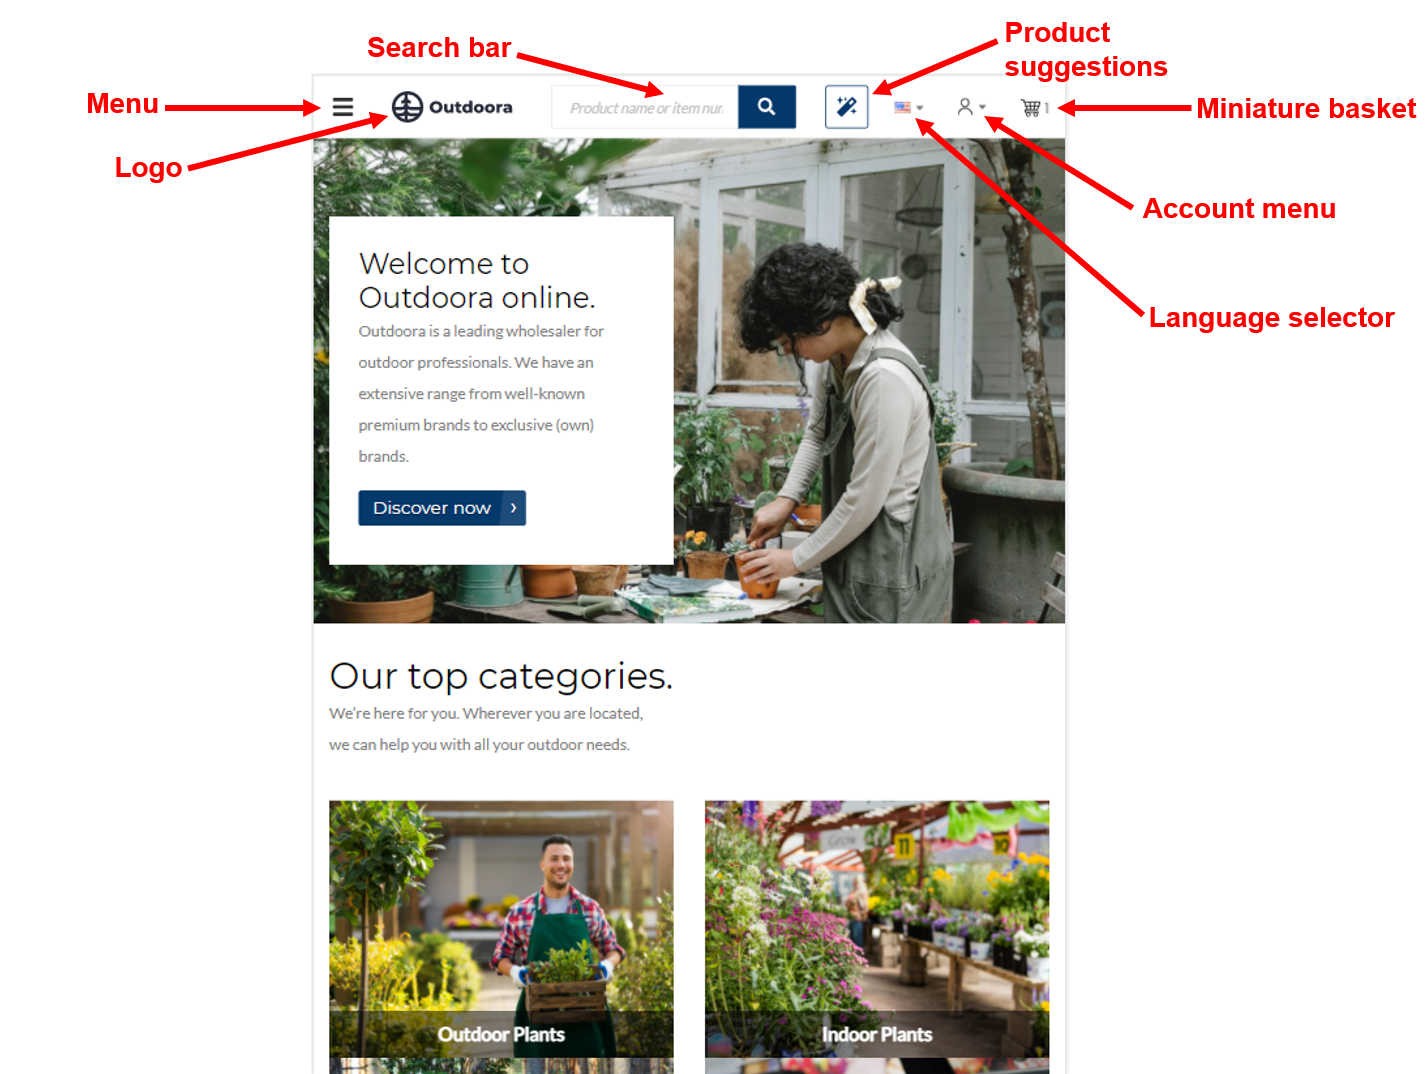
Miniature basket |
You can change the Miniature basket icon in Themes. In Sana Admin click: Design & Layout > Themes. Click Edit on your webstore theme and open Icons tab. Find the Shopping cart miniature icon. |
|
Menu |
The Menu content element is used to add navigation created in Sana Admin to the webstore header. To create the menu in Sana Admin click: Setup > Navigation. |
|
Language selector |
You can define how language name and country flag icon should be presented in the webstore header using the Language selector content element settings. The country flag icons shown in the webstore header are retrieved from the language packs. For more information, see Languages. |
|
Logo |
You can change your webstore logo in Themes. In Sana Admin click: Design & Layout > Themes. Click Edit on your webstore theme and open Branding tab. Use the Default logo field to change the webstore logo. |
|
Search bar |
You can enter the text which will be shown inside the search bar. You can do this in the header template using the Search bar content element settings. You can also change the Search bar icon in Themes. In Sana Admin click: Design & Layout > Themes. Click Edit on your webstore theme and open Icons tab. Find the Search button icon. |
|
Account menu |
You can specify how account menu text and icon should be shown in the webstore header. You can do this using the Account menu content element settings. You can also change the Account menu icon in Themes. In Sana Admin click: Design & Layout > Themes. Click Edit on your webstore theme and open Icons tab. Find the User menu icon. |
|
Product suggestions |
Product suggestions are used to offer your customers the products which they might be interested to buy. Product suggestions content element is shown in the header template only if product suggestions are completely configured in Sana Admin. It adds only the product suggestions button. To learn how to set up product suggestions in Sana Admin, see the Product Suggestions article. You can also change the Product suggestions icon in Themes. In Sana Admin click: Design & Layout > Themes. Click Edit on your webstore theme and open Icons tab. Find the Product suggestions icon. |
Mobile
On the Mobile tab, you can modify a header for the mobile layout.
Here, you can see the header which you can use as a template to create your own header. The webstore header that is used in your webstore for the mobile layout is loaded.
The template presented on the Mobile tab consists of rows, columns and content elements. Using this template, you can customize the header to fit your business needs.
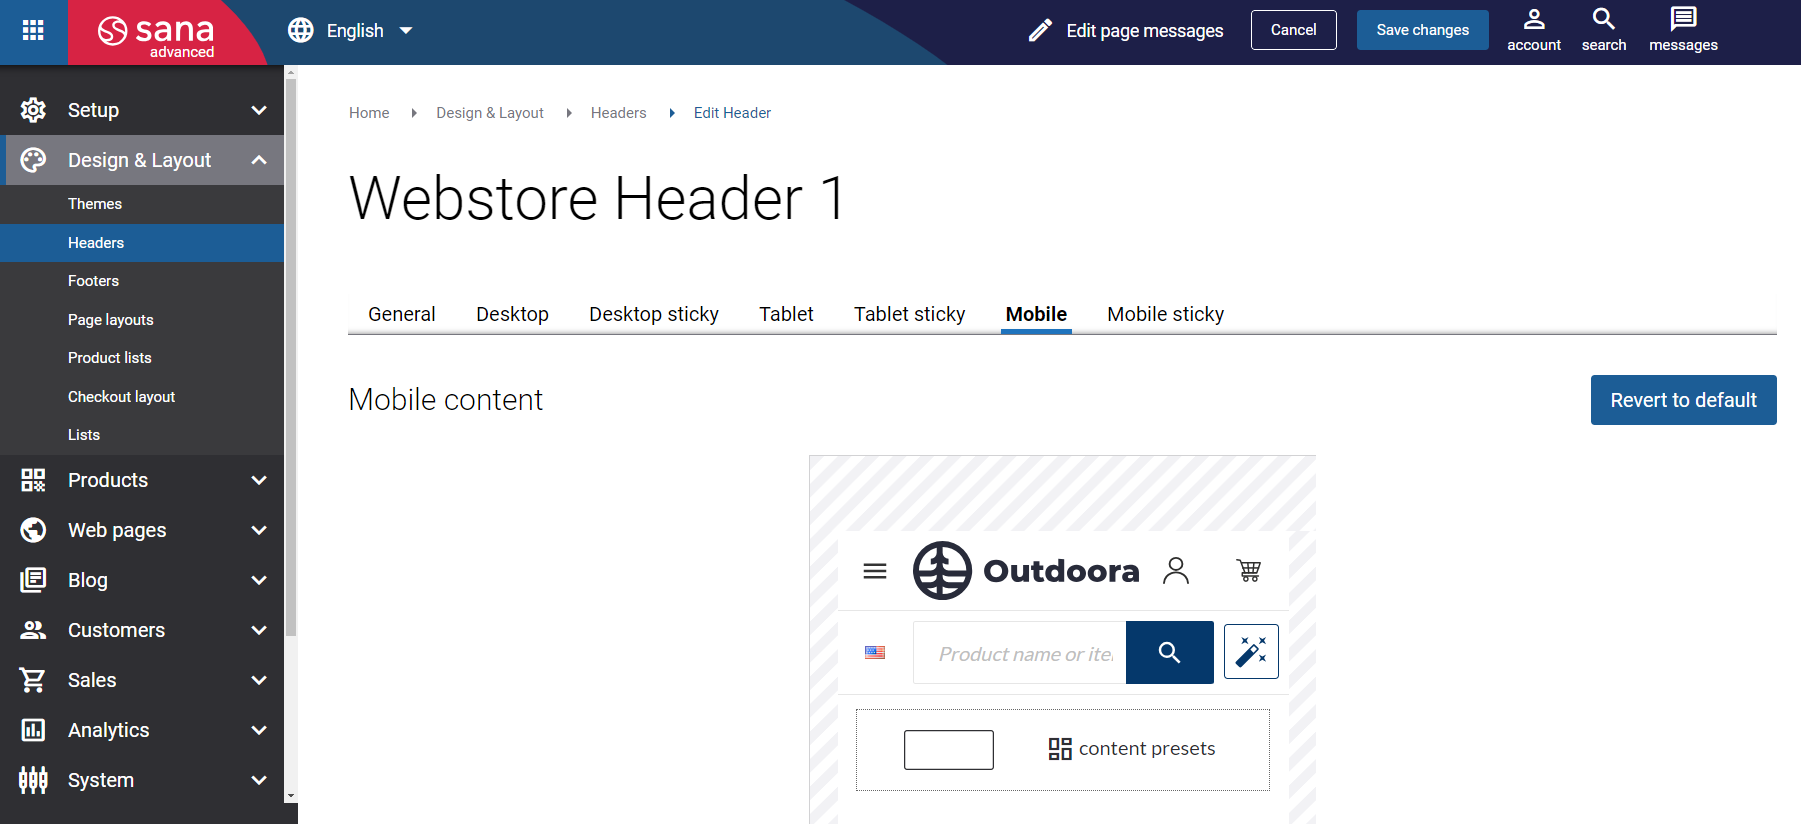
The following content elements are used to create the webstore mobile header:
These are the standard content elements which are available in Sana out-of-the-box.
You can add content elements to columns and re-arrange them by dragging and dropping. Also, you can remove or add content elements.
Using column and row settings, you can edit webstore header. Besides, you can configure each content element separately. There are specific settings which are available for some content elements and you can use the Advanced settings available for all content elements to style them.
You can also revert any changes you have made to the header. Using the Revert to default button, you revert your changes, and start from scratch with the header template you selected.
In case you need to change the look of some header element or you want to configure it, you can do this using different Sana Admin settings. See the table below to find out how to change header icons and configure the settings for some header elements in Sana Admin.
|
Mobile header element |
Where to configure the mobile header element in Sana Admin? |
|---|---|
|
Miniature basket |
You can change the Miniature basket icon in Themes. In Sana Admin click: Design & Layout > Themes. Click Edit on your webstore theme and open Icons tab. Find the Shopping cart miniature icon. |
|
Main menu |
The Menu content element is used to add navigation created in Sana Admin to the webstore header. To create the menu in Sana Admin click: Setup > Navigation. |
|
Language selector |
You can define how language name and country flag icon should be presented in the webstore header, using the Language selector content element settings. The country flag icons shown in the webstore header are retrieved from the language packs. For more information, see Languages. |
|
Logo |
You can change your webstore logo in Themes. In Sana Admin click: Design & Layout > Themes. Click Edit on your webstore theme and open Branding tab. Use the Default logo field to change the webstore logo. |
|
Search bar |
You can enter the text which will be shown inside the search bar. You can do this in the header template using the Search bar content element settings. You can also change the Search bar icon in Themes. In Sana Admin click: Design & Layout > Themes. Click Edit on your webstore theme and open Icons tab. Find the Search button icon. |
|
Account menu |
You can specify how account menu text and icon should be shown in the webstore header. You can do this using the Account menu content element settings. You can also change the Account menu icon in Themes. In Sana Admin click: Design & Layout > Themes. Click Edit on your webstore theme and open Icons tab. Find the User menu icon. |
|
Product suggestions |
Product suggestions are used to offer your customers the products which they might be interested to buy. Product suggestions content element is shown in the header template only if product suggestions are completely configured in Sana Admin. It adds only the product suggestions button. To learn how to set up product suggestions in Sana Admin, see the Product Suggestions article. You can also change the Product suggestions icon in Themes. In Sana Admin click: Design & Layout > Themes. Click Edit on your webstore theme and open Icons tab. Find the Product suggestions icon. |
Sticky Header
Sticky header is a navigation tool that keeps the header of a website at the top or bottom of the screen as the user scrolls up or down a page.
Sticky header is always accessible and it allows users to easily and quickly move to other parts of your webstore without scrolling all the way to the top, thus improving your users browsing experience. Also, as a rule, the brand name, logo and other relevant information is included on the webstore header, with the help of sticky header you can strengthen your brand recognition, since your logo or brand will be always visible, grabbing users’ attention.
In Sana along with regular headers, you can also create sticky headers for the desktop, tablet and mobile layouts and style them in the same way. Three separate templates are used to create headers for the desktop, tablet and mobile layouts. Each template consists of different content elements. These are the same content elements which take part in creation of the regular headers. Besides, you can use other content elements available in Sana to create an impressive sticky header. With the possibilities Sana Commerce Cloud provides, you can change the order of the sticky header elements the way you need, add and remove different elements.
To style a sticky header, in Sana Admin click: Design & Layout > Headers. Use the Desktop sticky, Tablet sticky and Mobile sticky tabs.

You can enable or disable sticky header for each layout separately. To do this, use the settings on the General tab of the webstore header.
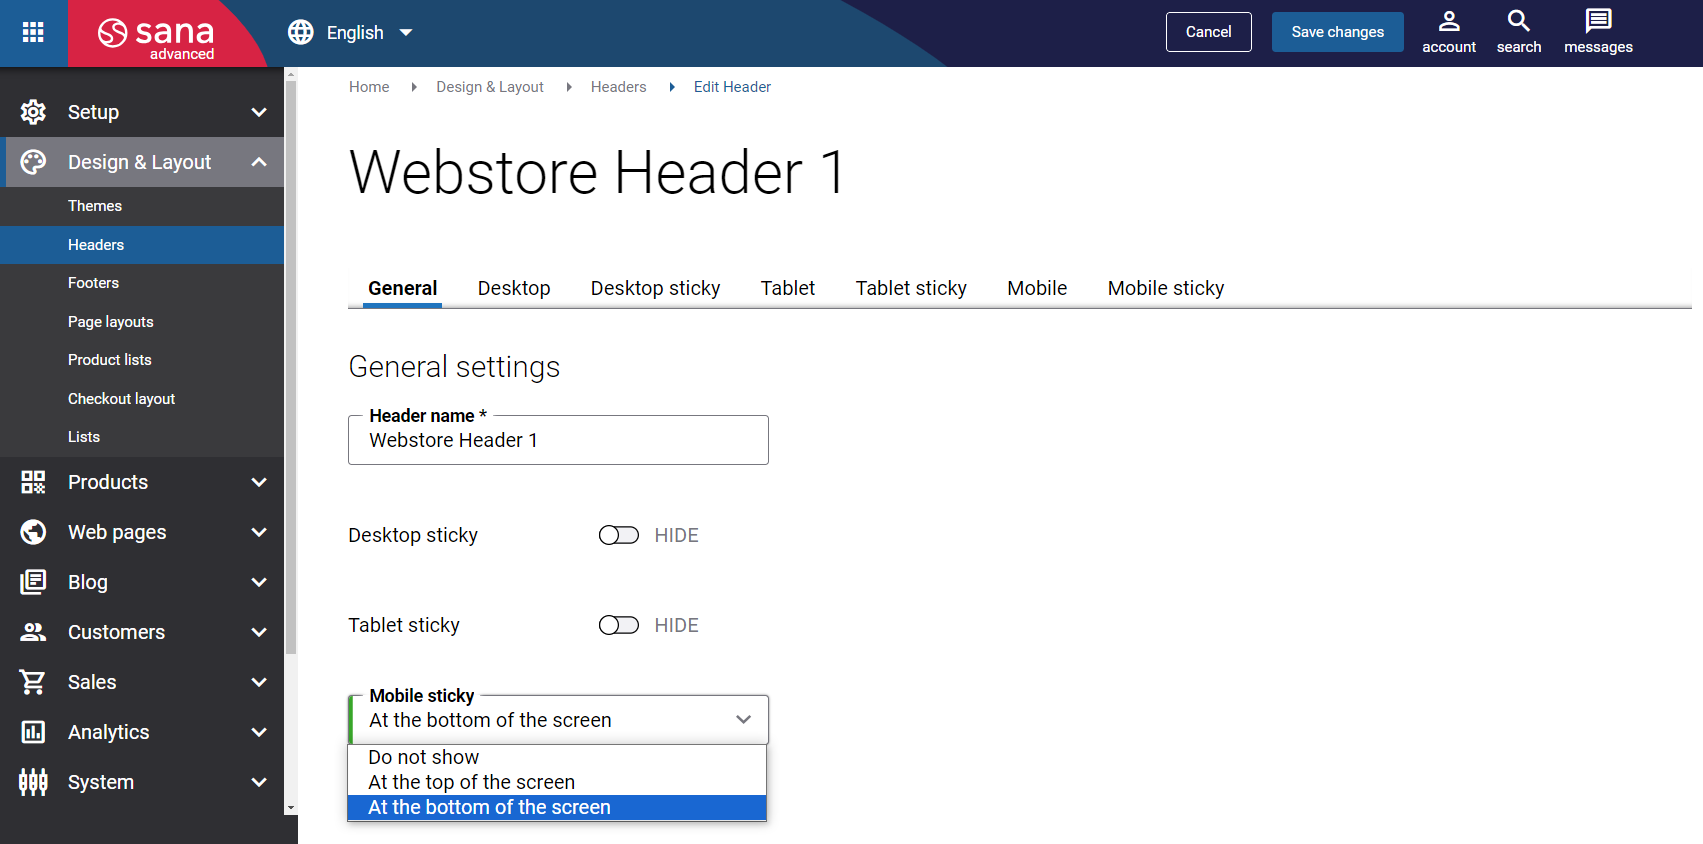
The Mobile sticky setting has the following options:
-
Do not show
-
At the top of the screen
-
At the bottom of the screen
If you use the option At the bottom of the screen, make sure that the content elements used for the regular mobile header and the sticky mobile header are not duplicated. For example, you can add a logo of your company to the mobile header displayed at the top of the screen and you can add the rest of content elements, like navigation, account menu, language selector, search bar, miniature basket and product suggestions to the sticky mobile header displayed at the bottom of the screen.

If you use the same content elements for the regular mobile header and the sticky mobile header, and the sticky mobile header is displayed at the bottom of the screen, then when a customer opens a page in the Sana webstore, the webstore header will be loaded twice. This can affect performance and ranking score once run by Google Lighthouse auditing tool.
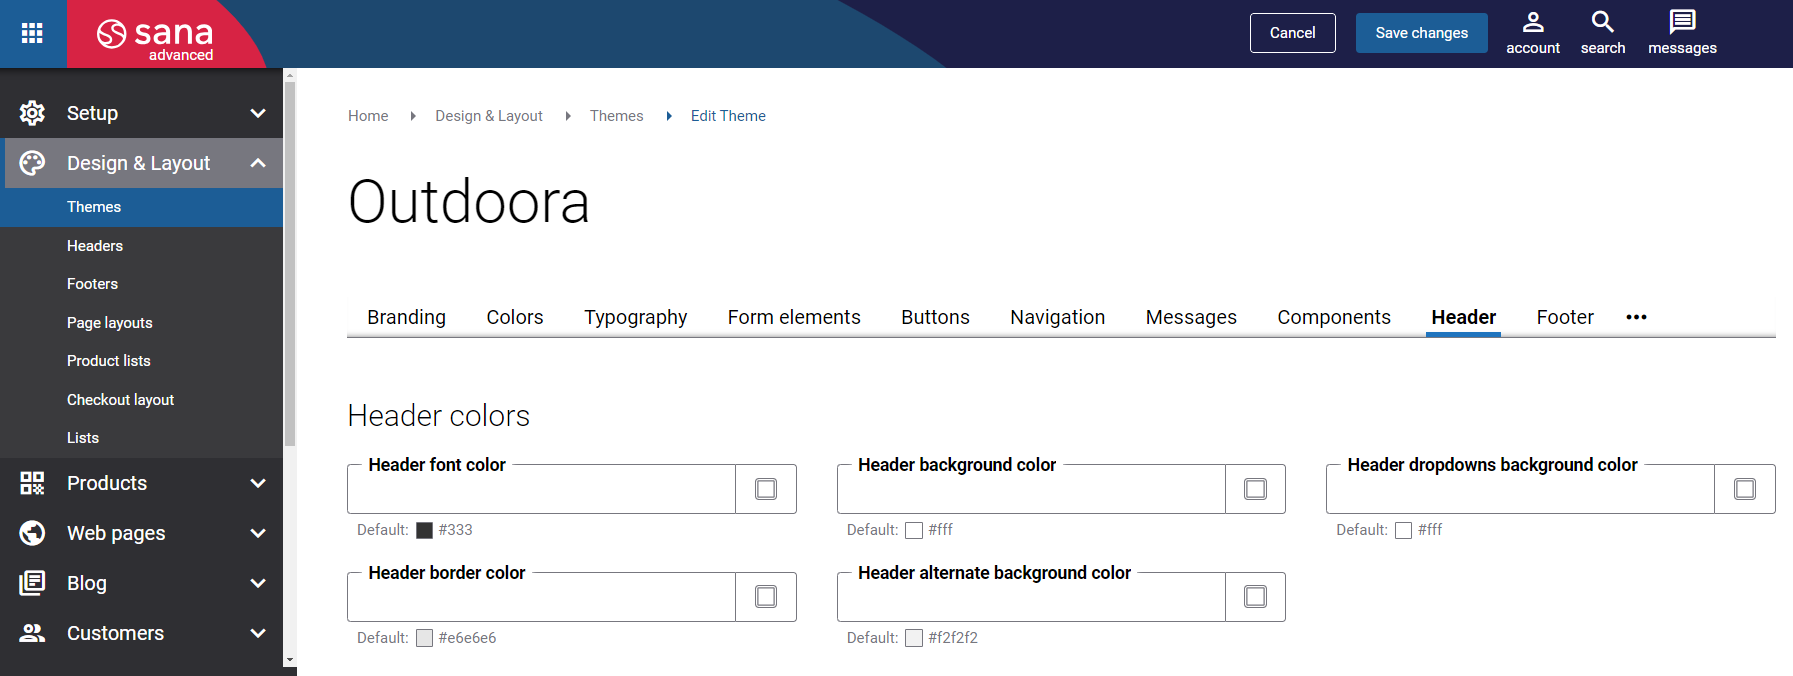
Header Colors
Besides, you can make your webstore header more impressive by changing header colors. You can change header colors, using Themes.
In Sana Admin click: Design & Layout > Themes. Click Edit on your webstore theme and open the Header tab.
Paragraph Content Element
Using the Paragraph content element, you can add some text and links to your webstore header. The Paragraph content element allows to add an external URL or a link to the internal webstore page. For example, if you have the Customer service page, you can add the link to it to the webstore header.
