Content Elements
WATCH THE VIDEO
Great content is the key to success. Use content elements to enrich your webstore with original, creative, and useful content.
Content elements are content blocks such as text, images, banners, sliders, videos, tiles, product set, store locator, newsletter, etc. that can be added to your web pages.
Content elements can be added to content pages, system pages, product, and product list pages in Sana Admin.
Content elements can be added to the columns and rearranged across your page layout by dragging and dropping them. You can add one or several content elements to one column.
Sana Commerce Cloud comes with a few content elements out-of-the-box, and there are also content elements that are available as apps and can be installed from the Sana App Center. Below you can see the list of all content elements available in Sana.
Standard Content Elements
Sana Apps
All content elements have been carefully created by web design professionals and offer different options to build any content you can think of with any page layout. Within minutes, you can build complex pages using layouts and content elements without touching a single line of code.

Search, Filters, Sorting, and Favorites
Sana Commerce Cloud provides a lot of various content elements. Sometimes it can be a challenge to find the content element you need in the long list of content elements available in Sana. The search and filtering options available in the content element explorer can make this task easier. Using the search and filtering options in the content element explorer, you can quickly find the necessary content element. To see the filtering options in the content element explorer, click Add filter.
You can search for a content element by title. Using the filtering options, you can see installed and not installed, only installed and only not installed content elements. Besides, you can filter content elements by categories. To do this, select the necessary category in the Tag filter. For example, if you select Product information category, then all content elements used on the product details pages will be shown.
Some content elements can be used only on specific pages or content areas. For example, there are content elements which are used specifically on the product details pages, webstore header or footer. Such content elements cannot be used on other pages. For example, if you open the content page and look for one of the product details page's specific content elements, let’s say Related products, you will not see this content element.
When you create some pages, especially content pages, you use some content elements more often than others, for example, heading, paragraph, images, etc. Using the Sort by setting, you can sort content elements in alphabetical ascending order (name a-z), and alphabetical descending order (name z-a) or you can use the recently used option, then the last used content elements will be shown at the top of the list.
You can pin content elements that you use most often. The pinned content elements are shown first in the list.

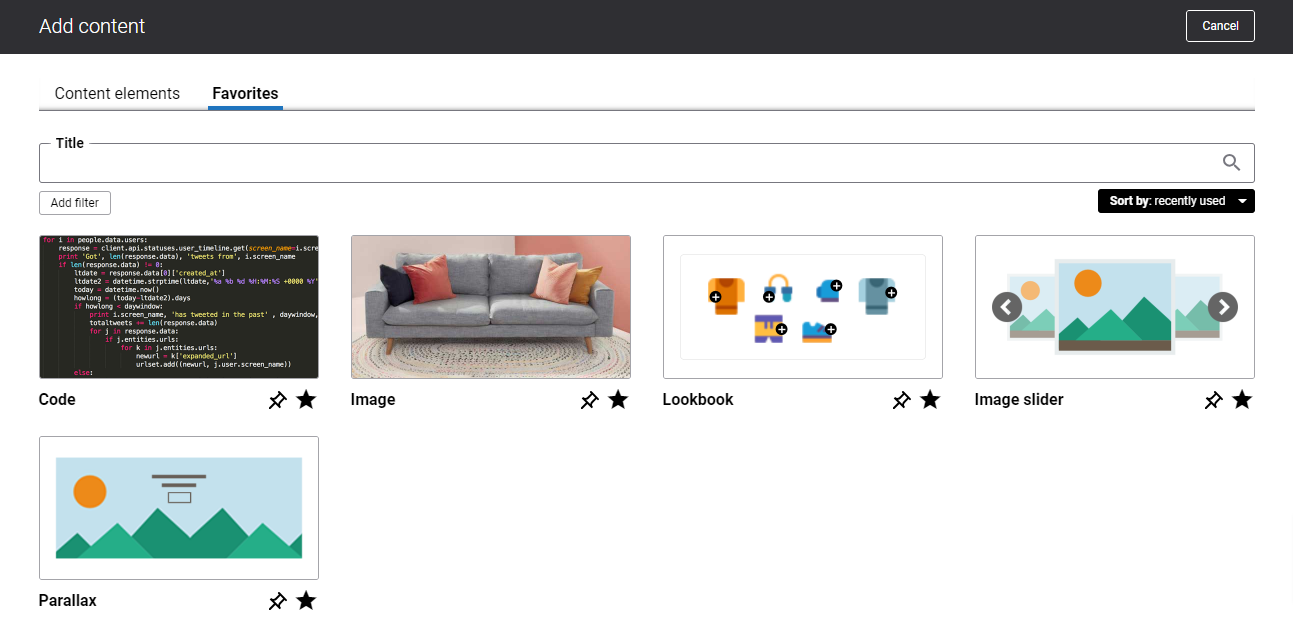
Besides, it is also possible to add the frequently used content elements to Favorites. When you mark some content element as your favorite, it will appear in your favorites list on the Favorites tab. The same sorting, filtering, and search options are available on the Favorites tab as in the general list of content elements.
You can easily remove a content element from the favorites list. To do this, you need to unfavorite a content element either from the Content elements tab or the Favorites tab. In this way, a content element will no longer be shown on the Favorites tab.
Add Content Elements to a Page
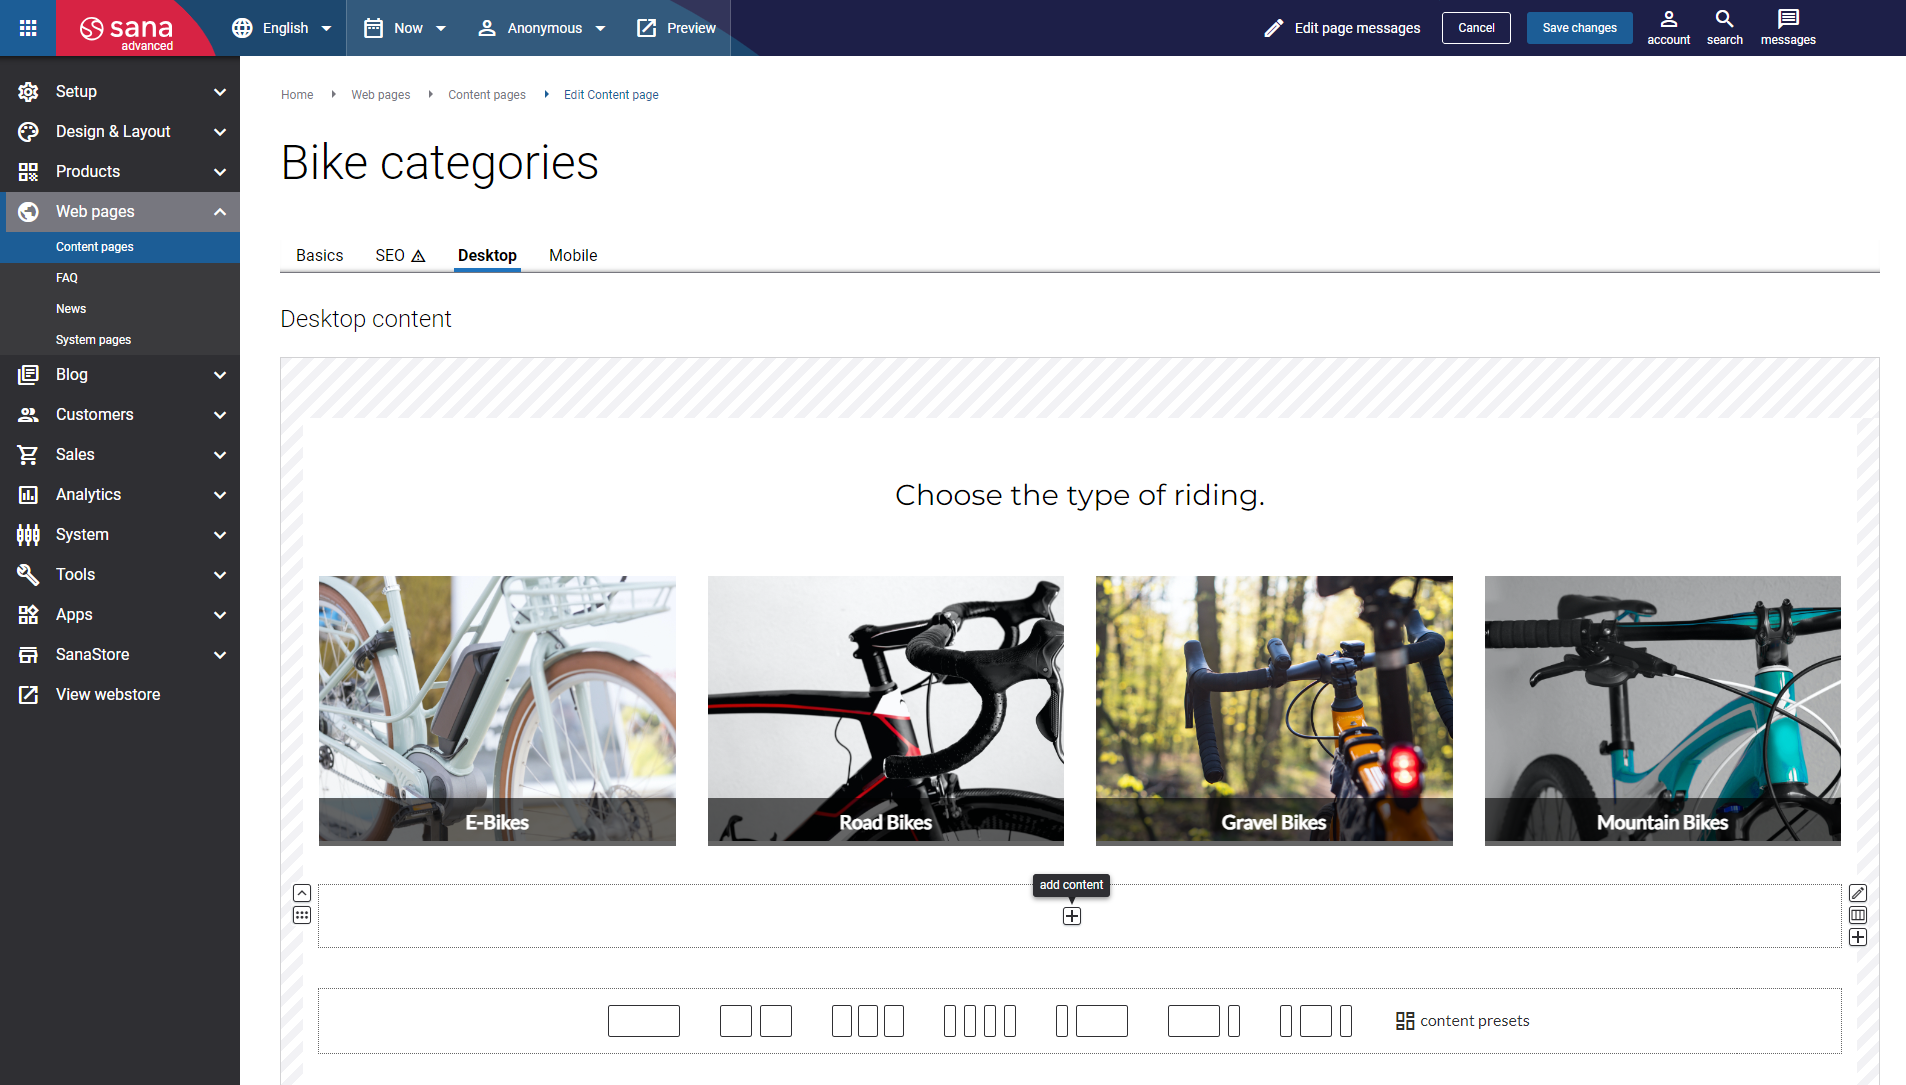
Step 1: To add a content element to a page, open the necessary page, and you must first choose a column layout.
Step 2: Then, hover over a column, and you will see the following button ![]() (add content) in the center of the column.
(add content) in the center of the column.
If you add a second, third, and so on content element to the same column, the button ![]() (add content) will be shown at the bottom of the column.
(add content) will be shown at the bottom of the column.
Step 3: Click on the add content button ![]() . You will see all standard content elements that are available in Sana by default, and those content elements that are available as apps in the Sana App Center. Find the necessary content element, hover over it, and click Add to page. If the content element is not installed yet, click Install & add to page to install the content element and add it to the page.
. You will see all standard content elements that are available in Sana by default, and those content elements that are available as apps in the Sana App Center. Find the necessary content element, hover over it, and click Add to page. If the content element is not installed yet, click Install & add to page to install the content element and add it to the page.
For quicker and more comfortable usage, you can search, filter, sort content elements and add content elements to favorites.
Step 4: Then, a window will pop up. There are two tabs: Content and Advanced.
You can configure the settings immediately or add the content element without configuring it (if there are no required fields) and return to it later.
After the content element is added, it can be selected in the visual designer. Once selected, its settings appear in the panel on the right, where you can view and adjust them as needed.
On the Content tab, you can add the content you need and configure the content element settings.
The content you can add and the settings you can configure differ depending on the content element you choose.
Use the Advanced tab to style the content element. You can configure the content element height, width, and spacing settings. The settings presented on the Advanced tab are also available in the column settings and row settings, which is why you need to configure them correctly, making sure that they do not interfere with each other and the content looks good on the page.

Below see the description of the Advanced settings.
Depending on the content element you add, the settings can behave differently. Thus, after configuring height, spacing, and border settings, make sure that your content element looks good on the page. To check this, preview the page.
Minimum Element Height
You can specify the minimum element height for desktop computers, tablets and mobile devices.
If you add some content element to a column, the column will automatically take the height of the content element.
In case the height of the column is bigger than the height of the content added to it, then you can stretch the content to the available height of the column. For this purpose, use the option Stretch to available height of the column.
Minimum Element Width
You can specify the minimum element width for desktop computers, tablets, and mobile devices.
In case the width of the column is bigger than the width of the content added to it, then you can stretch the content to the available width of the column. For this purpose, use the option Stretch to available width of the column.
Spacing Settings
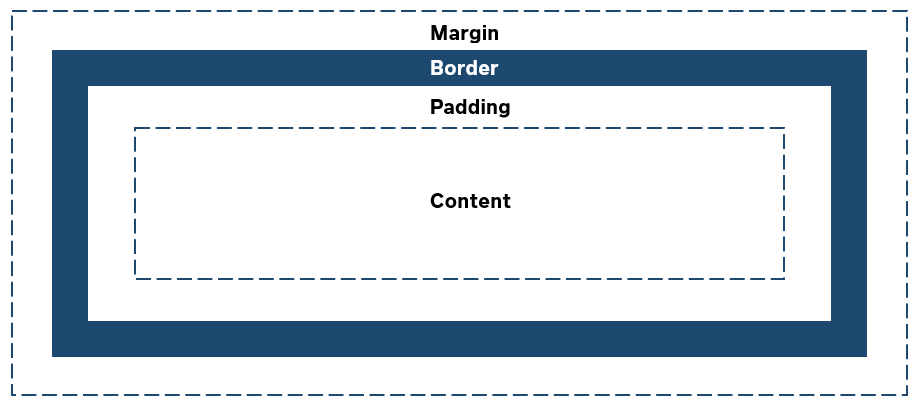
A column is essentially a box that wraps around the content inside it. It consists of margins, borders, padding, and the actual content. The image below illustrates the box model.
-
Margin: An area outside the border. Each side of a border has a margin size in pixels that you can change individually or specify the same size for all margins.
-
Padding: An area around the content. Each side of a content element has a padding size in pixels that you can change individually or specify the same size for all paddings.
Using margin and padding, you can define space between elements.
There are settings for specifying margin and padding for each side of an element:
- t – top margin or padding
- r – right margin or padding
- b – bottom margin or padding
- l – left margin or padding
Also, using the option Content horizontal alignment, you can set the horizontal alignment of a content element in a column. The available horizontal alignment options are:
- Left
- Center
- Right
- Justify
Using the option Vertical alignment of element, you can set the vertical alignment of a content element in a column. The available vertical alignment options are:
- Inherited
- Top
- Middle
- Bottom
- Justify
The option Vertical alignment of element has an effect only when the setting Content element orientation in the Advanced column settings is set to Show content horizontally in column or Show content horizontally and split in column. It does not work in combination with the option Show content vertically in column.
You can move a content element from one column to another by dragging and dropping it. If you want to place the same content element in multiple columns, there’s no need to add it manually each time. Simply duplicate it by holding down Ctrl (or Option on Mac) and dragging the element to the desired column.
Replacement Tags
Sana Commerce Cloud offers a lot of great features that allow content managers to create personalized content. Using Replacement tags, you can impress your customers even more with content addressed to each customer individually.
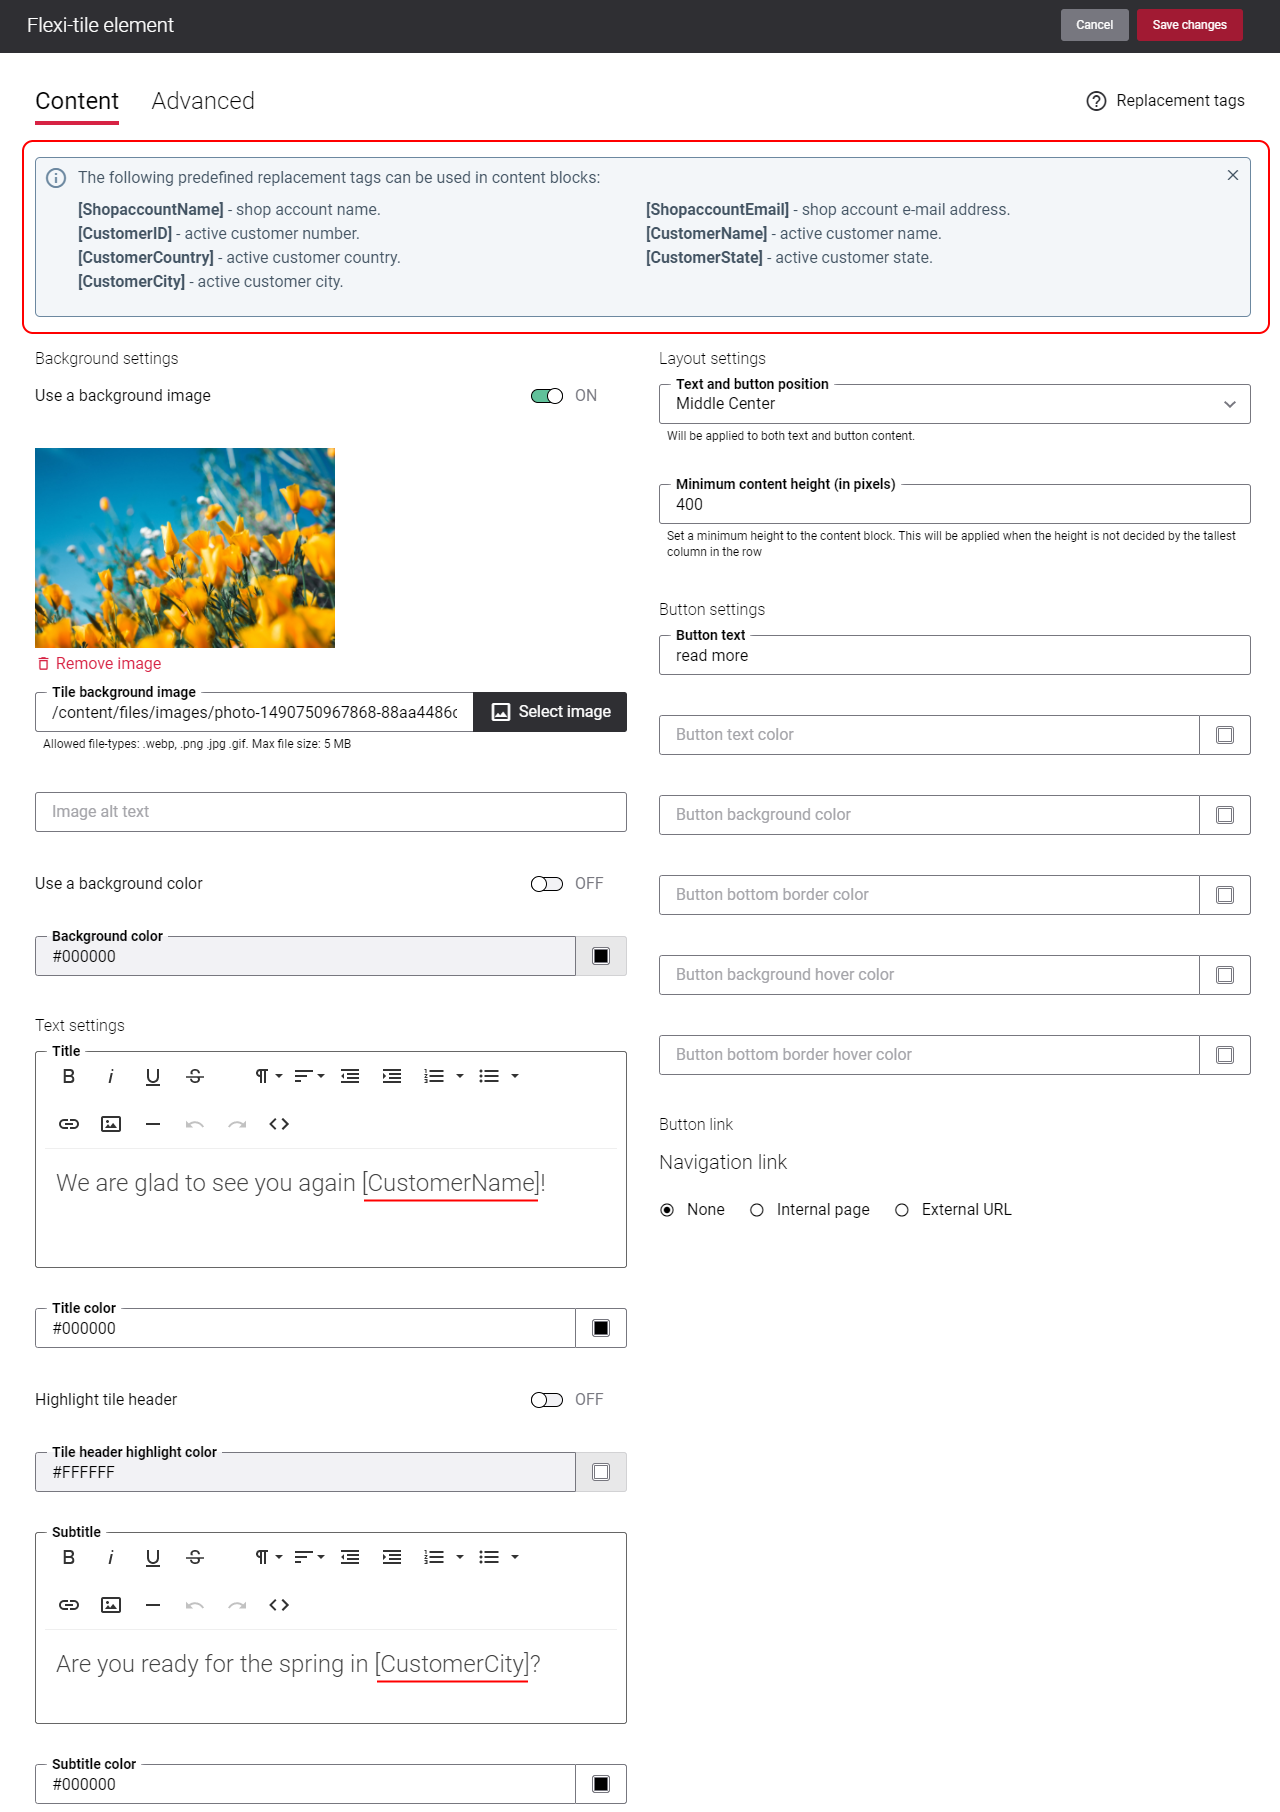
You can use replacement tags in the content elements, such as customer name, e-mail or address to contact your customers directly through your webstore content. These tags will be replaced with your customer's personal information retrieved from the ERP system. Replacement tags can be used in the text (HTML) editor and in different text fields such as Title, Subtitle, Button text etc.
In this way, you can build and deepen relationships with each individual customer.