Return Receipts
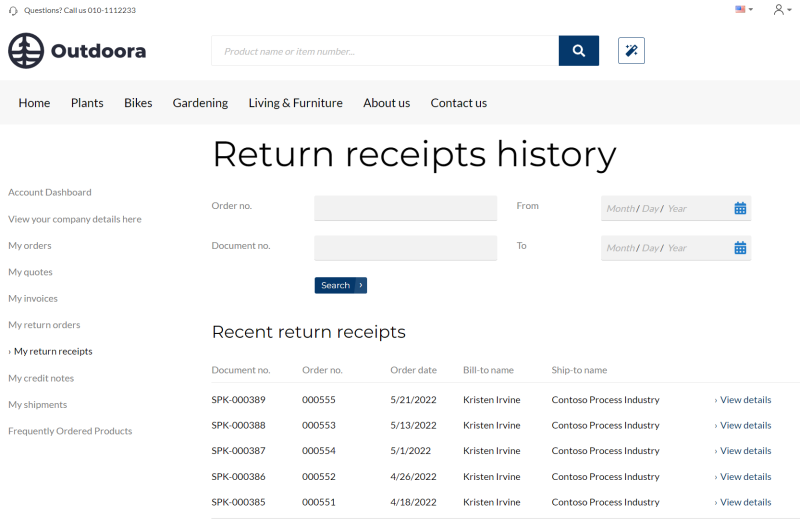
Return receipts history is a must-have on any e-commerce site because it is a convenient and easy way for a customer to keep track of all recent and past return receipts. Customers can check their return receipts history from the My account page in the Sana webstore.
Return receipts history contains up-to-date information about each return receipt, including document number, order number and date, bill-to name and ship-to name, etc. By clicking on the link in return receipt line, customers can get detailed information about a return receipt. Customers can also search for a specific return receipt by the document number or order number and filter return receipts by date. For more information, see Order History.
With possibilities Sana Commerce Cloud provides, you can manage the content of the Return receipts history page the way you need. You can make the Return receipts history page impressive and at the same time easy to use and thus improve your customers shopping experience.
Edit Content of the Return Receipts Page
You can style the Return receipts history page using the Return receipts system page in Sana Admin.
The Return receipts page is a system page that exists in Sana by default, but you can also change the content and styles of the Return receipts page if you want to modify its appearance.
To edit the content of the Return receipts page, in Sana Admin click: Web pages > System pages. On the System pages page, you can see all available system pages and you can edit the Return receipts system page.
The Desktop and Mobile tabs hold the content elements of the Return receipts page that are shown on the desktop and mobile devices. Thus, the Return receipts page can be styled differently for the desktop and mobile devices.
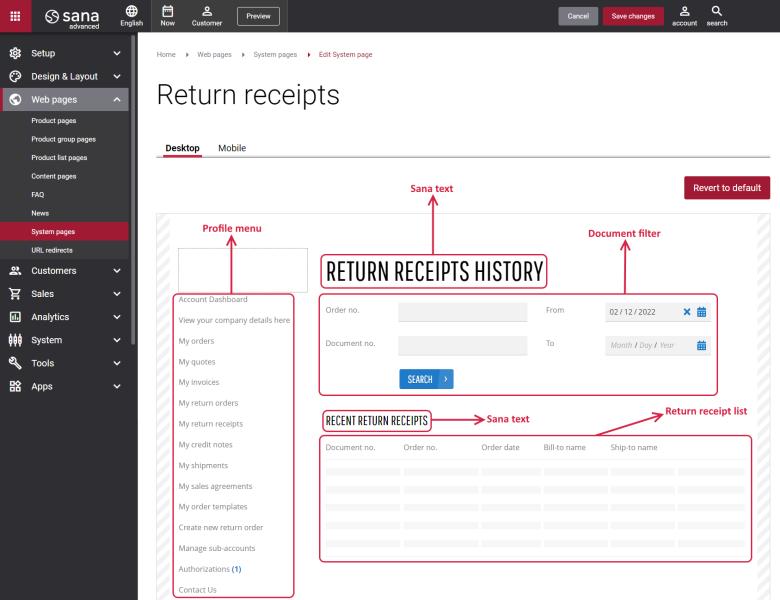
There are several default content elements on the Return receipts page which you can edit. The default content elements on the Return receipts page are:
- Profile menu
- Sana text
- Document filter
- Return receipt list
Also, you can add and remove various content elements on the Return receipts page as well as use the content management system of Sana with the page layouts, row and column settings to create high quality and impressive design for the Return receipts page.
Using the Revert to default button, you can revert any changes you have made to the page and start from scratch.
Content Elements on the Return Receipts Page
Below you can see the description of all standard content elements that are shown on the Return receipts page.
Profile Menu
The Profile menu content element is used to show the account menu on the Return receipts history page.
Document Filter
The Document filter content element is used to show search and filter on the Return receipts history page.
A customer can search for a specific return receipt by document number or order number and filter return receipts by date on the Return receipts history page in the Sana webstore.
Return Receipt List
The Return receipt list content element is used to show the list of return receipts on the Return receipts history page.
A customer can check the information about the return receipts, like document number, order number, order date, bill-to name and ship-to-name, etc. Also, there is a link in the return receipt line using which a customer can get more detailed information about a return receipt. This link is not shown in the Return receipt list content element in Sana Admin, but it is available on the Return receipts history page in the Sana webstore.
Content Element Advanced Settings
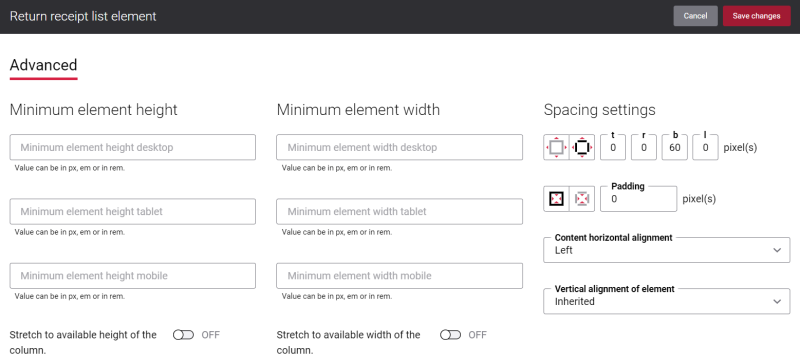
On the Advanced tab of each Return receipts page content element, you can configure height, width and spacing settings. These settings are the same for all content elements.
For more information about advanced settings, see Content Elements.
Change the Default Texts of the Return Receipts Page
You can easily change the standard texts of the Return receipts page in the English language or any other installed webstore language.
Standard texts on the Return receipts page can be separate Sana text content elements as well as parts of other content elements.
-
If the default text on a page is a Sana text content element, you can change this text either directly on the page using the inline editing, or by opening the settings of the Sana text content element and changing it there.
-
If the text on a page is a part of another content element, you can change this text either in the Page elements & messages or In-site editor.


