Single Sign-On
Sana Commerce Cloud provides customers with the ability to log in to the Sana webstore using their identity provider accounts.
Single sign-on (SSO) is a secure authentication method that allows users to sign in using one set of credentials to multiple independent software systems. It means users can log in once with their identity provider account to access a Sana webstore and other apps that use the same identity provider. Users don’t need to log in to every application they use with different credentials, but instead, use the same account to access different independent apps. Authentication takes place using the identity provider, which means applying its security policies.
Sana Commerce Cloud uses the OpenID Connect authentication protocol based on OAuth 2.0.
Single sign-on for webstore customers is not tied to a specific identity provider, therefore it can be configured for any identity provider that implements the OpenID Connect protocol.
We tested Sana Commerce Cloud with the following identity providers:
- Microsoft Entra ID
- Microsoft Entra External ID
- Azure Active Directory B2C
- Okta Workforce Identity Cloud
- Okta Customer Identity Cloud (Auth0)
Of course, we cannot check all identity providers and make sure that Sana Commerce Cloud works correctly with all of them. Therefore, if you want to use single sign-on for your webstore customers, you must connect Sana to your identity provider and make sure that everything works correctly.
To allow your webstore customers to log in to the Sana webstore with their accounts of your identity provider, you will need to:
- Create a Sana Commerce Cloud application in your identity provider. How to do this depends on the identity provider you are using. Therefore, you will have to do it yourself. You can always refer to the official documentation of your identity provider. If you are using one of the identity providers listed above, we also provide manuals for basic configuration of these providers.
- Connect Sana Commerce Cloud to your identity provider. You need the application client (ID) and the authentication server URL of the application created in your identity provider.
- Create users (customers) in your identity provider and give them access to the application. How to do this depends on the identity provider you are using. Therefore, you will have to do it yourself. You can always refer to the official documentation of your identity provider. If you are using one of the identity providers listed above, we also provide manuals for basic configuration of these providers.
- Create shop accounts in Sana Admin with a single sign-on authentication type to link users in your identity provider with shop accounts in Sana Admin.
- Add the "Single sign-on login button" content element to the "Login" page.
Connect Sana Commerce Cloud to Your Identity Provider
Only one identity provider can be used for a webstore. If you have multiple webstores, you can use the same identity provider for all your webstores or different ones. You can connect your webstores to the same identity provider application or to different ones.
Step 1: Log in to Sana Admin and click: Customers > Shop Accounts.
Step 2: On the Shop accounts page, click Configure single sign-on.

Step 3: On the Single sign-on - Shop accounts page, enable the option Single sign-on for shop accounts.
Step 4: Enable the option Enforce single sign-on login if single sign-on is the only login method in your Sana webstore. Enforcing single sign-on login hides other login options, including internal shop account login, customer registration, and guest checkout. When customers click on the Login link in the Sana webstore, they will be redirected to the identity provider's Login page.
Do not enable this option if your store type is set to Closed. In a closed webstore, the customer's journey begins on the Login page. When the Enforce single sign-on login option is enabled, the standard Sana Login page is not shown.
Step 5: Enter the Application (client) ID and Authentication server of the Sana Commerce Cloud application that you created in your identity provider.
The Application (client) ID and Application server are case-sensitive and must be entered exactly as they appear in your identity provider. The Application server URL must have the https protocol at the beginning.
The names Application (client) ID and Authentication server may differ from one identity provider to another.
Step 6: Enter the Custom scopes if necessary. A scope in the identity provider protocols is an additional permission or user data that can be requested from your identity provider beyond the standard OpenID Connect scopes. You must add only the scopes that are required by your identity provider.
Step 7: Click Test connection to check if the application (client) ID and server are valid and Sana Commerce Cloud can connect to the selected identity provider.
Step 8: Click Save changes.
Create Shop Accounts in Sana Admin
If identity provider accounts are used to log in to the webstore, shop accounts must also be created in Sana Admin. Only customers with shop accounts can log in to the webstore.
When using single sign-on, shop accounts can be created automatically or manually in Sana Admin.
Automatic Creation of Shop Account
When customers log in to the Sana webstore with their identity provider accounts for the first time, shop accounts can be automatically created for them in Sana Admin.
To automatically create shop accounts:
Step 1: Log in to Sana Admin and click: Customers > Shop Accounts.
Step 2: On the Shop accounts page, click Configure single sign-on.
Step 3: On the Single sign-on - Shop accounts page, enable the option Automatically create shop account on authentication.
Step 4: Configure shop account attributes with their default values and claims.
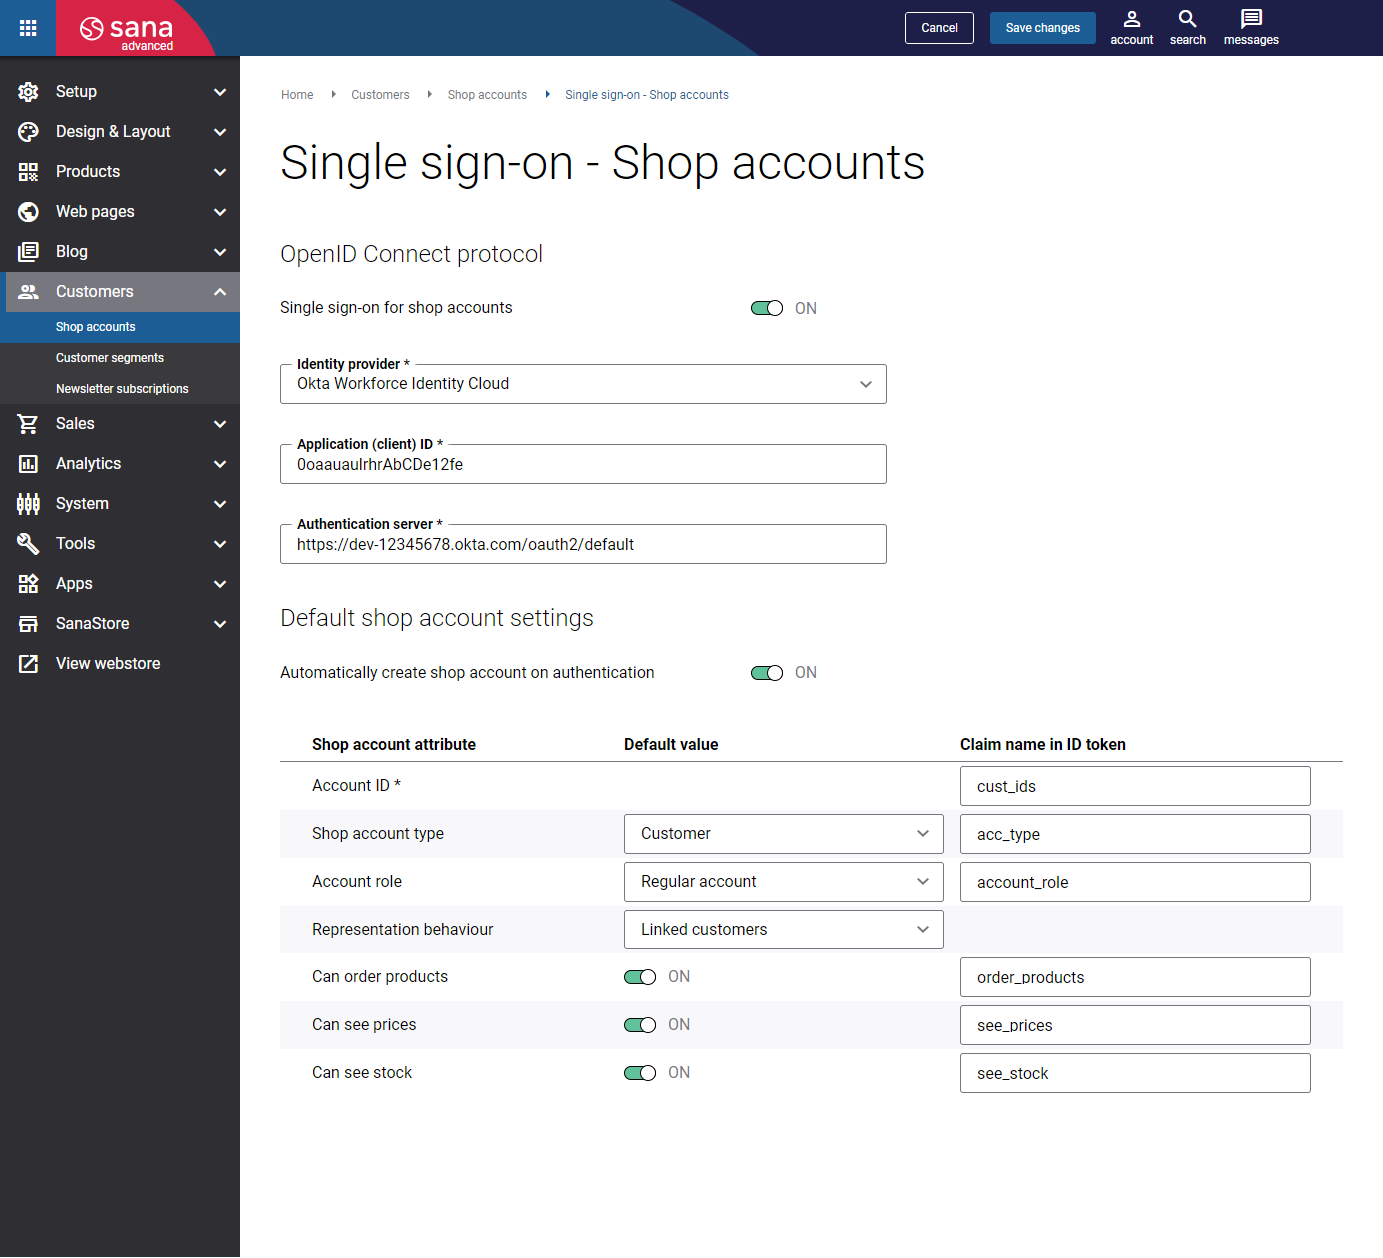
Shop account attributes and their default values are the settings that are used to create shop accounts. If you look at the details of any existing shop account or start creating a new account, you will see the same settings.
Claims are pieces of information about a user that are sent by the identity provider to the application. Account ID is a mandatory claim for creating shop accounts. All others are optional and default values can be used instead. If you use claims from your identity provider, the default values will be ignored.
The necessary claims, at least for the Account ID, must be created in your identity provider.
The claim names on the screenshot above are just examples. You must enter the same claims that are created in your identity provider.
Account ID is used to link the correct customer from your ERP system to the shop account when creating it. This means that you must have the claim for customer accounts from ERP in your identity provider. Using this claim, the customer ID from your ERP system must be specified for users in your identity provider.
- If you need to create all shop accounts with the same account type and other settings, you can use the default values in Sana Admin, and there is no need to create claims in your identity provider other than the Account ID.
- If you need to create shop accounts with different account types and settings, you must create the necessary claims and specify the required user details in your identity provider.
The Name claim is used to send the user's name from the identity provider to Sana Commerce Cloud. Most identity providers send this information by default. However, some businesses may create their own identity providers or use lesser-known or custom ones. In such cases, ensuring that the Name claim is included and that the customer’s name is sent to create a shop account is essential, enabling users to log in to the Sana webstore.
Sana Commerce Cloud relies on account details from the identity provider as its primary source of information. When customers log in to the Sana webstore using their identity provider accounts and their shop account already exists in Sana Admin, the corresponding shop account details are updated with information from the identity provider. This ensures that any changes made to the account details in the identity provider are reflected in the shop account within Sana Commerce Cloud. For example, if you change the account ID for the user in the identity provider and it does not yet exist in Sana Commerce Cloud, Sana attempts to retrieve it from the ERP system and update the shop account details in Sana Admin. If the account ID is also missing in ERP, the shop account remains unchanged. If the account details are not valid, the customer cannot log in to the Sana webstore.
For more information about how to create claims in different identity providers, see:
- Claims in Microsoft Entra ID
- Claims in Microsoft Azure Active Directory B2C
- Claims in Okta Workforce Identity Cloud
- Claims in Okta Customer Identity Cloud (Auth0)
Manual Creation of Shop Accounts
To manually create shop accounts:
Step 1: Log in to Sana Admin and click: Customers > Shop accounts.
Step 2: Add shop accounts for all customers that should be able to log in to the Sana webstore using single sign-on. You must select the Single sign-on authentication type for these shop accounts.
The customer's e-mail address must be the same in the identity provider and Sana Admin.

When a customer logs in to the Sana webstore for the first time, the customer is verified by e-mail. After the first login, the customer ID received from the identity provider will be shown in the shop account details in Sana Admin. See Identity provider ID. The next time the customer logs in to the Sana webstore, the customer will be verified by this ID.
The customer name shown in the Sana webstore after logging in is taken from the identity provider, not from the shop account details in Sana Admin.
Add Single Sign-On Login Button
To allow your customers to log in to your Sana webstore using single sign-on, you must add the Single sign-on login button content element to the page. This is a button. You can add it to the following pages:
You can edit the button text directly on the page using the built-in in-site editor.
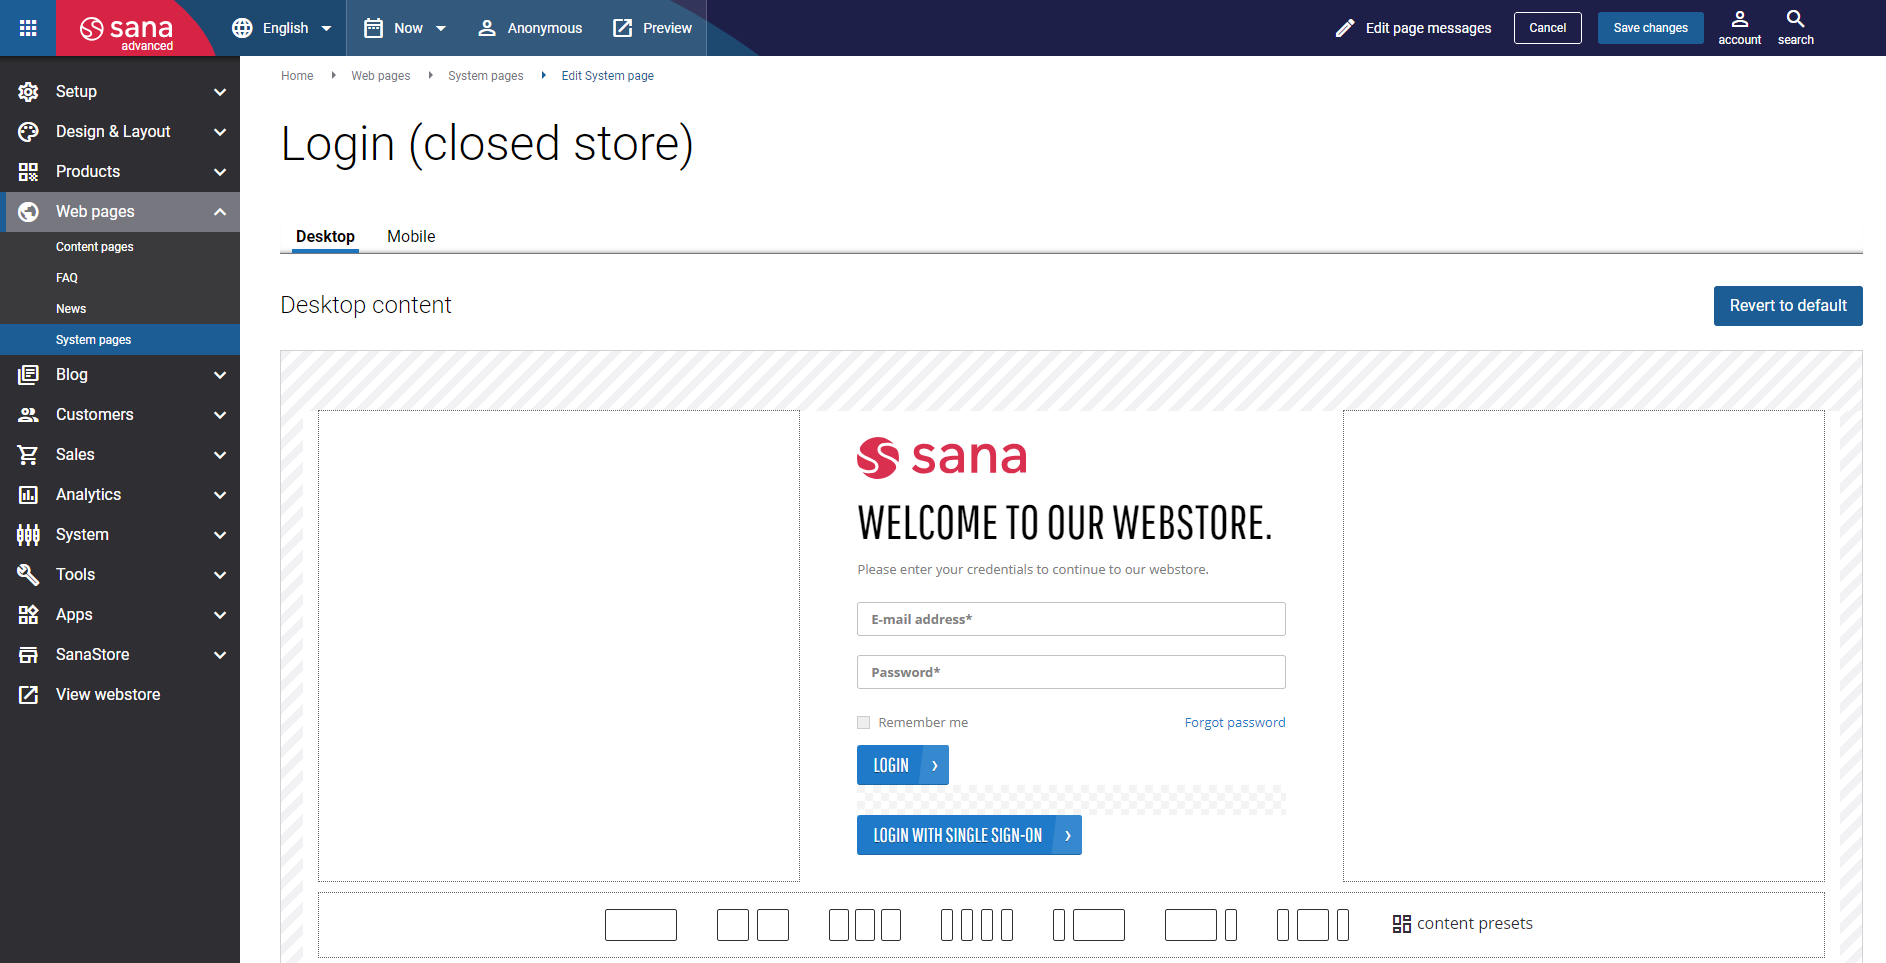
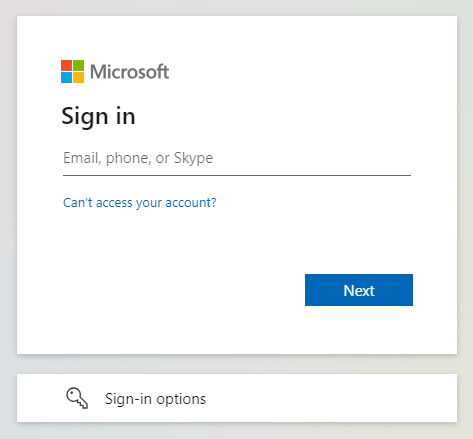
Clicking this button opens the login page of the configured identity provider, where customers can enter their credentials to log in to the webstore.
The screenshot below shows an example of the Microsoft login page where customers can log in to the webstore using their Microsoft account. This is because the Microsoft Entra ID identity provider is configured for shop accounts in Sana.
Silent Authentication
Silent authentication in the context of single sign-on (SSO) refers to the process where a user is automatically authenticated without requiring them to manually enter their login credentials (username and password). This process occurs in the background, typically leveraging the existing session that the user has already authenticated with earlier.
Okta Customer Identity Cloud (Auth0) does not support silent authentication. Customers are required to enter their credentials each time they access the Sana webstore.
Use Case
Some customers build custom portals that serve as a single point of entry for their users, consolidating all customer-facing applications. These portals typically use single sign-on (SSO) to grant access to the entire suite of applications.
When a user clicks on an application within the portal, such as the Sana webstore in our case, they should be automatically signed into the webstore using their active session, eliminating the need to manually enter login credentials.
To allow users to automatically access the Sana webstore from a custom portal using SSO with silent authentication, you should use the webstore link with an additional parameter ?silentLogin at the end in the following format:
https://[your-webstore-domain].com/?silentLogin
This link can direct users to any specific page of your webstore. For instance, if you want the user to land on a particular page of your webstore immediately after logging in, for example, on the page with the catalog, you can use the necessary URL.
Examples:
https://demo-store.com/?silentLogin
https://demo-store.com/catalog/?silentLogin
Good to Know
If you allow your webstore customers to log in to the Sana webstore using their identity provider accounts:
- You can set up any policies and restrictions in your identity provider, such as multi-factor authentication (MFA) and others.
- You can activate and deactivate the account. The deactivated accounts cannot log in to the applications.
- Your identity provider controls security policies, such as password reset and password expiration. If customers use their identity provider accounts to log in to the Sana webstore, they cannot use the forgot password functionality of Sana. Instead, they can use the functionality of their identity provider.