Microsoft Entra ID
With Microsoft Entra ID (formerly known as Azure Active Directory), your customers, employees, contractors, or business partners can securely log in to the Sana webstore and other applications with their Microsoft accounts using single sign-on (SSO). It provides a simple, secure, and seamless login to the Sana webstore using Microsoft accounts and enforcing all Microsoft security policies.
To allow your webstore customers to log in to the Sana webstore with their Microsoft accounts, you will need to:
- Register a Sana Commerce Cloud application in Microsoft Entra ID.
- Add users (customers) to Microsoft Entra ID.
- Assign users to the application in Microsoft Entra ID.
You will also need to connect Sana Commerce Cloud to Microsoft Entra ID, create shop accounts and modify the Login page of your webstore. For more information, see Single Sign-On.
Register a Sana Commerce Cloud Application in the Microsoft Entra ID
The application is needed to connect Sana Commerce Cloud to Microsoft Entra ID.
Step 1: Sign in to the Azure portal.
You must sign in with the Azure account that has an active subscription and permission to manage applications in Microsoft Entra ID.
Step 2: Search for and select Microsoft Entra ID.
Step 3: In the menu on the left, click: App registrations > New registration.
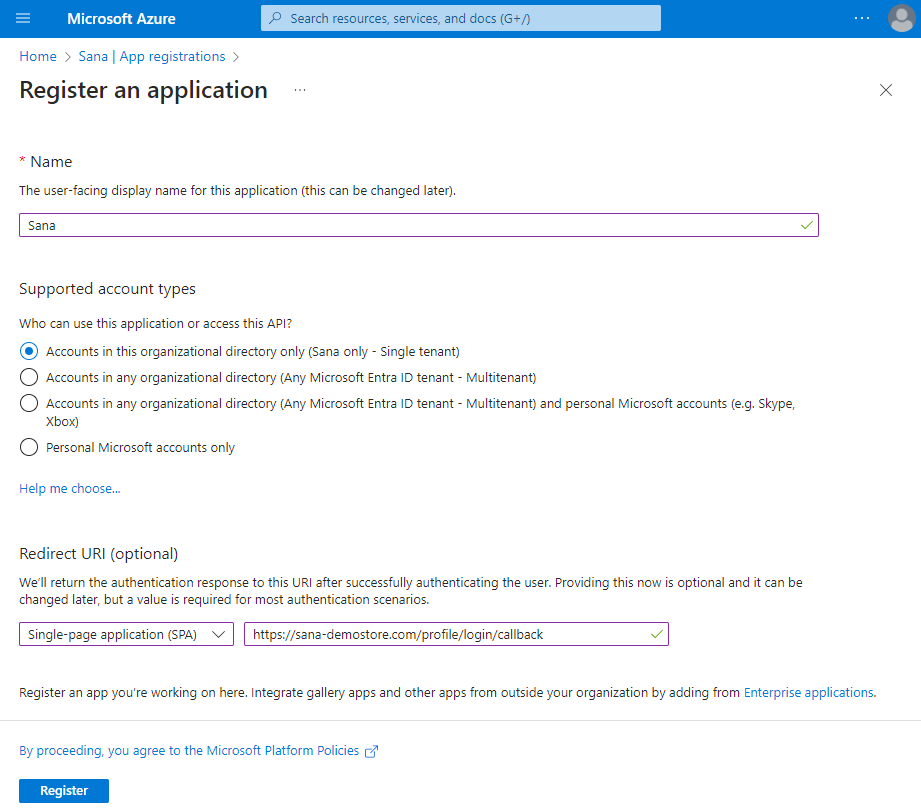
Step 4: Enter a display Name for your application, for example, Sana Commerce Cloud, Sana, your webstore or company name.
Step 5: Select the supported account type. You can leave the default value.
Step 6: In the Redirect URI (optional) section, select the Single-page application (SPA) platform and enter your webstore URL in the following format: https://your-webstore-domain.com/profile/login/callback.
A redirect URI is where the Microsoft identity platform redirects a user's client and sends security tokens after authentication.
If you have multiple Sana Commerce Cloud webstores and want to use single sign-on for all your webstores, you must add all your webstore URLs to the Redirect URIs section. You can do this on the Authentication page only after the application is registered.
If you have a multi-lingual webstore, you need to add all webstore URLs for all languages, for example:
https://your-webstore-domain.com/de-de/profile/login/callback

Step 7: Click Register to complete Sana Commerce Cloud app registration.
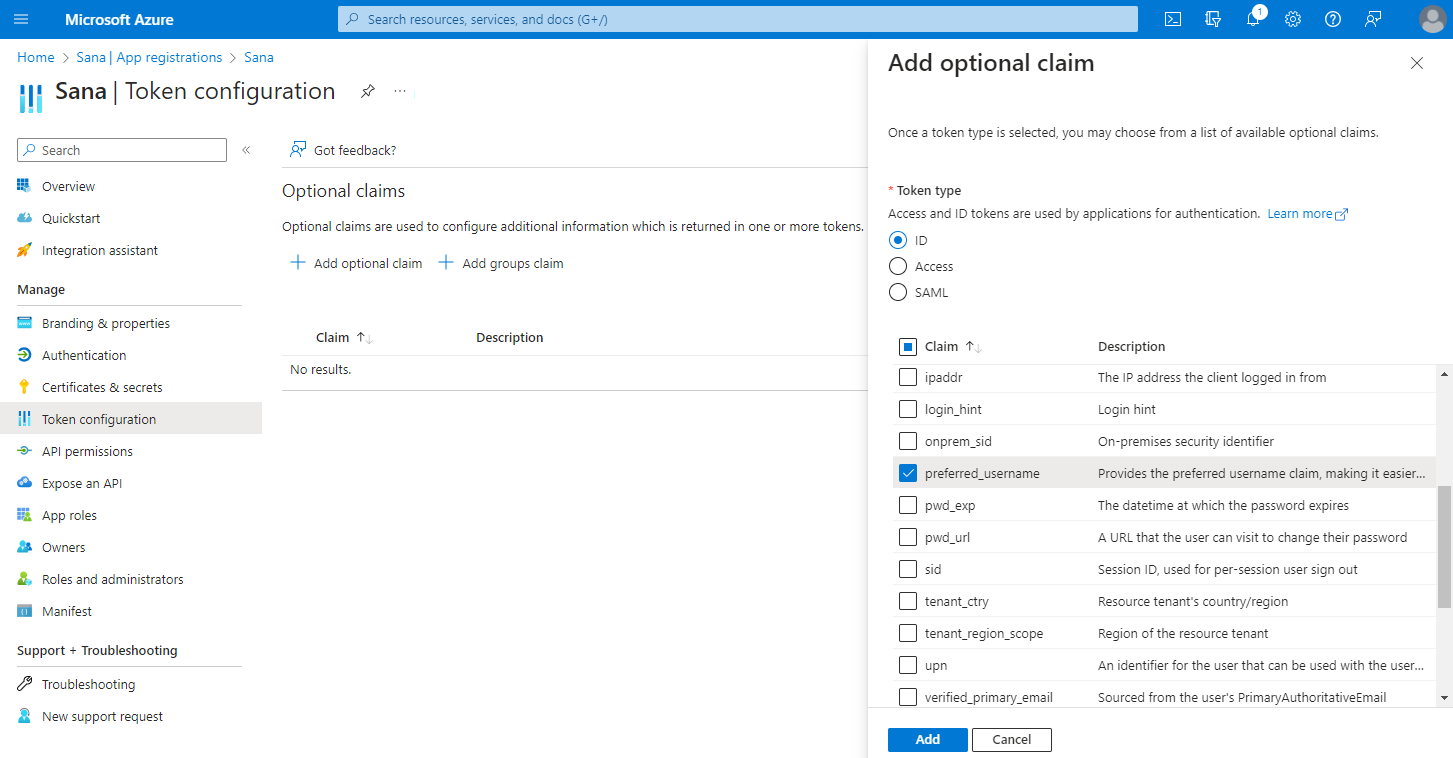
Step 8: When the application is registered, click Token configuration in the menu on the left. Then, click Add optional claim.
Step 9: Select the ID token type. Then, find and select the preferred_username claim, and click Add.
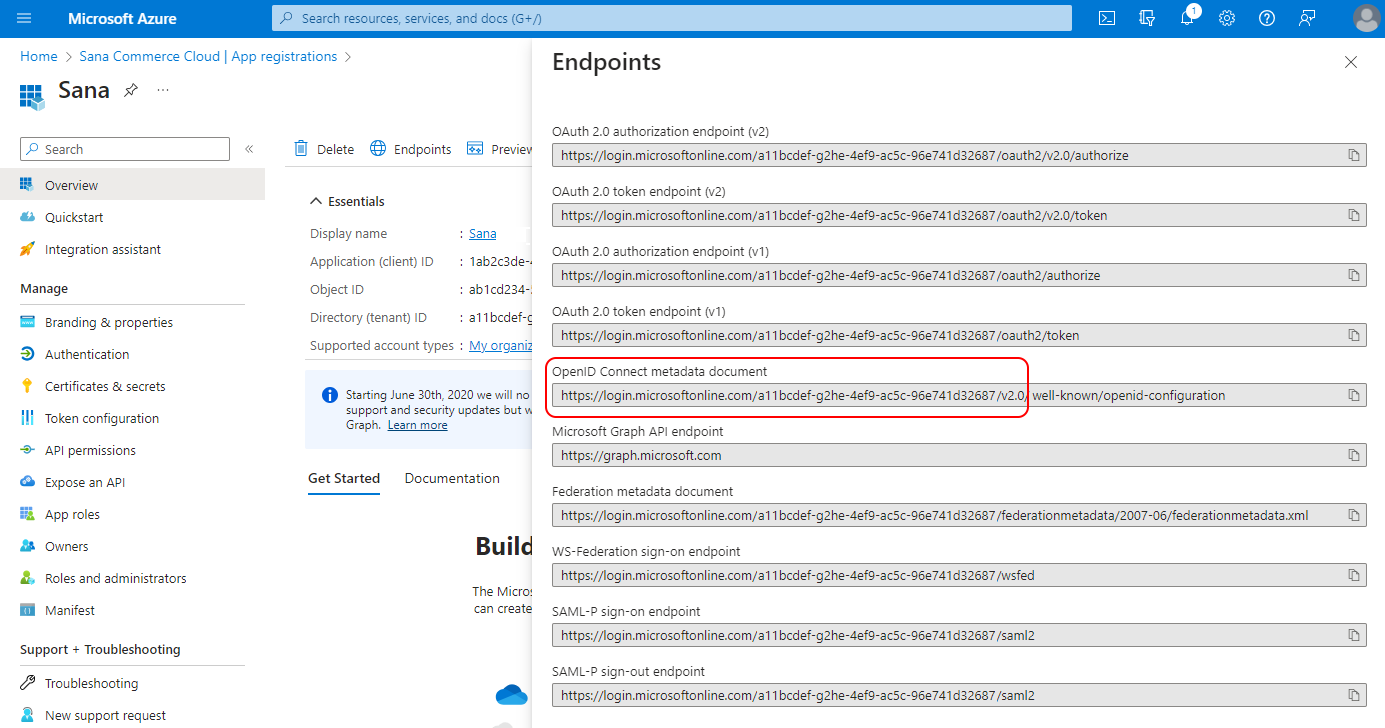
Step 10: Click Overview in the menu on the left to see the details of your application, such as the Application (client) ID. The application (client) ID uniquely identifies your application in the Microsoft identity platform. You will need the application (client) ID to connect your Sana Commerce Cloud application to Microsoft Entra ID. Thus, you can copy it.
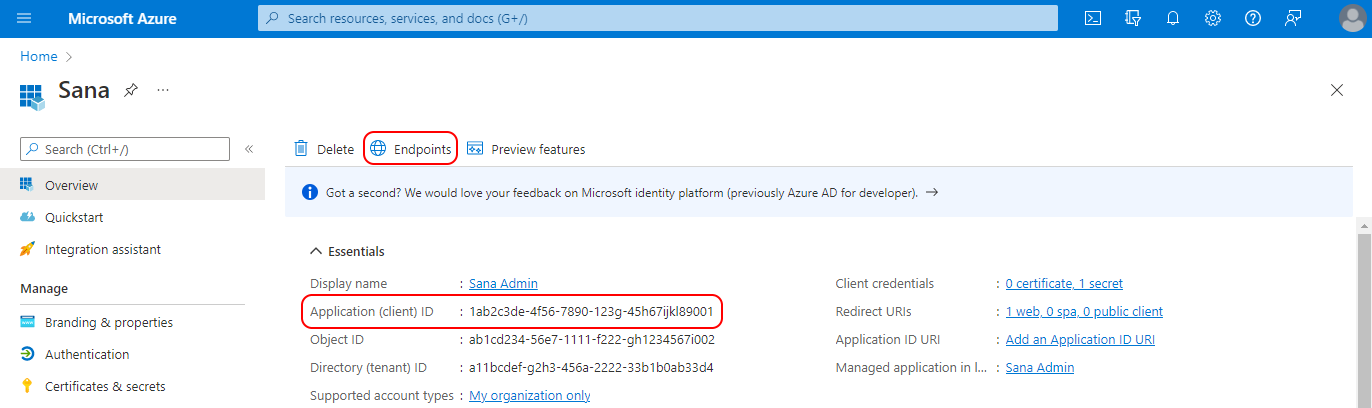
You will also need the authentication server. To find it, click Endpoints. See OpenID Connect metadata document. You will need this URL, or rather part of it as shown on the screenshot.
An example of the URL to enter in Sana Admin as the application server URL:
https://login.microsoftonline.com/a11bcdef-g2he-456f-2222-33b1b0ab33d4/v2.0
For more information, see Register an application in Microsoft Entra ID on the Microsoft website.
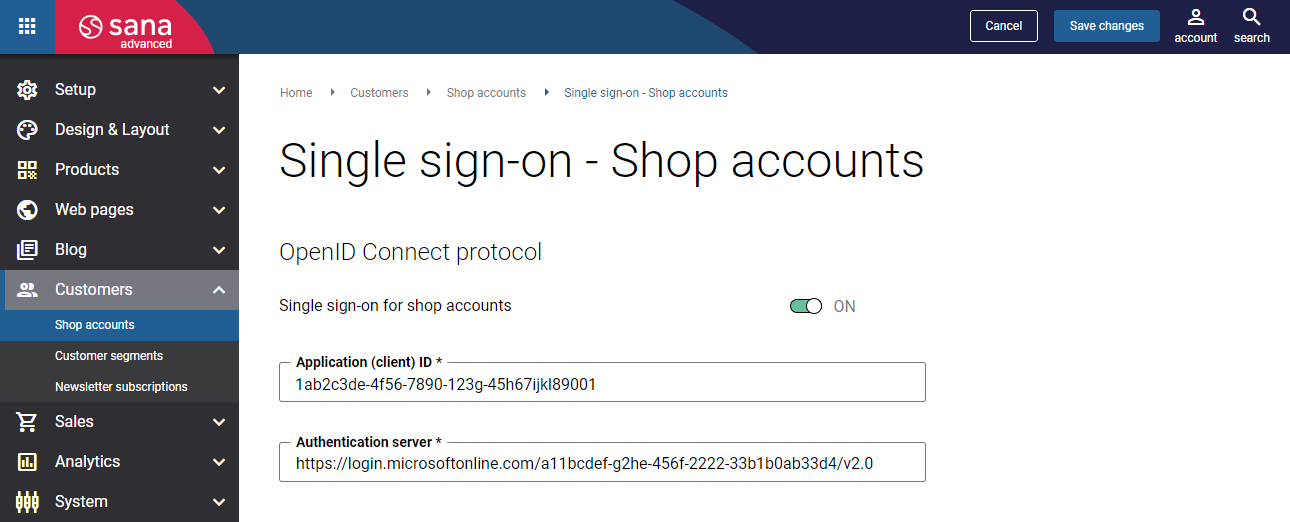
To connect Sana Commerce Cloud to Microsoft Entra ID, you will need to enter your application (client) ID and OpenID Connect metadata document URL in Sana Admin.
User Accounts
You can create new users in Microsoft Entra ID or use existing users to allow your webstore customers to log in to the Sana webstore with their Microsoft accounts.
Create a User in Microsoft Entra ID
To add or delete users, you must be a User administrator or Global administrator.
Step 1: Sign in to the Azure portal in the User administrator role for the organization.
Step 2: Search for and select Microsoft Entra ID.
Step 3: Click Users, and then click New user.
Step 4: On the User page, enter information for this user, such as user name and name.

Step 5: Copy the auto-generated or created password provided in the Initial password box. You'll need to give this password to the customer to log in to Sana webstore for the first time.
Step 6: Click Create.
The user is created and added to your Microsoft Entra ID organization.
For more information, see Add or delete users on the Microsoft website.
Assign Access for a User to the Sana Commerce Cloud Application in Microsoft Entra ID
You must assign your application in Microsoft Entra ID to users so that they can access it.
Step 1: Sign in to the Azure portal.
Step 2: Search for and select Enterprise applications.
Step 3: Open your Sana Commerce Cloud application.
Step 4: Click Users and groups, and then click Add user/group.
Step 5: On the Add Assignment page, select Users to open the Users selection list.
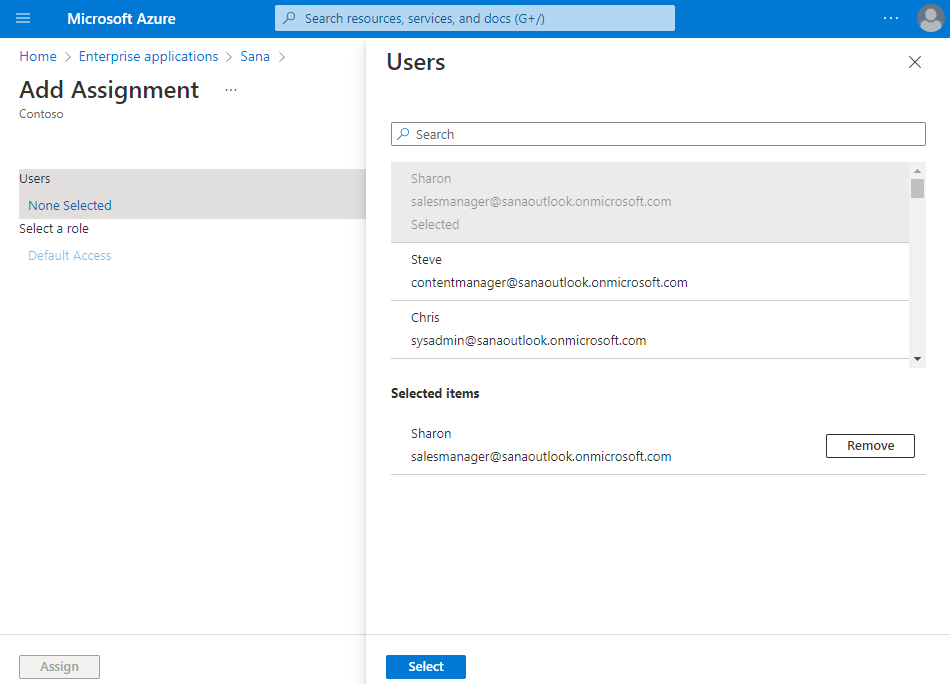
Step 6: Select the necessary users, then click Select to add them to the Add Assignment list.
Step 7: Click Assign to assign the users to the Sana Commerce Cloud application.
For more information, see Use a group to manage access to SaaS applications on the Microsoft website.
When the Sana Commerce Cloud app is registered in the Microsoft Entra ID, Sana Commerce Cloud is connected to Microsoft Entra ID, users are created in Microsoft Entra ID, assigned to the application and connected to the shop accounts in Sana Admin, these users can log in to the Sana webstore using their Microsoft accounts.
Claims for Shop Accounts Creation
Claims are pieces of information about a user that the identity provider sends to the application. They are necessary to automatically create shop accounts in Sana Admin for customers who log in to the Sana webstore with their identity provider accounts.
For more information, see Single Sign-On: Create Shop Accounts in Sana Admin.
How to Configure Claims
Step 1: Sign in to the Azure portal with your Microsoft account.
Step 2: In Microsoft Entra ID claims are added to the groups. Therefore, you must create the necessary groups and add users to these groups in Microsoft Entra ID. This can be one group with all users if the claims are the same for all users, several groups with different users, or even one group with one user if the claims are different for all users.
Step 3: In the Azure portal, go to Microsoft Entra ID, and then click Enterprise applications in the menu on the left.
Step 4: Find your Sana Commerce Cloud application and click on it.
Step 5: Click Single sign-on in the menu on the left.
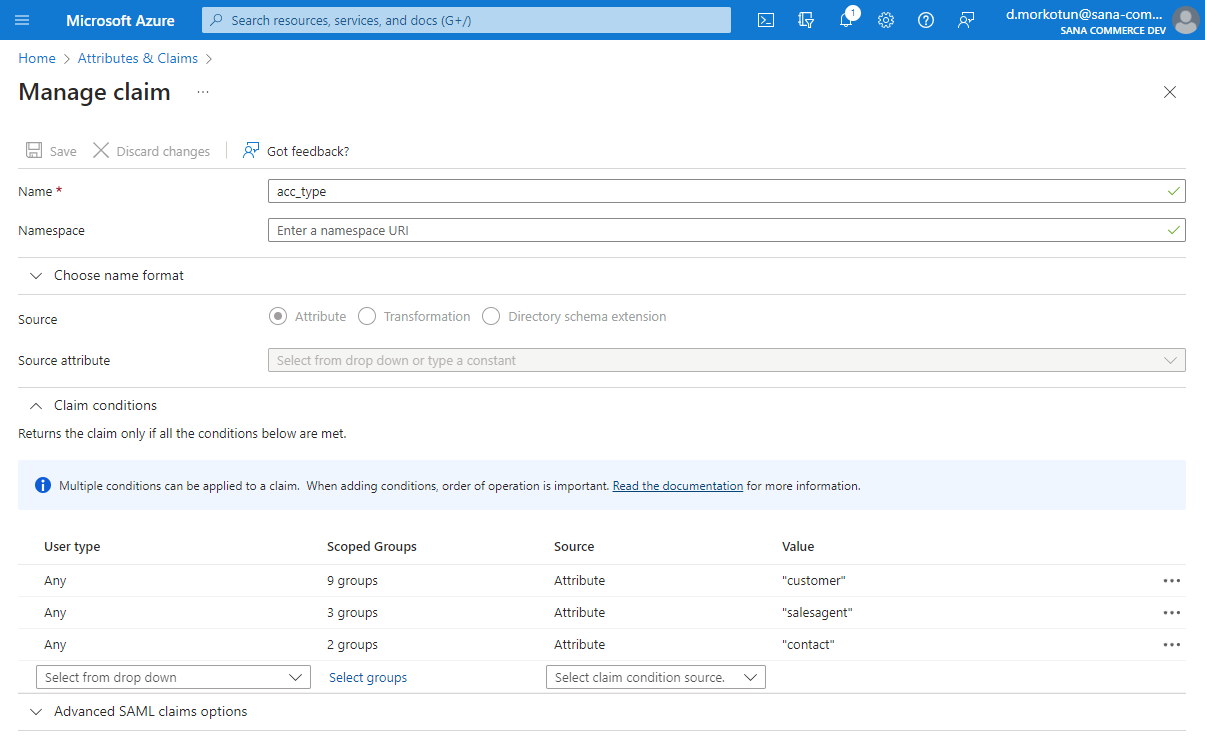
Step 6: In the Attributes & Claims section, click Edit.
Step 7: On the Attributes & Claims page, click Add new claim.
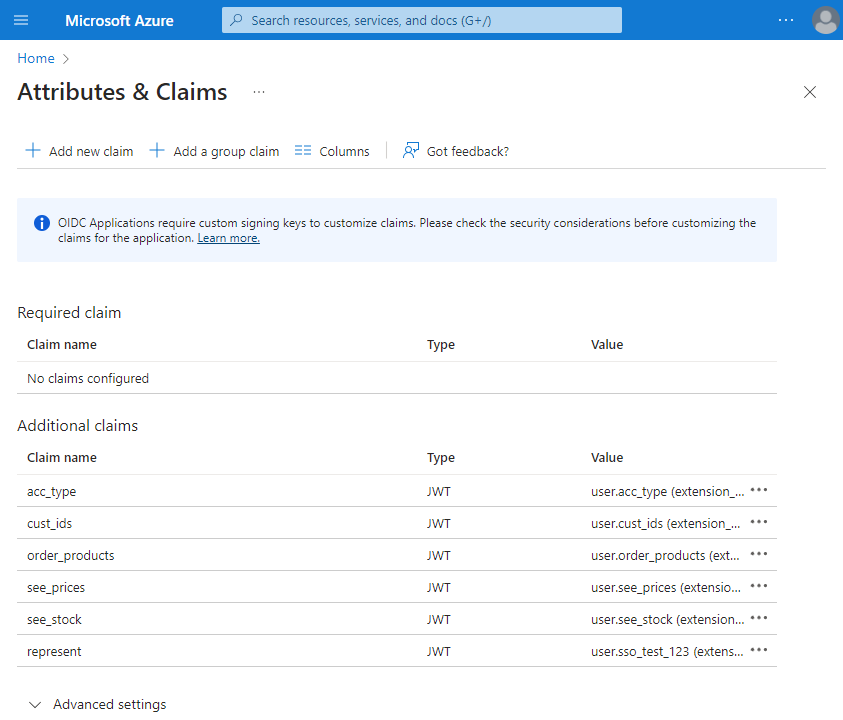
Fill in the following fields:
- Name: Enter the claim name. You can enter any claim name. In the table below you can see examples of claim names that you can also use. The claim names you specify must also be used to set up claims in Sana Admin. You can create claims for the following shop account settings:
- Account (customer) ID
- Shop account type
- Account role
- Can order products
- Can see prices
- Can see stock
- User type: Select Any.
- Scoped Groups: Select groups with your customers.
- Source: Select Attribute.
- Value: Enter the appropriate values.
This is the user data that will be used to create shop accounts for the customers in Sana Admin when these customers log in to the Sana webstore for the first time with their Microsoft account.
| Shop account settings | Claims | Values |
|---|---|---|
| Account (customer) ID | cust_ids | Customer ID in ERP
To support one to multi relation, Sana Commerce Cloud expects string collection in the customer ID token claim. Example: "cust_ids": [ "CUSTOMER-1", "CUSTOMER-2", "CUSTOMER-3" ] |
| Shop account type | acc_type |
|
| Account role | account_role |
|
| Can order products | order_products |
|
| Can see prices | see_prices |
|
| Can see stock | see_stock |
|
Accept Custom Claims
To accept custom claims:
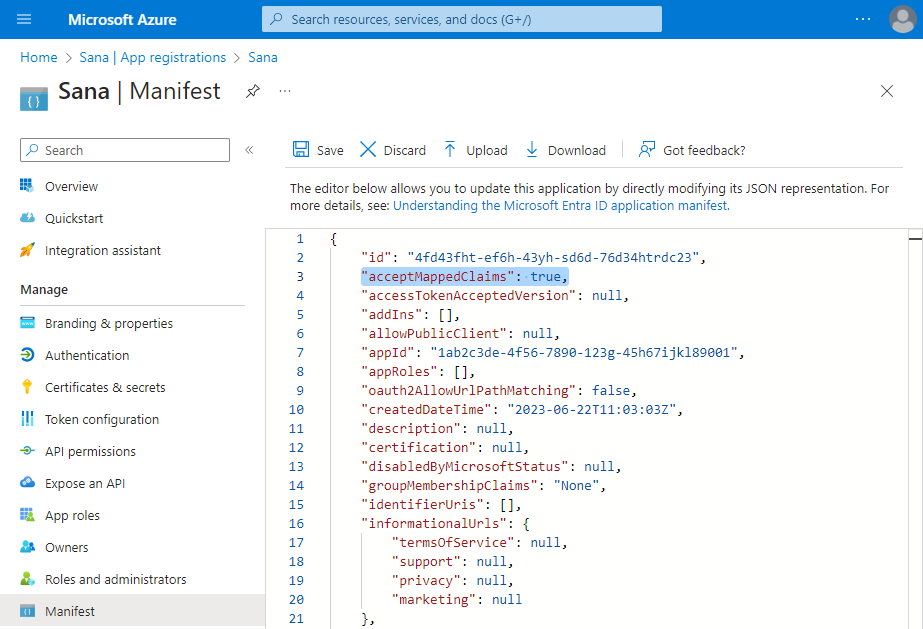
Step 1: In the Azure portal, go to Microsoft Entra ID, and then click App registrations in the menu on the left.
Step 2: Find your Sana Commerce Cloud application and click on it.
Step 3: Click Manifest in the menu on the left.
Step 4: Make sure that the value of the acceptMappedClaims attribute is set to true.
Shop Account Roles
Sana Commerce Cloud supports shop account roles when using single sign-on to log in to the Sana webstore with the Microsoft accounts. You can use claims in Microsoft Entra ID to automatically create shop accounts with the necessary role (regular account, account manager, sub-account) in Sana Admin when customers log in to the Sana webstore for the first time with their Microsoft account.
When a customer logs in to the Sana webstore for the first time with the Microsoft account and the shop account is created, it can be changed in Sana Admin. The claims in Microsoft Entra ID are only used to create shop accounts.
Limitations
- The account manager cannot change the name and e-mail of sub-accounts logged in to the Sana webstore with their Microsoft accounts. This information is stored in the user details in Microsoft Entra ID.
- The account manager cannot remove sub-accounts logged in to the Sana webstore with their Microsoft accounts.
Logging in to the Sana Webstore for the First Time with a Microsoft Account
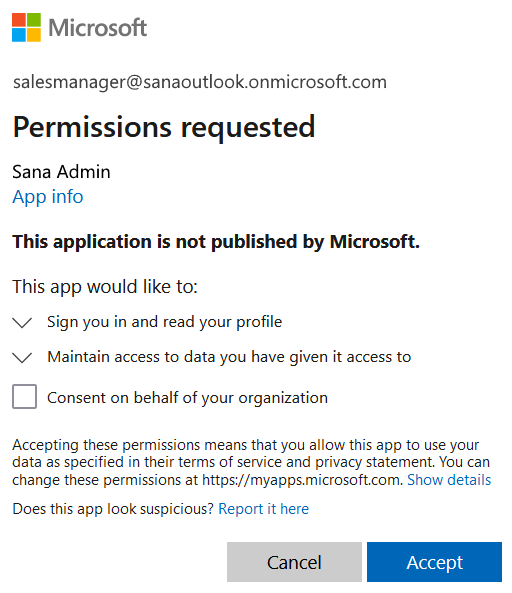
If the customer logs in to the Sana webstore with the Microsoft account for the first time, Microsoft will ask you to accept the permissions required for the Sana Commerce Cloud app created in the Microsoft Entra ID. The customer must select the checkbox Consent on behalf of your organization and click Accept.
The customer will be asked to agree to the terms and conditions of the end-user license agreement (EULA).
Logging out of the Sana Webstore
If users have several Microsoft accounts for different purposes and they log out of the Sana webstore, users will be asked to choose the account that they want to log out of. The user can choose the necessary Microsoft account and log out of the Sana webstore.
If you want to avoid this and log out without choosing the required account, you can add an optional claim to your application. To do this:
Step 1: Go to the Azure portal.
Step 2: Search for and select Microsoft Entra ID.
Step 3: In the menu on the left, click App registrations.
Step 4: Select the Sana Commerce Cloud application you want to configure optional claims for in the list.
Step 5: Go to Token configuration and click Add optional claim.
Step 6: Select the ID token type. Then, find and select the login_hint claim, and click Add.

If you add the login_hint claim to the Sana Commerce Cloud app, the user will not need to choose the Microsoft account to log out of the Sana webstore.
For more information, see Configure optional claims on the Microsoft website.
Good to Know
If you use a single sign-on for your webstore customers with Microsoft Entra ID:
- You can set up any security policies and restrictions in Microsoft Entra ID, such as multi-factor authentication (MFA) and others.
- You can enable and disable the account in Microsoft Entra ID. The disabled users cannot log in to the applications.
- Microsoft Entra ID controls user password policies, such as password reset and password expiration. If customers use their Microsoft accounts to log in to the Sana webstore, they cannot use the forgot password functionality of Sana. Instead, they can use Microsoft's functionality, which is managed in the Azure portal.