Configure the Cybersource App
When the Cybersource payment provider is configured in the Cybersource Business Center, you must install and configure the Cybersource Unified Checkout app in Sana App Center to enable the embedded Unified Checkout experience in your webstore.
Step 1: The Cybersource payment provider is available as an app which uses Unified Checkout. It can be installed from the Sana App Center.
In Sana Admin click: App Center > Apps.
Install the Cybersource Unified Checkout app and configure it.
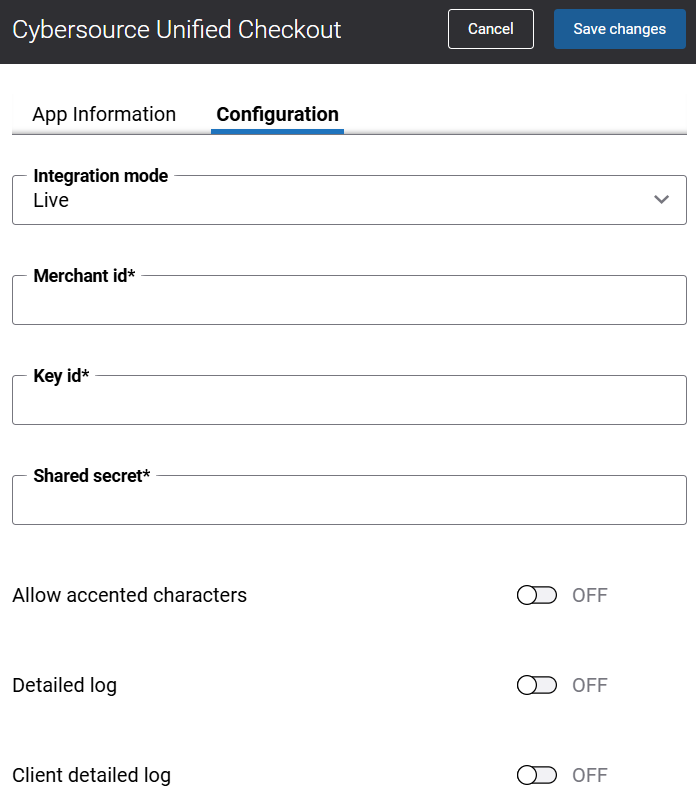
Step 2: Choose the appropriate payment integration mode.
Two integration modes are available: Test and Live. Test mode simulates the payment process without processing a real transaction, letting you confirm everything works correctly before going live. Live mode processes real purchases using your configured payment provider and payment methods.
Step 3: Enter your Merchant id.
Enter your unique Cybersource Merchant Account Identifier (Organization ID) registered in the Cybersource Business Center.
Step 4: Enter your Key id.
Enter the REST API Key ID generated in the Cybersource Business Center under Payment Configuration > Key Management. This key is used to authenticate requests sent from Sana Commerce Cloud to Cybersource.
Step 5: Enter your Shared secret.
This secret is used to digitally sign each request sent to Cybersource, verifying that it genuinely came from your Sana webstore and has not been altered in transit.
Step 6: Enable Allow accented characters, if necessary.
Enable this option to allow customer names, billing, and shipping addresses that contain non-English or accented characters (e.g., é, ñ, ö) to be processed without triggering validation errors during checkout. This option is disabled by default.
Step 7: Enable Detailed log for server-side troubleshooting.
Enable this option to record detailed server-side logs for all Cybersource API requests and responses in Sana Admin. This helps you analyze backend transaction errors or connection failures. We recommend enabling it only during setup or troubleshooting.
Step 8: Enable Client detailed log for frontend troubleshooting.
Enable this option to capture client-side (browser) logs for the embedded Unified Checkout iFrame widget. This helps diagnose rendering issues, JavaScript errors, or CORS restrictions directly in the browser console. We recommend enabling it only during setup or troubleshooting.


