Google Analytics 4
Google Analytics 4 is a powerful analytics service and marketing tool that enables you to measure traffic and engagement across your websites. It collects event-based data from a website about the entire lifecycle of the customer journey. It is designed to help businesses and marketers make better data-driven decisions.
Create Google Tag Manager Account and Container
Step 1: Open Google Tag Manager and create an account.
If you already have a Google Tag Manager account, you can create a new container for the Sana webstore with the Web target platform.
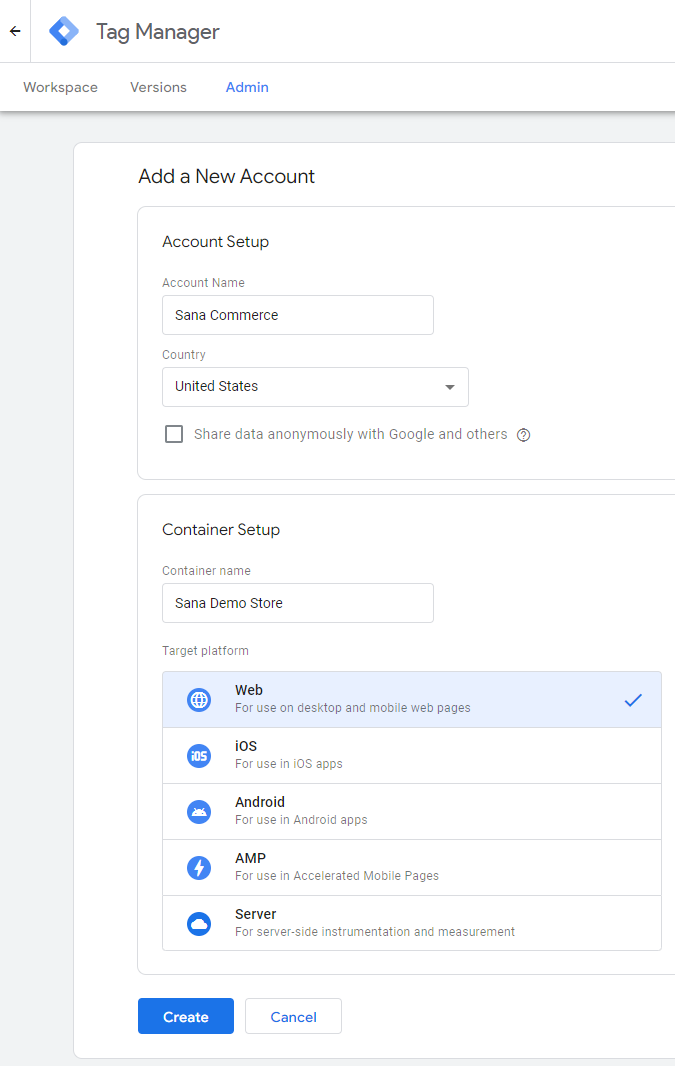
1.1 Enter the account name and select the country.
1.2 Enter the container name and select the Web target platform.
1.3 Click Create and agree to the Terms of Service.
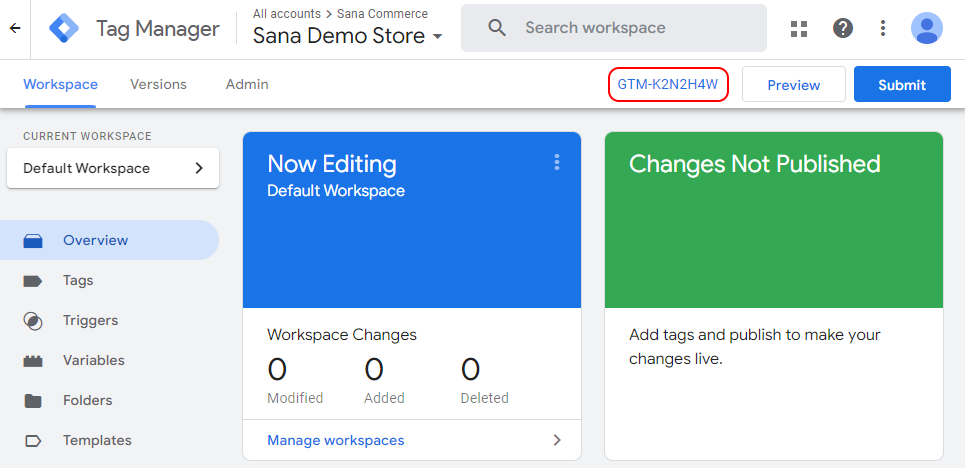
Step 2: When the container is created, you will see the container ID in the following format GTM-XXXXXXX. Copy the container ID.
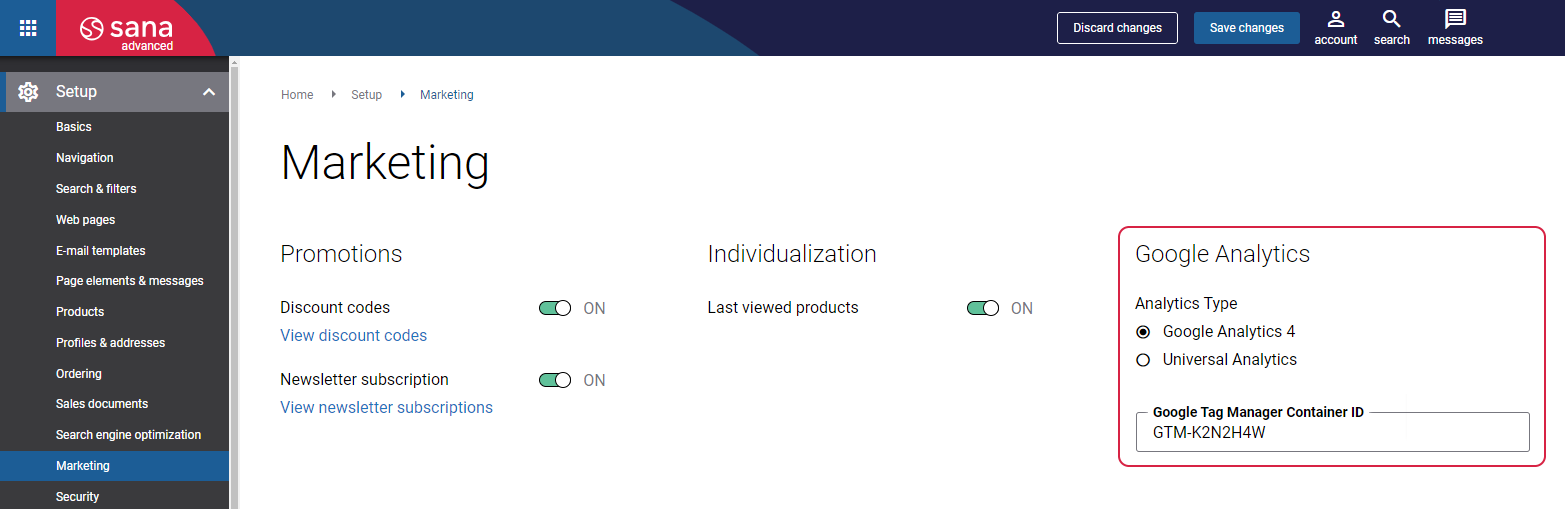
Step 3: Log in to Sana Admin and go to: Setup > Marketing. In the Google Analytics section, select Google Analytics 4. Enter the container ID in the Google Tag Manager Container ID field and save your changes.
Create Google Analytics 4 Account and Property
Open Google Analytics and create an account with a property for the Web platform.
If you already have a Google Analytics account, you can create a new property for the Sana webstore with the Web platform.
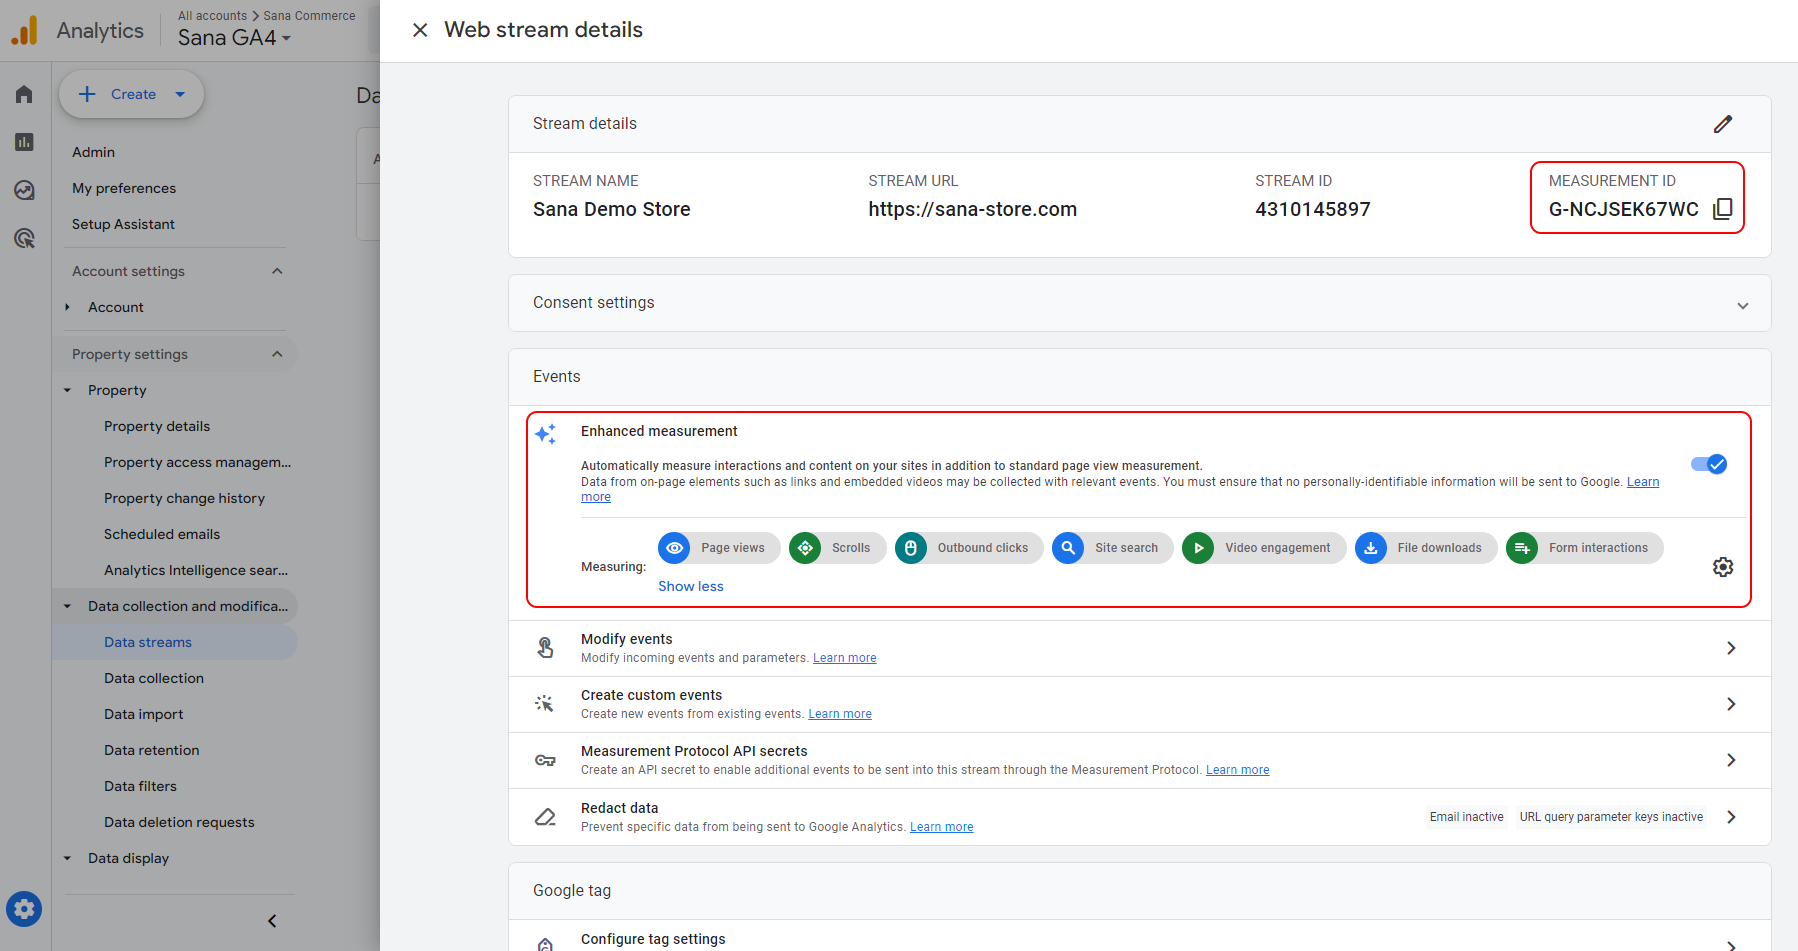
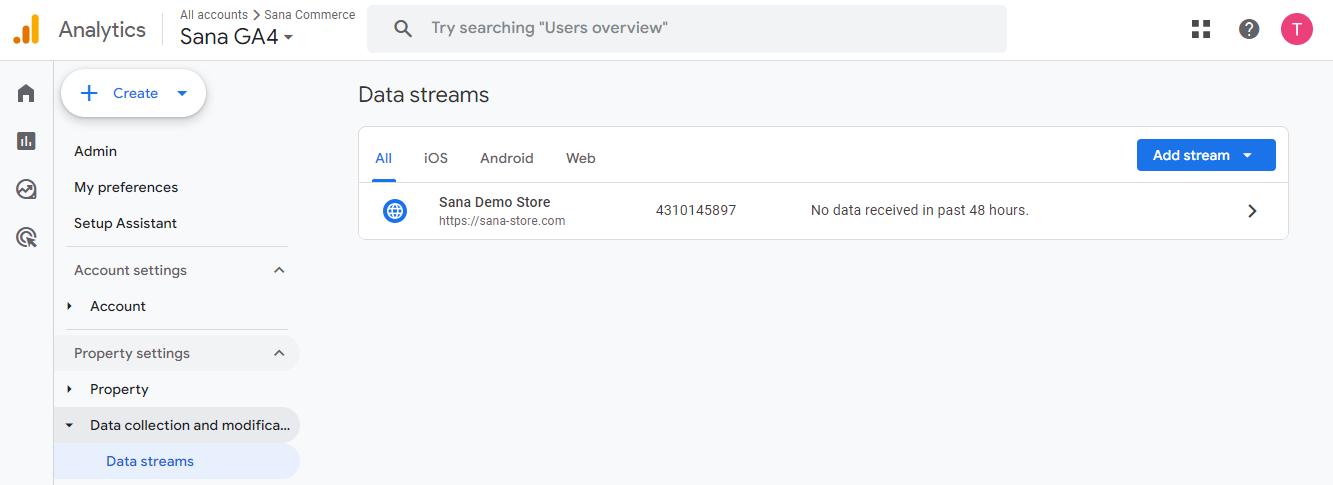
You will need the measurement ID later, so you can copy it. You can find it under: Data collection and modification > Data streams.
Make sure that the Enhanced measurement is enabled.
For more information on how to create a Google Analytics account and a property, see [GA4] Set up Analytics for a website and/or app, [GA4] Measurement ID, and [GA4] Enhanced measurement events.
Set Up the Google Tag
Step 1: Open Google Tag Manager and go to Tags.
Step 2: To add a new tag, click New.
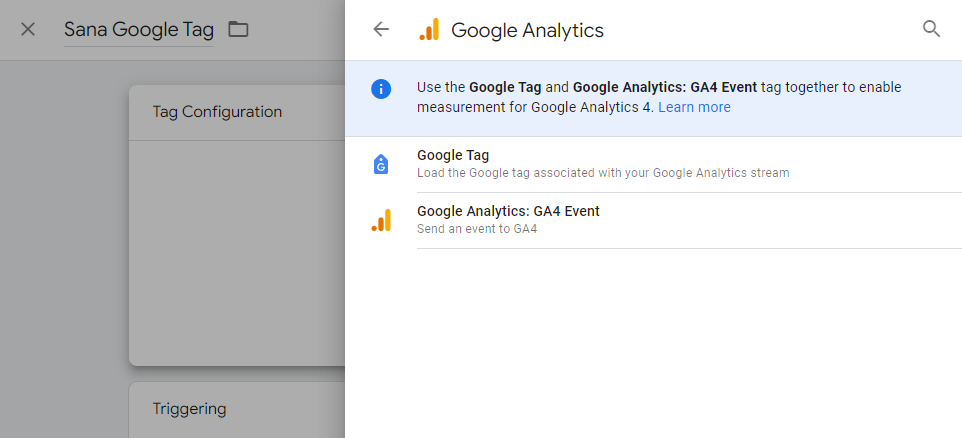
Step 3: Name your tag and configure it:
3.1 Tag Configuration: Choose Google Tag.
3.2 Enter your Tag ID.
3.3 Triggering: Choose Initialization - All Pages.
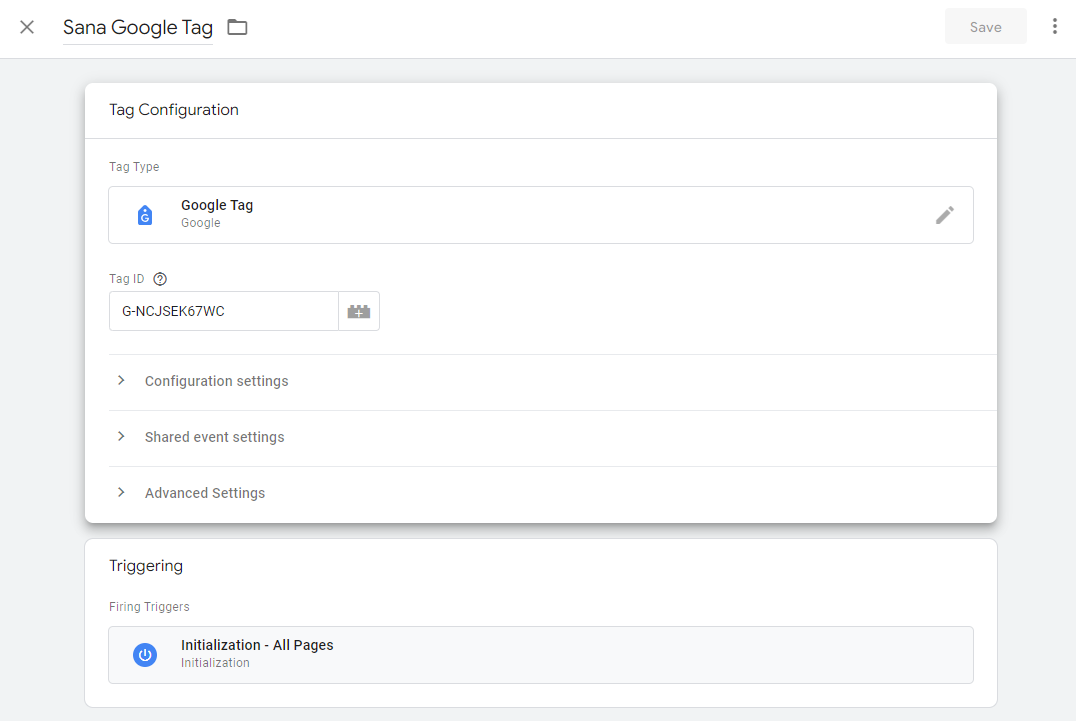
Step 4: Click Save to save the tag.
Page View Tracking
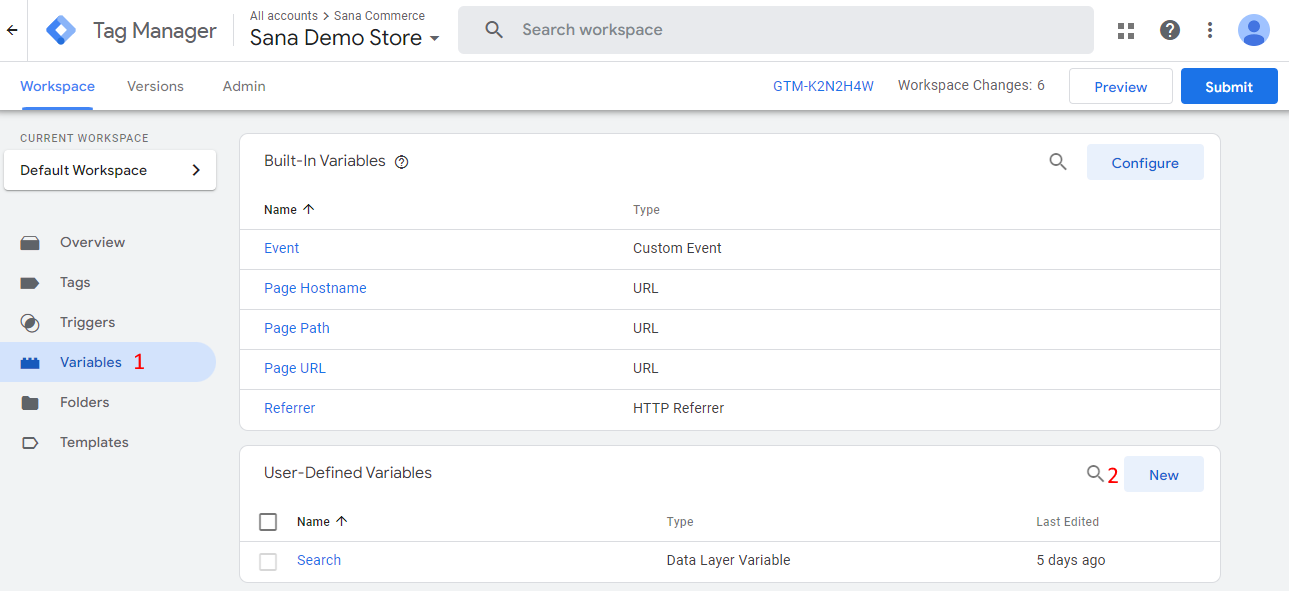
Step 1: Open Google Tag Manager and go to Variables.
Step 2: Create at least the listed below required data layer variables.
2.1 To create a variable, in the User-Defined Variables section, click New and enter the variable name.
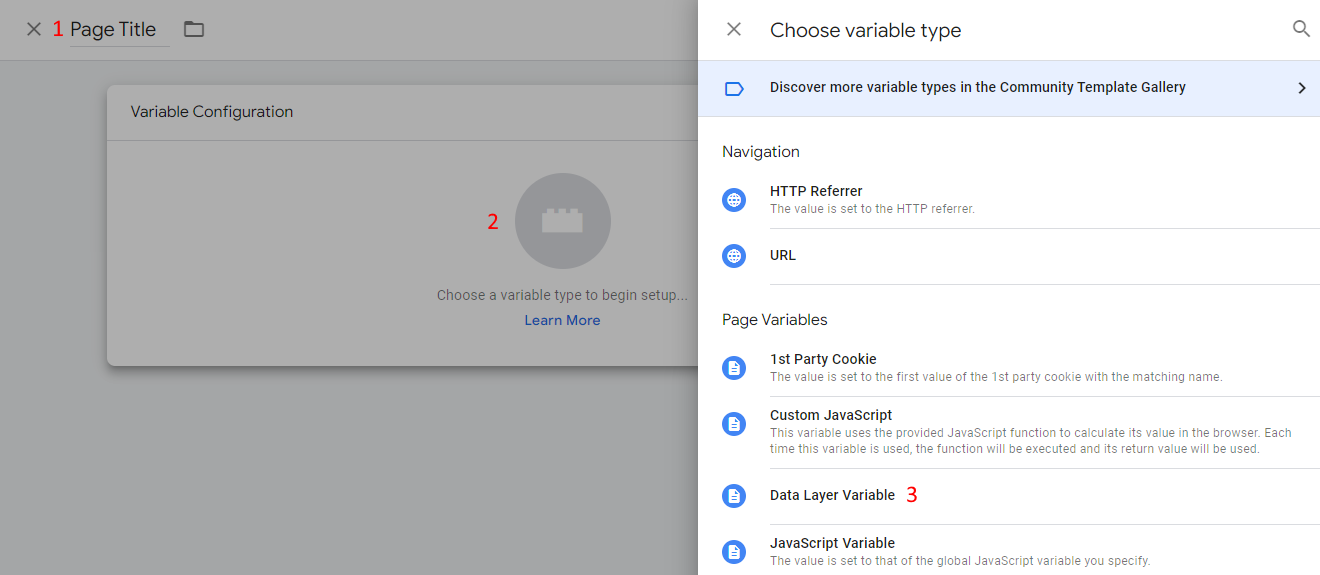
2.2 Click Choose a variable type to begin setup… and choose Data Layer Variable.
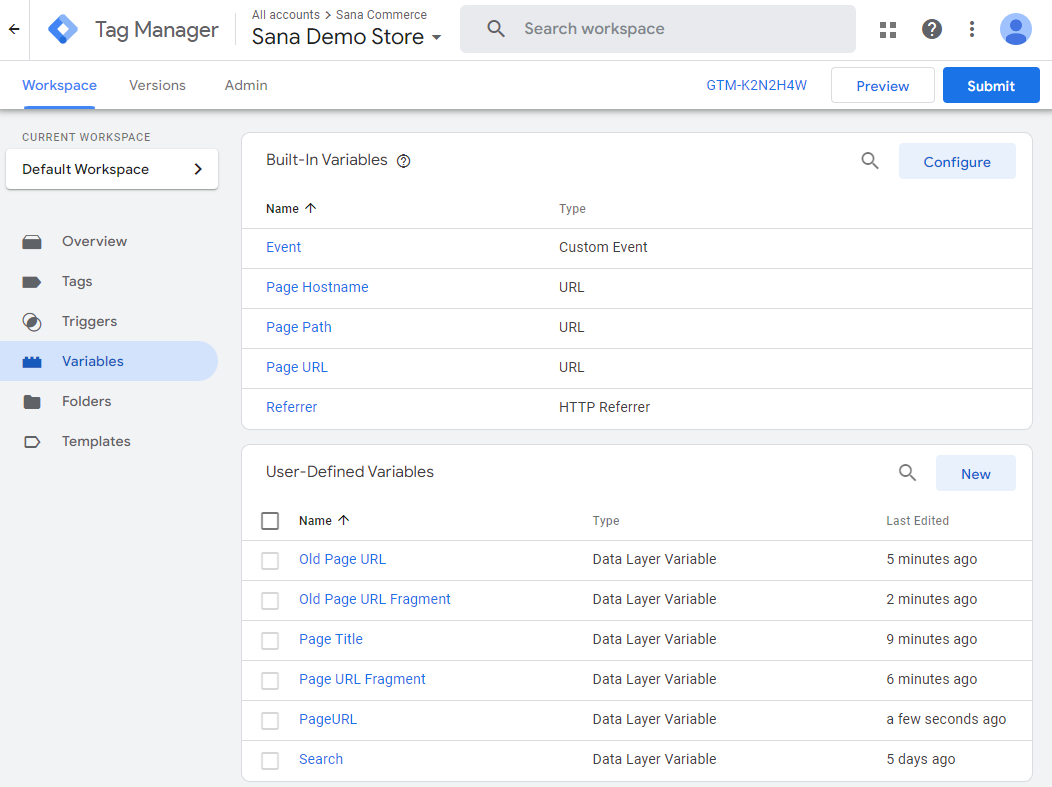
Required variables that must be created to track page views
- Page title: The title of the viewed page. The data layer variable name must be pageTitle.

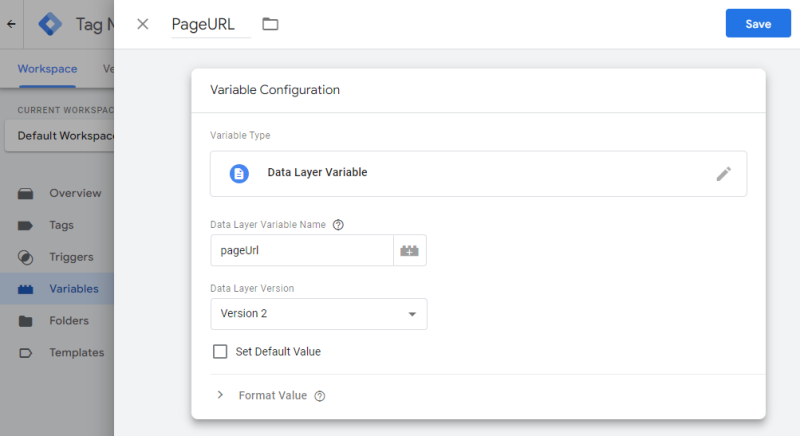
- Page URL: The URL of the viewed page. The data layer variable name must be pageUrl.


Optional variables that can be created
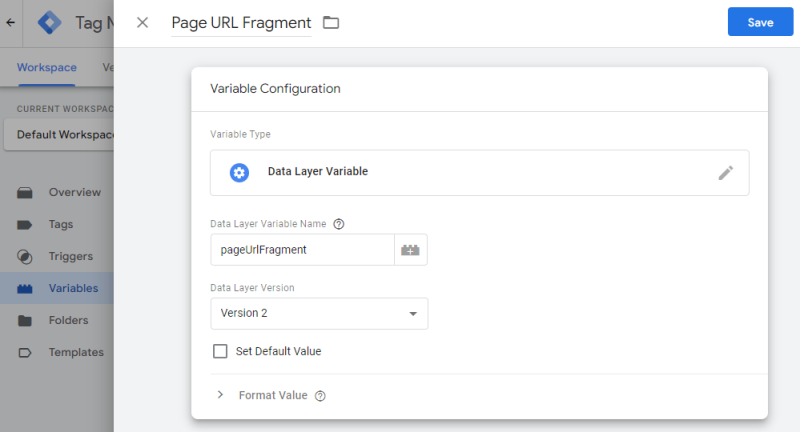
- Page URL fragment: The URL fragment of the viewed page. The data layer variable name must be pageUrlFragment.
- Old page URL: The URL of the previously viewed page. The data layer variable name must be oldPageUrl.

- Old page URL fragment: The URL fragment of the previously viewed page. The data layer variable name must be oldPageUrlFragment.


-
Page type: The type of the page. This variable works for content, blog article, product list, product details, product group, and search results pages, also for FAQ and News pages. The data layer variable name must be pageType.
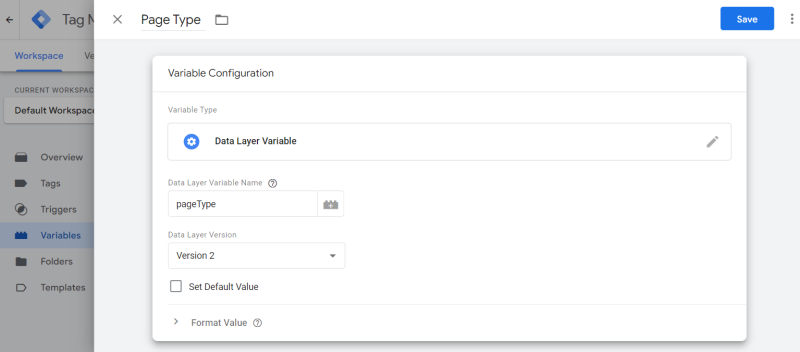

On the screenshot below you can see an example of the user-defined data layer variables that you can create in Google Tag Manager for page view tracking.
Step 3: Create a new tag. Name your tag and configure it:
3.1 Tag Configuration: Choose Google Analytics: GA4 Event.
3.1.1 Select the Measurement ID created earlier.
3.1.2 In the Event Name field, enter pageView.
3.1.3 Under Event Parameters, add the parameters page and title and choose the previously created pageTitle and pageUrl variables in the Value field as shown on the screenshot below.
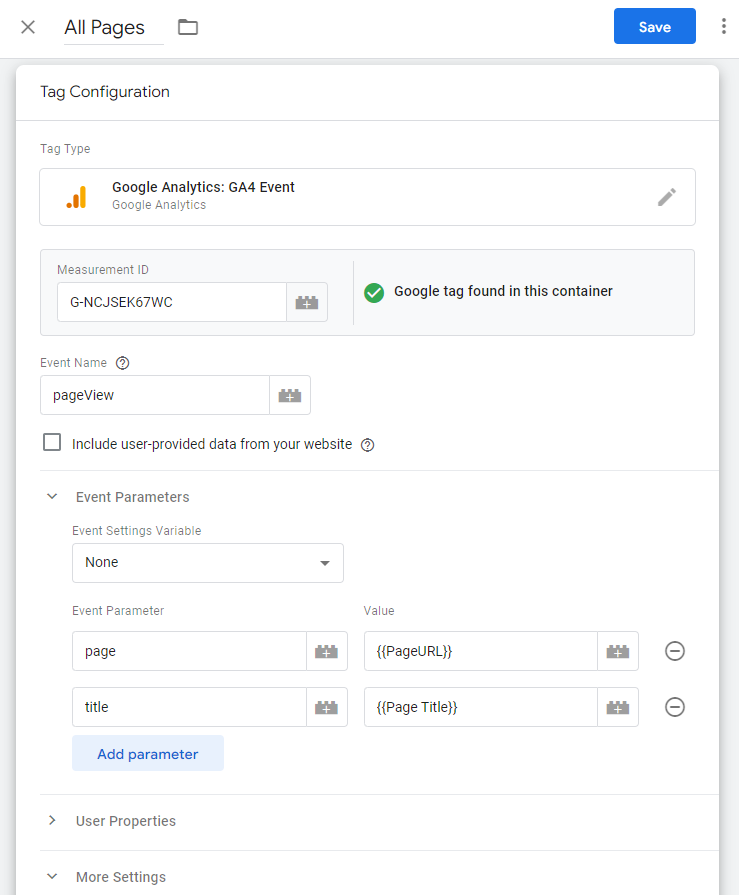
3.1.4 Under More Settings, select the Send Ecommerce data checkbox.
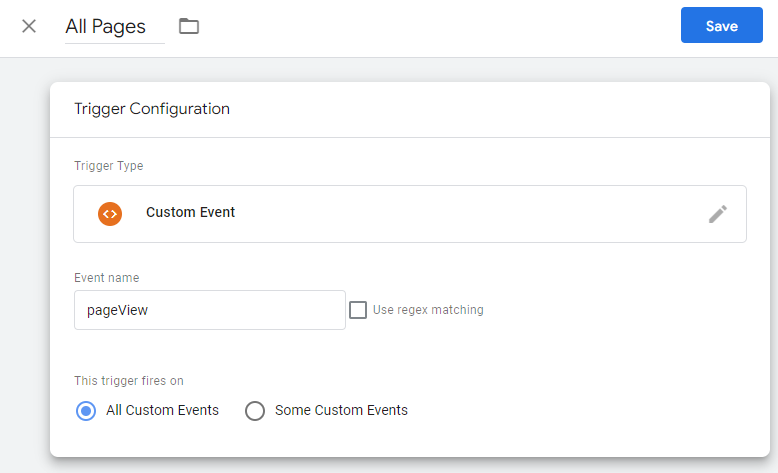
3.2 Triggering: You must create a new Custom Event trigger for the pageView event. Enter pageView in the Event name field and save your changes.
Step 4: Click Save to save the tag.
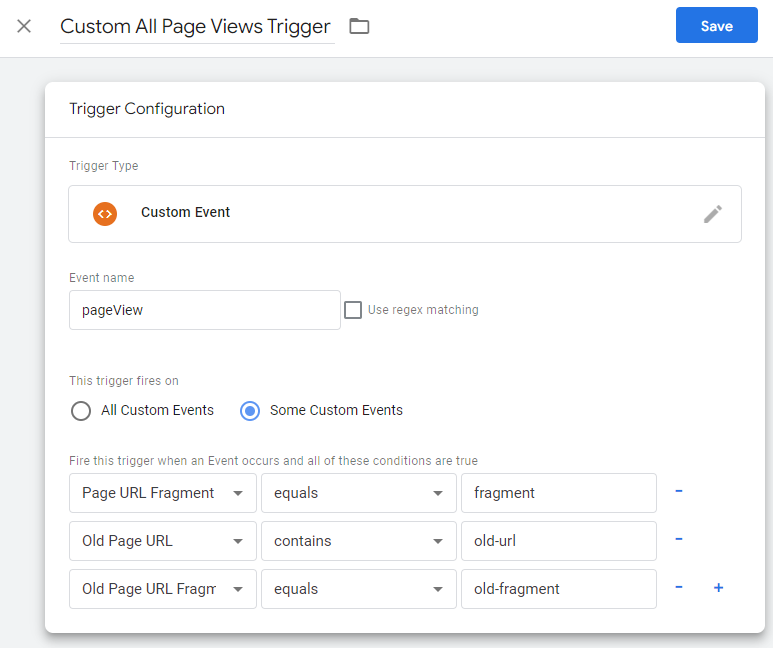
The optional data layer variables documented in step 2 can be used to configure additional conditions to fire a page view trigger. See example below.
Track Ecommerce Data
Events are used to measure user interactions on your Sana webstore, for example, you can measure when someone loads a page, clicks a link, or makes a purchase. Google Analytics uses data from events to create reports.
You need to create 10 different events.
|
Event name |
Description |
|---|---|
|
select_item |
It is triggered when a user clicks on a product. |
|
view_item |
It is triggered when a user views a product details page. |
|
view_item_list |
It is triggered when a user views a product list page, search results, and last viewed products. |
|
add_to_cart |
It is triggered when a user adds one or multiple products to the shopping cart. |
|
remove_from_cart |
It is triggered when a user removes one or multiple products from the shopping cart. |
|
begin_checkout |
It is triggered when a user initiates the checkout process. |
|
add_payment_info |
It is triggered when a user selects a payment method during checkout. |
|
add_shipping_info |
It is triggered when a user selects a shipping method during checkout. |
|
purchase |
It is triggered when a user places an order. |
Step 1: Open Google Tag Manager.
Step 2: Click on the container that is used for your Sana webstore.
Step 3: Go to Tags. To add a new tag, click New.
Step 4: Name your tag and configure it. To understand which tag is responsible for what, it is better to name them similarly to the corresponding event names.
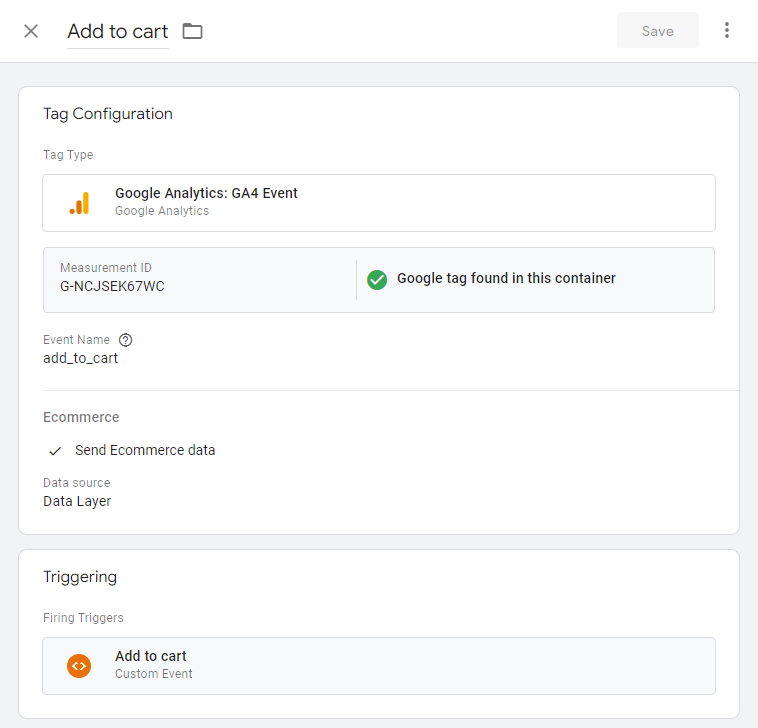
4.1 Tag Configuration: Choose Google Analytics: GA4 Event.
4.1.1 Select the Measurement ID created earlier.
4.1.2 In the Event Name field, enter the necessary event name. In the table above you can see a list of all events supported by Sana.
4.1.3 Under More Settings, select the Send Ecommerce data checkbox.
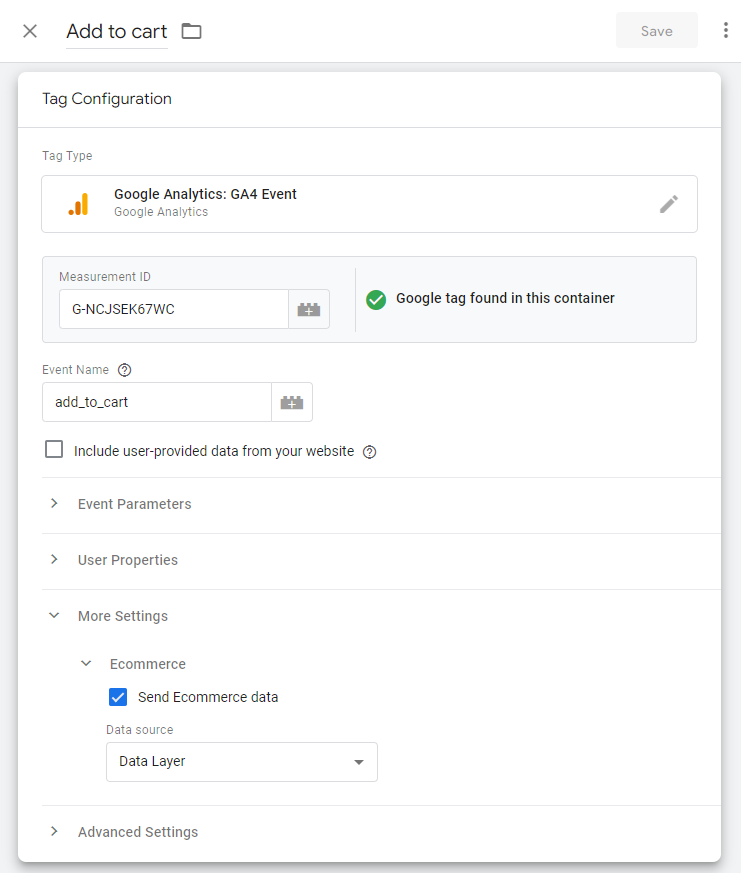
4.2 Triggering: You must create a new Custom Event trigger for each event.
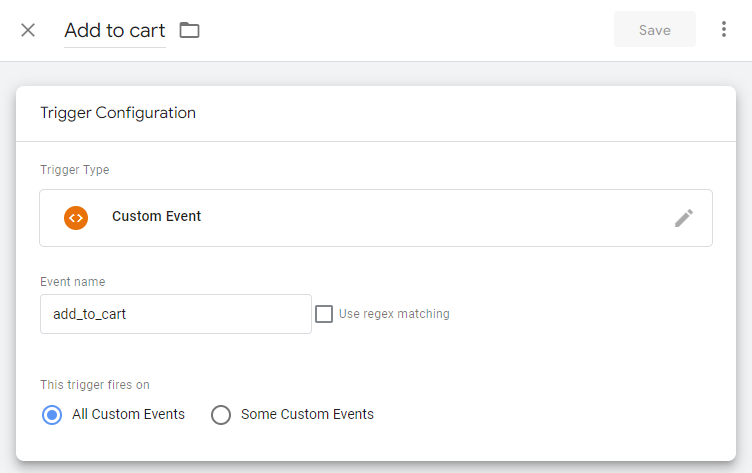
Step 5: Click Save to save the tag.
Webstore Search Tracking
Using the Google Analytics 4 site search tracking feature, you can determine the search terms (keywords) used by your webstore visitors to find the information they are looking for.
To keep track of the search terms your visitors use on the webstore, you need to:
-
Make sure that the site search event measurement is enabled in Google Analytics.
-
Create the custom search event in Google Tag Manager.
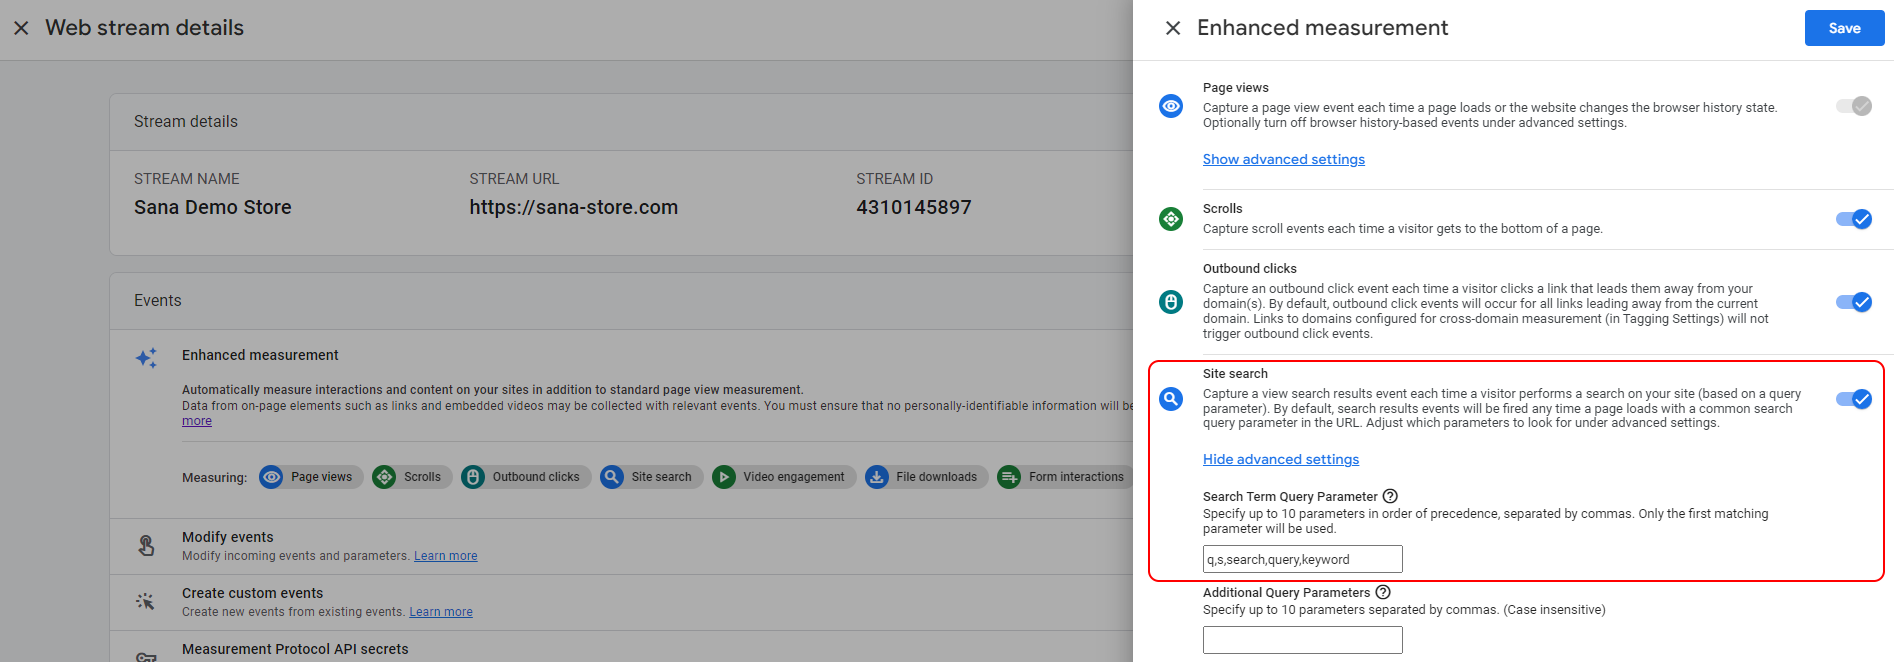
Check if the Site Search Event Measurement is Enabled in Google Analytics
Step 1: Open Google Analytics. Make sure you are using the correct Google Analytics 4 account and property - the one used for your Sana webstore.
Step 2: In the property settings, click: Data collection and modification > Data Streams, and open the data stream used for your Sana webstore.
Step 3: Make sure that the Site search event is available.
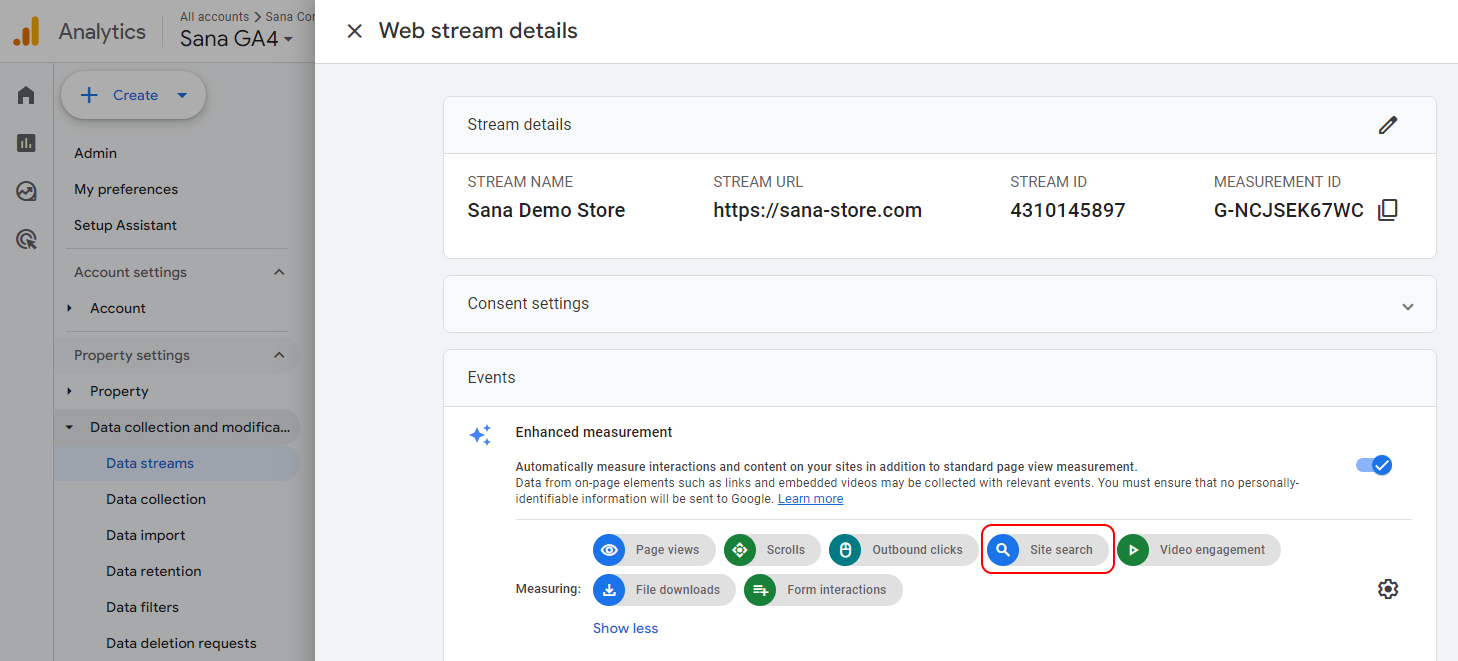
If not, click Configure enhanced measurement and enable it.
Sana uses q as the search term query parameter.
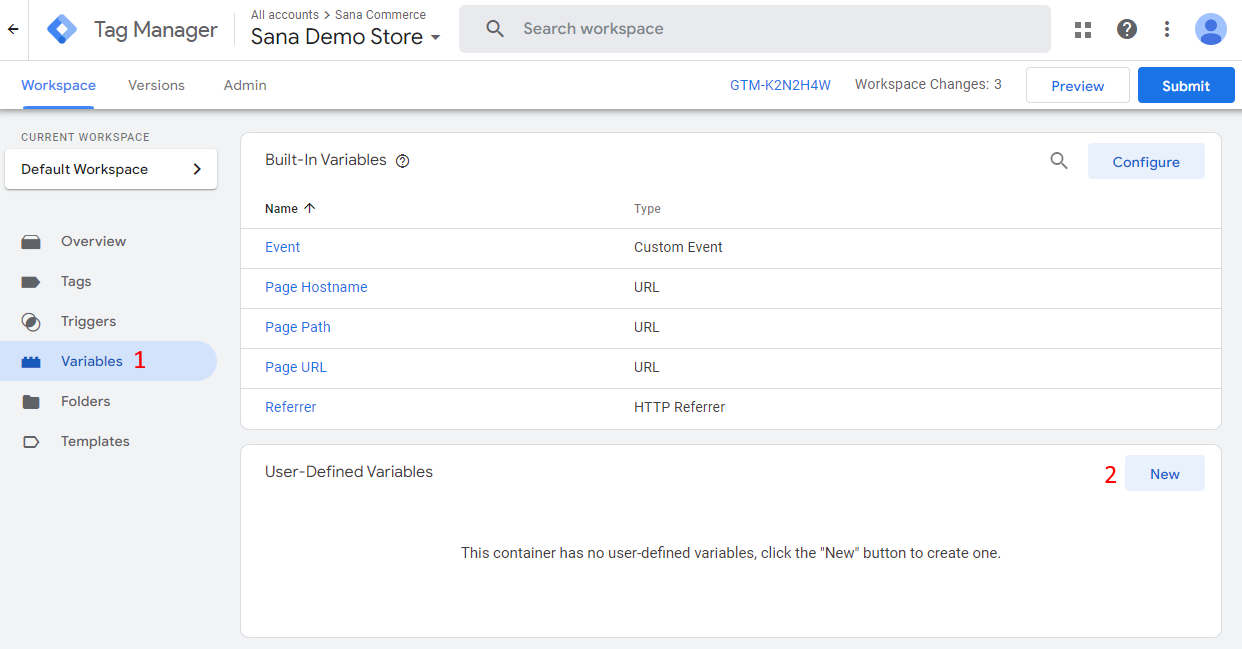
Create a Data Layer Variable for Search Terms
To create the custom search event described below, you need two data layer variables, one for search terms and the other for the number of search results (number of products found).
Step 1: Open Google Tag Manager.
Step 2: Click on the container that is used for your Sana webstore.
Step 3: Go to Variables.
Step 4: To create a variable, in the User-Defined Variables section, click New and name your variable.
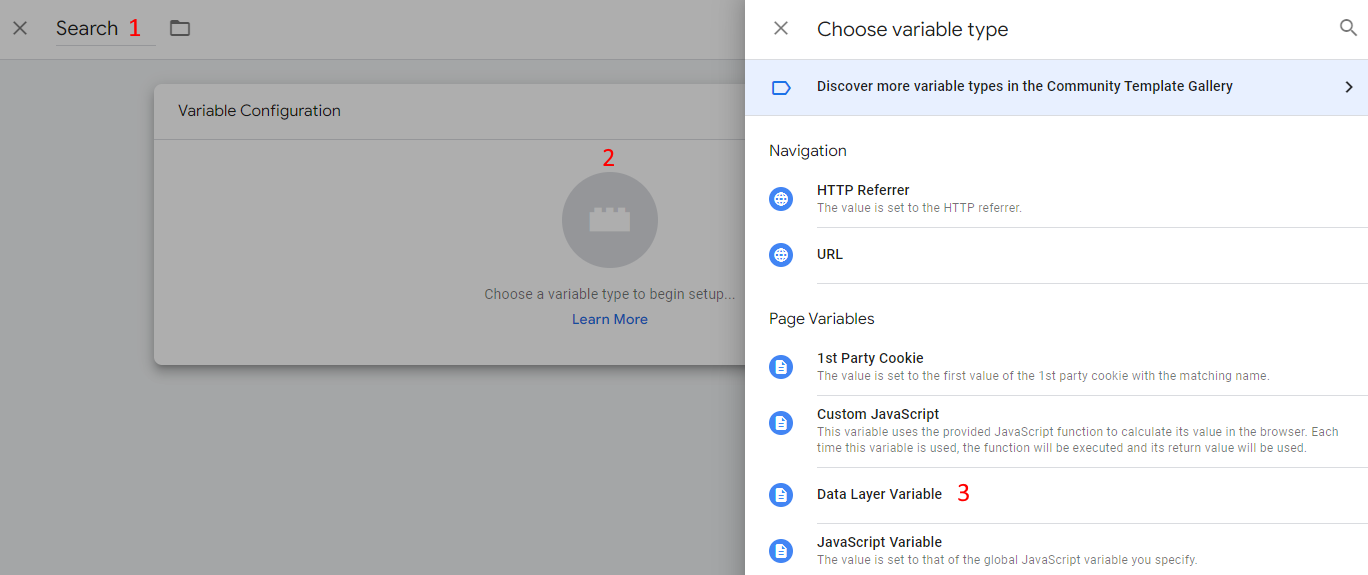
Step 5: Click Choose a variable type to begin setup… and choose Data Layer Variable.
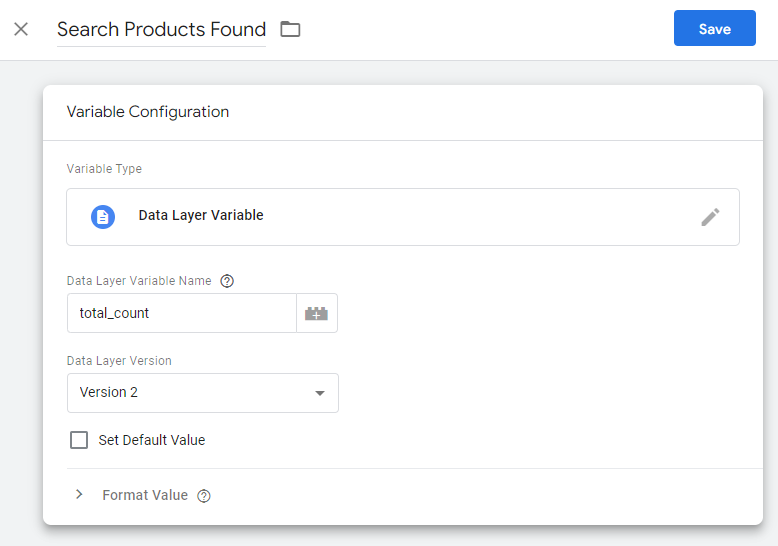
Step 6: In the Data Layer Variable Name field, enter search_term.
Step 7: In the Data Layer Version field, select Version 2.
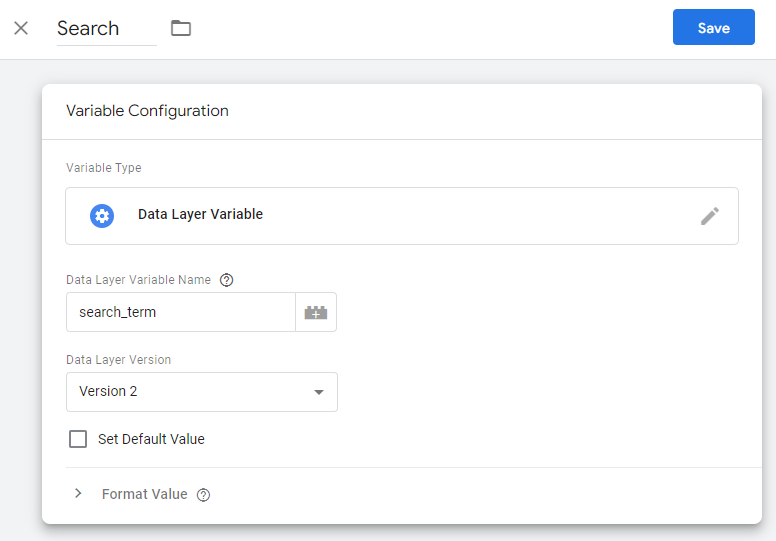
Step 8: Click Save.
Step 9: In the same way as described above, create a second data layer variable to keep track of the number of products found. In the Data Layer Variable Name field, enter total_count.
Create the Custom Search Event in Google Tag Manager
Step 1: Open Google Tag Manager.
Step 2: Click on the container that is used for your Sana webstore.
Step 3: Go to Tags. To add a new tag, click New.
Step 4: Name your tag and configure it. To understand which tag is responsible for what, it is better to name them similarly to the corresponding event names, for example Search.
4.1 Tag Configuration: Choose Google Analytics: GA4 Event.
4.1.1 Select the Measurement ID created earlier.
4.1.2 In the Event Name field, enter search.
4.1.3 Under Event Parameters, click Add Parameter. You must add two rows with two different parameters and values.
Parameter 1: In the Event Parameter field, enter search_term. In the Value field, select the search_term data layer variable created earlier.
Parameter 2: In the Event Parameter field, enter total_count. In the Value field, select the total_count data layer variable created earlier.
4.1.4 Under More Settings, select the Send Ecommerce data checkbox.
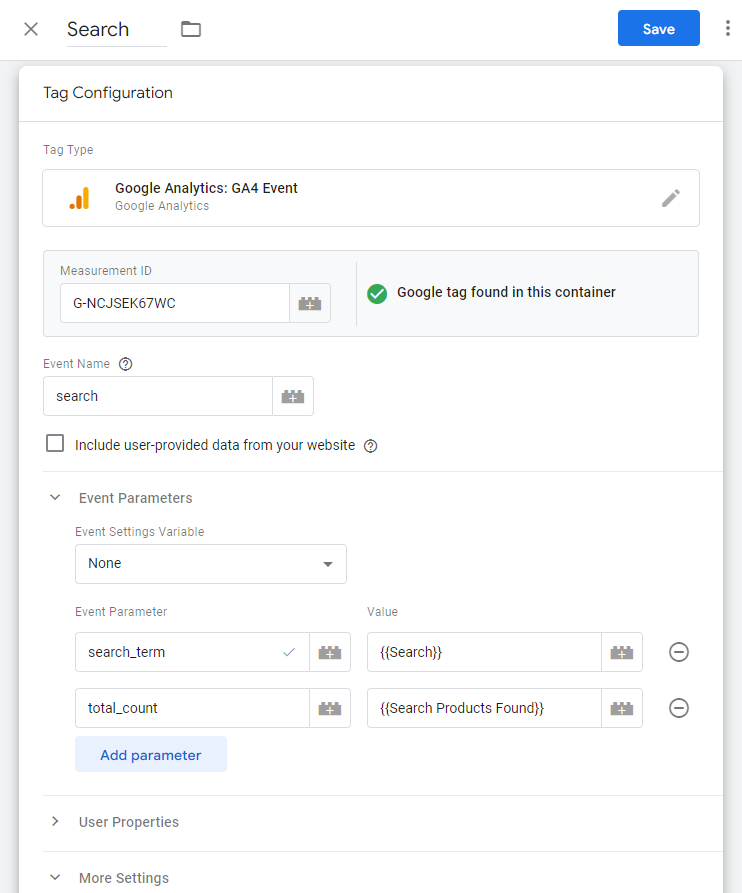
4.2 Triggering: You must create a new Custom Event trigger for the search event.

Step 5: Click Save to save the tag.
When you are ready, you can preview and debug the container, and publish your changes.