Installation and Configuration
When you apply for a live Sana Pay account, most of the setup will be done by a Sana product specialist or service consultant. This is one of the many advantages of Sana Pay over other payment service providers supported by Sana.
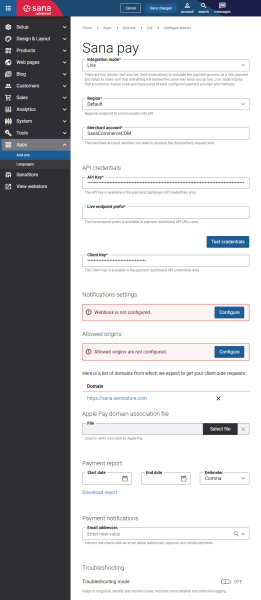
Sana Pay Settings
The Sana Pay add-on has various settings, such as API credentials to connect the Sana webstore to the Sana Pay payment system, merchant account where all payments are processed, and notification settings that are used to inform Sana Commerce Cloud about payment status updates and notify merchants about authorized, captured and modified payments, as well as other events and ensure that all payment stages have been processed.
Merchant account and notification settings are also available in the payment method settings of the Sana Pay payment provider.
Region is used for communication between Sana Commerce Cloud and Sana Pay (live account) by a region-specific URL that matches the region of your live endpoint. Setting the appropriate region improves the reliability and availability of the service during the checkout process.
All of the above settings are configured by our product specialists or service consultants, or the necessary information is sent to the webstore owner for further configuration. Most of the setup will be done at your merchant account level when we create a Sana Pay live account for you. We will ask you for the information we need to set up Sana Pay for you, such as what payment methods you need.
When everything is configured, to start accepting live payments using your Sana Pay live account, you will need to create the necessary payment methods in Sana Admin.
Keep in mind that moving from the test environment to live, changing the merchant account, API credentials, or webstore domain requires reconfiguring the Sana Pay add-on.
If you have any questions, please contact your Sana Commerce representative.
Webhook Connection Monitoring
To ensure smooth integration between Sana Commerce Cloud and Sana Pay, the system regularly checks the webhook connection. If the connection is interrupted after previously being active, the webstore administrator will be notified via e-mail.
Connection Check Logic
The connection between Sana Commerce Cloud and Sana Pay is checked once per hour.
Monitoring is performed only for the general merchant account configured in the Sana Pay add-on settings. It does not apply to merchant accounts configured at the payment method level.
E-Mail Notification Details
Notification is sent when the connection to Sana Pay fails for 3 consecutive checks.
E-mail subject: "No Sana Pay webhook connection configured or connection is not available"
The e-mail is sent to the administrator’s notification e-mail address defined in Sana Admin at the following location: Setup>Basics>E-mail addresses.
Only one e-mail is sent per incident to avoid spamming, even if more failures occur after the initial three.
Once the connection is restored, the counter resets. If the connection fails again, a new notification will be sent.
No notification is sent if:
- The webhook has never been configured.
- The Sana Pay add-on is not set up or contains invalid credentials.
