Set Up WorldPay Account
When the WorldPay payment provider is installed, it should be configured in the WorldPay Merchant Interface and in Sana Admin. To configure the WorldPay payment provider and payment methods, you should have the WorldPay account with all the necessary data.
Step 1: In the WorldPay merchant interface click: Installations > Integration Setup. Click on the following button  to access installation administration of the WorldPay test / production environment.
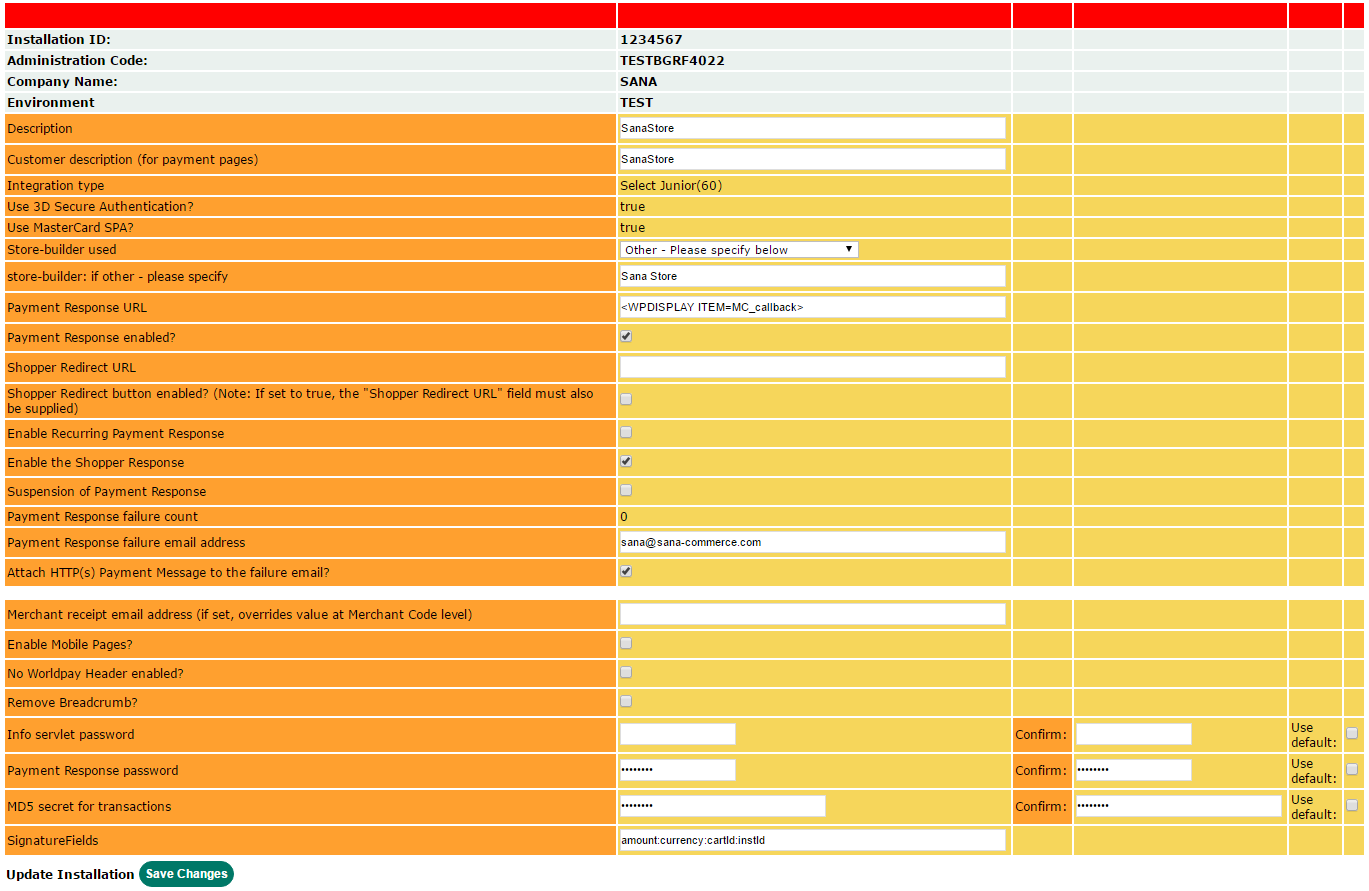
Step 2: Fill in the required information. For more information about how to configure WorldPay merchant interface, see Installation administration on the WorldPay support website.
The table below provides the description of the required settings.
| Settings | Description |
|---|---|
| Description | This is your own reference for this installation. This can be useful if you have multiple installations and you wish to easily distinguish them. |
| Customer description (for payment pages) | A description you can enter and modify that will be shown to the customers on the payment service page. For example, Sana Store. |
| Store-builder used | The store-builder software that is used to process customers' payments via the WorldPay payment service.
Select Other - Please specify below and in the field below enter the store-builder name, for example, Sana Commerce. |
| store-builder: if other - please specify | |
| Payment response URL | Enter: <WPDISPLAY ITEM=MC_callback> |
| Payment Response enabled? | Select this checkbox |
| Enable the Shopper Response | Select this checkbox. |
| Payment Response password | Enter payment response password. This password is used to validate a Payment Notification message. |
| MD5 secret for transactions | Enter a value for the MD5 secret. When you enter a value for the MD5 secret, MD5 encryption becomes active for your purchase requests.
This value should match the value of the 'secret' field in the WorldPay configuration section in Sana Admin. |
| SignatureFields | The SignatureFields parameter tells the WorldPay payment service, which values to use when checking your MD5 signature.
It consists of the amount, currency, cartId and instId parameters. You can enter your own SignatureFields by specifying a colon separated list of parameter names, for example: amount:currency:cartId:instId. The SignatureFields parameters order should be identical to the one in the signatureFields field in the WorldPay configuration section in Sana Admin. |
Step 3: In the WorldPay merchant interface click: Installations > Edit Payment Pages.
Step 4: Select installation Id and click Edit Payment Pages.
Step 5: Under File Menu, click File Management.
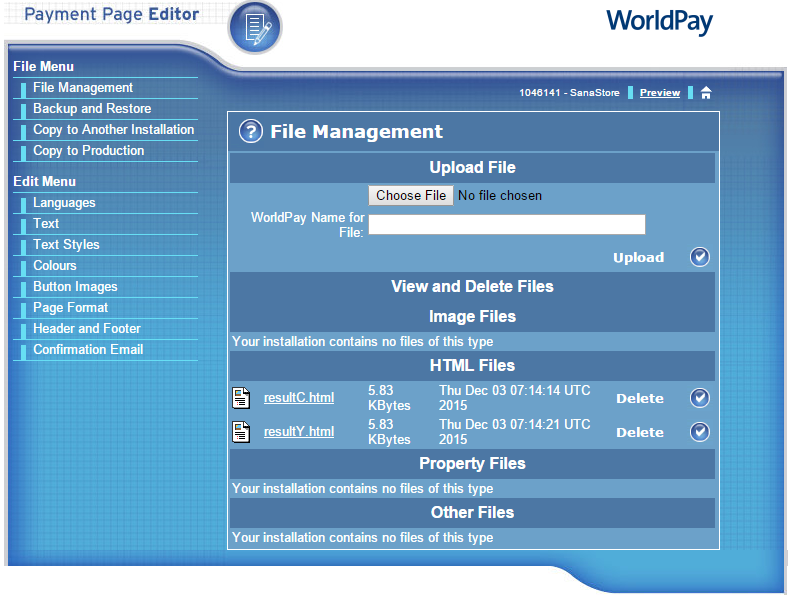
Step 6: Upload the resultC and resultY HTML files. Sana partners can download these files on the Add-ons page on the Sana Community website. All changes you make will only apply to the TEST Payment Page belonging to the installation. Use the copy to production environment option to make your changes live.
When you move your WorldPay test environment to production, you need to copy the resultC and resultY pages to production environment before going live. To do this, click Copy to Production in the menu on the left.