Configure Versapay
When the Versapay payment provider is installed, it should be configured in Sana Admin. To configure the Versapay payment provider and payment methods, you should have the Versapay test / live account with all the necessary data.
Step 1: The Versapay payment provider is available as an app. It can be installed from the Sana App Center.
In Sana Admin click: App Center > Apps > Apps Explorer. When the Versapay app is installed, you can configure it on the app details page by clicking on the Configure button ![]() .
.
Step 2: Choose the appropriate payment integration mode.
There are two modes: test and live. Test mode allows you to simulate the payment process as if it is a real payment and helps to make sure that everything will behave the same way when you go live. Live mode implies that a customer makes a real purchase using an already configured payment provider and methods.
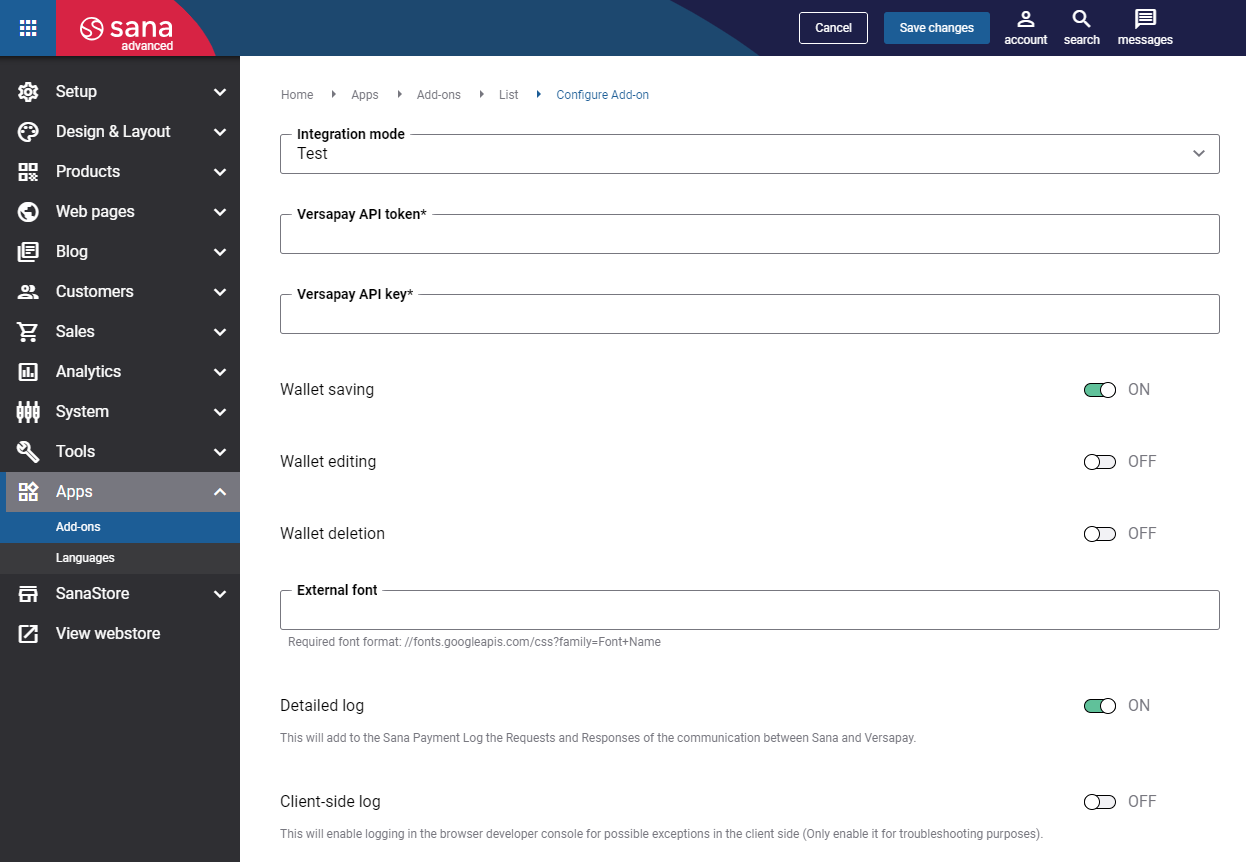
Step 3: Configure the Versapay payment provider by entering the payment provider specific settings of the test / live account.
The table below provides the description of the Versapay payment provider fields.
|
Field |
Description |
|---|---|
|
Versapay API token |
Enter the Versapay API token and Versapay API key. This information will be provided by a Versapay representative. To create a new Versapay account, contact the Versapay customer support team. For more information, see the Versapay Contact Us page. |
|
Versapay API key |
|
|
Wallet saving |
Enable the setting to allow your customers to securely store their payment details (credit card or bank account) during checkout. This way you provide the convenience of reusing their preferred payment methods for future purchases. The Wallet saving feature streamlines the buying process, making repeat transactions faster and more seamless. NOTE
Payment details will be securely stored on Versapay servers, not on Sana servers. |
|
Wallet editing |
Enable the setting to allow your customers to update their saved payment details, such as credit card or bank account information, whenever needed. Whether it is editing a card number, expiration date, or a cardholder’s name, the Wallet editing feature offers flexibility and ensures that payment information remains accurate. By providing an easy way to make updates, you enhance the user experience and help prevent payment errors during future transactions, ensuring a smoother and more efficient checkout process. |
|
Wallet deletion |
Enable the setting to allow your customers to delete any saved payment methods, such as credit card or bank account, that they no longer wish to use. The Wallet deletion feature enhances security and control, giving customers the ability to manage their stored payment information. By removing outdated or unnecessary details, customers can streamline their accounts and ensure only active, relevant payment options are available for future transactions. |
|
External font |
Enter the URL of a Google Font to customize the default font within the Versapay iFrame (Versapay’s extra payment step, where customers should enter their payment details). Ensure the URL is correctly formatted according to the provided guidelines for smooth integration into the iFrame design, enhancing both the visual appeal and user experience. For more information, see Add Google Fonts. |
|
Detailed log |
Enable the setting to provide comprehensive information about each transaction within the payment log. The Detailed log feature is particularly useful for troubleshooting, testing integrations, or monitoring specific behaviors. However, it is recommended to keep this setting disabled during regular operations and activate it only when detailed insights are required to diagnose or resolve issues. |
|
Client-side log |
Enable the setting to provide detailed reporting of issues directly in the browser console, offering valuable insights into client-side errors. By default, the Client-side log setting is disabled and should only be enabled during testing or troubleshooting. Enabling it during regular operations may impact performance or expose sensitive data, so it is recommended to resolve specific issues. |
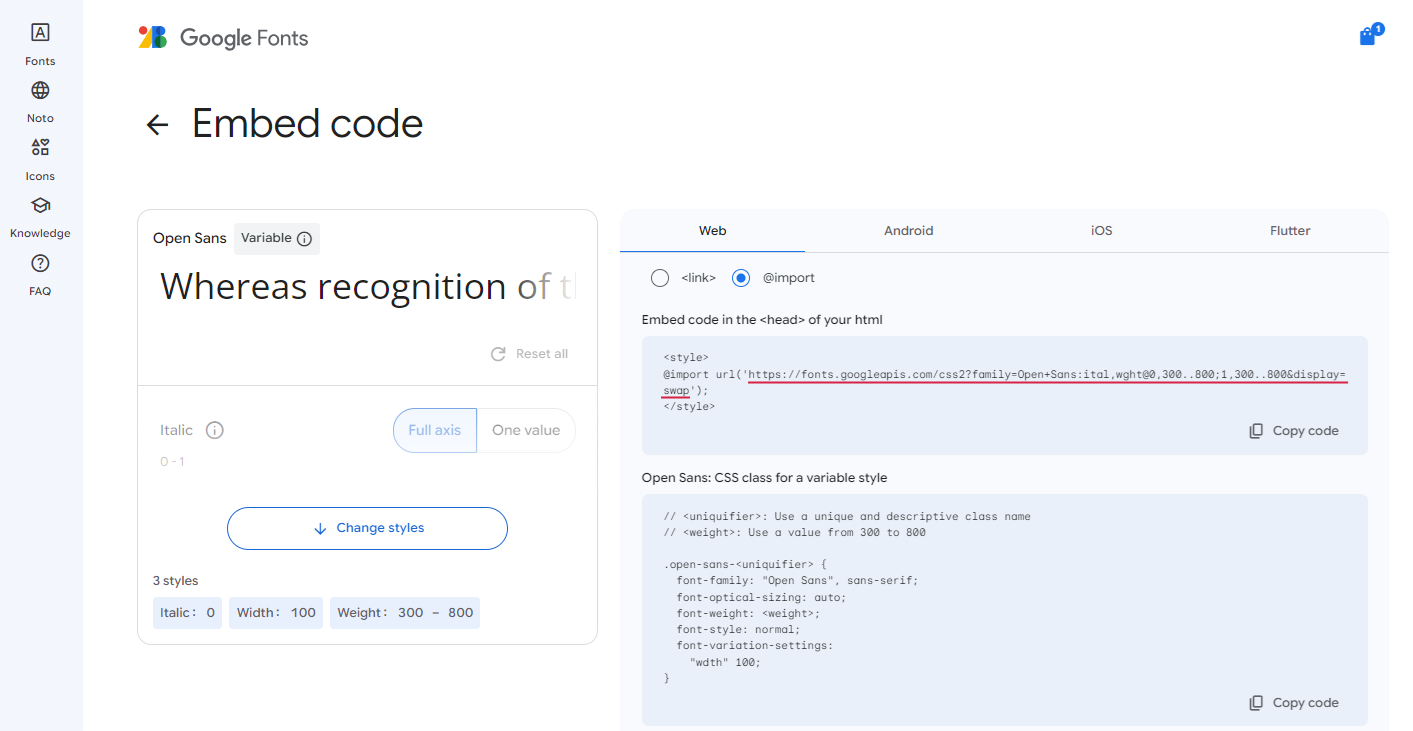
Add Google Fonts
Step 1: Open Google Fonts.
Step 2: Choose a font you like. To get the font, click Get font.

Step 3: Then click Get embed code.
Step 4: On the Web tab, choose @import.
Step 5: Copy the URL with the font family and paste it into the External font field in Sana Admin.
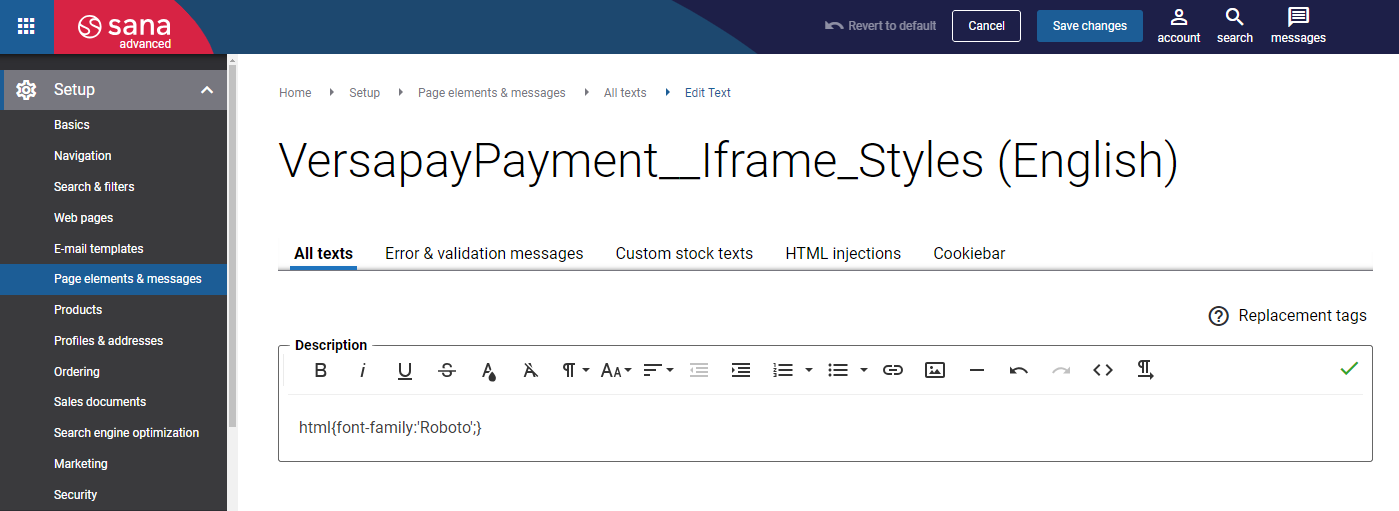
This URL is used only for downloading the font. To apply the font to the Versapay iFrame, add a line of code to the VersapayPayment__Iframe_Styles text.
In Sana Admin click: Setup > Page elements & messages. For example: html{font-family:'Roboto';}