Configure NAV 2009 Three-Tier Environment
Applies to: Microsoft Dynamics NAV 2009 Three-Tier Installation on Three Computers
If you have a different setup of Microsoft Dynamics NAV 2009, skip this article.
There are two configurations for NAV 2009 three-tier installation on multiple servers available: Three Tiers On Two Computers and Three Tiers on Three Computers.
The key characteristic of the Three Tiers On Two Computers configuration is that the two server tiers - Microsoft Dynamics NAV Server and SQL Server - are on the same computer.
If you install Microsoft Dynamics NAV Server and SQL Server on separate computers (Three Tiers on Three Computers configuration), you must set up delegation, to enable clients to use the Microsoft Dynamics NAV Server service's credentials while interacting with a SQL Server database.
The key characteristic of the Three Tiers On Three Computers configuration is that the client, Microsoft Dynamics NAV Server, and SQL Server are installed on separate computers.
You can find more information about installing the three tiers on two computers on MSDN: Walkthrough: Installing the Three Tiers On Two Computers.
The Three Tiers on Three Computers configuration is described here: Walkthrough: Installing the Three Tiers on Three Computers.
During the installation you can encounter the configuration problems. The information below will help you to solve them.
First check the accounts which are running the NAV and SQL services. Make notes of domain account names, machine names, and FQDN (Fully qualified domain name).
For more detailed information about which accounts (Domain User Account or Network Service Account) should be created and when they are used, read the articles on MSDN:
Walkthrough: Installing the Three Tiers On Two Computers
Walkthrough: Installing the Three Tiers on Three Computers
Check for Incorrect Service Principal Names (SPN's)
When the NAV Server and the SQL Server are on separate machines and the NAV Service is running under Domain account:
Two SPNs have to be set up for the NAV Service:
Step 1: Open the Windows command prompt.
Step 2: Execute the following command:
setspn -A DynamicsNAV/ServerNameWhereNavServerIsLocated.DomainName:7046 DomainName\UserNameWhoRunsNavServerReplace server name, domain name and username with the appropriate values.
Step 3: In order to set up the second service (NAV 2009 Web Service) execute the following command:
setspn -A http/ServerNameWhereNavServerIsLocated.DomainName DomainName\UserNameWhoRunsNavServerReplace server name, domain name and username with the appropriate values.
SPN for SQL Service is not needed if SQL is running under the NetworkService account.
SPN for SQL Server is needed if SQL Server is running under a Domain account - see SQL SPN at the end of this chapter.
When the NAV Server and the SQL Server are on separate machines and the NAV Service is running under NetworkService account:
-
No SPN is needed for the NAV Service;
-
SPN for SQL Service is not needed if SQL is running under NetworkService account;
-
SPN for SQL Server is needed if SQL Server is running under Domain account - see "SQL SPN" at the end of this chapter.
Check Delegation
When running the NAV Service under Domain account, Delegation has to be set up for the account running the NAV service:
The Delegation tab will only be present after adding the SPN to the domain user account.
Step 1: Click Start, then click Run.
Step 2: Type in dsa.msc and click OK.
Step 3: Expand the Domain and then click on Users.
Step 4: Locate the domain user account you are using, right click and select Properties.
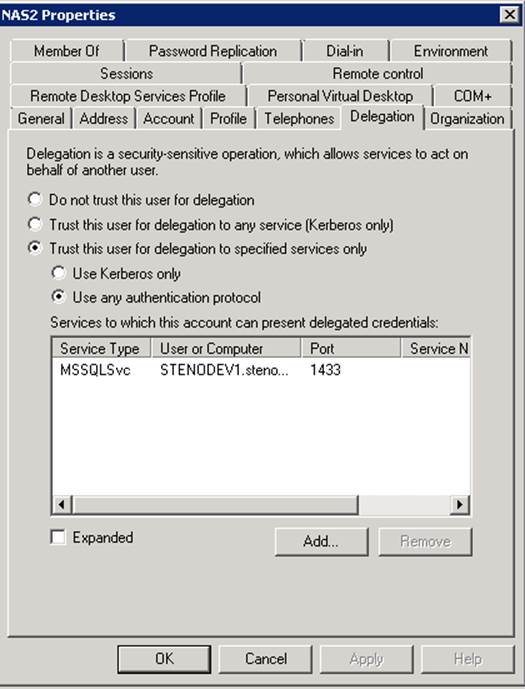
Step 5: Under that Delegation tab, select Trust this user for delegation to any service (Kerberos only), then click OK. This is not constrained delegation as mentioned in the Walkthrough, but this makes it a little easier to set up delegation. You can always come back after it is setup and working to implement constrained delegation. For constrained delegation, select Trust this user for delegation to specified services only and then select the MSSQLSvc SQL service.
If you do not have the Kerberos authentication protocol, then select Trust this user for delegation to specified services only and Use any authentication protocol. Then select the MSSQLSvc SQL service.
Step 6: Close the Active Directory Users and Computers window.
When running the NAV Service under NetworkService account, Delegation has to be set up for the machine running the NAV service:
Step 1: Click Start, and then click Run.
Step 2: Type in dsa.msc and click OK.
Step 3: Expand the Domain and then click on Computers.
Step 4: Locate the computer name, right click and select Properties.
Step 5: Under that Delegation tab, select the Trust this machine for delegation to any service (Kerberos only), then click OK.
Step 6: Close the Active Directory Users and Computers window.
Check SQL Logins and OCL
Adding the login(s) to SQL Server and setting up the Object Change Listener (OCL):
OCL is not required if the NAV Server and SQL Server are on the same machine and the NAV service is running under Network Service account.
If using a Domain User to run services, make sure the login has been added to both SQL Server and NAV. Also check that user has Full Control to the server folder (the default path to the server folder is the following: C:\Program Files\Microsoft Dynamics NAV\60\Service).
The account may already exist in SQL Server, but the permissions must be manually set correctly:
Step 1: Open Microsoft SQL Server Management Studio.
Step 2: Click Security to expand the tree-view, right-click Logins, and then select New Login.
This opens the Login - New dialog box.
Step 3: Add the domain user account in the Login name field, using the following format:
domain\domainUser
Step 4: Click OK to exit the Login - New dialog box.
Step 5: Click Databases, Demo Database NAV (6-0) or other database name, and then click Security to expand the tree-view.
Step 6: Under Security, right-click Users, and then select New User.
This opens the Database User - New dialog box.
Step 7: Add the domain user account in the User name and Login name field, using the following format:
domain\domainUser.
Add $ndo$navlistener in the Default schema field:
Step 8: Click the Securables page.
Step 9: Click Add, click OK, click Object Types, check Tables and then click OK. Click Browse, check the [dbo].[Object Tracking], click OK, click OK again.
In the Explicit permissions check Grant on the Select permission.
Step 10: Click OK to exit the Database User - New dialog box.
Step 11: Close Microsoft SQL Server Management Studio.
If the NAV server and SQL Server are on different machines and the Network Service account is running the NAV Service, then the Login and OCL must be set up using the same steps but for the machine account rather than the domain user.
Use the steps described earlier, but replace the domain account with the machine account in the following form: <domain>\<computername>$
Check the Configuration of Delegation for the RTC
Step 1: Change the ClientUserSettings.config on the computer running the RTC, under the current user's profile, to define that a domain user account is to be used when connecting to the NAV Service tier.
On Windows Vista or Windows Server 2008, the default location is:
X:\Users\\AppData\Local\Microsoft\Microsoft Dynamics NAV
On Windows XP or Windows Server 2003, the default location is:
X:\Documents and Settings\\Local Settings\Application Data\Microsoft\Microsoft Dynamics NAV
Step 2: Add the following key to the file:
<add key="DelegationInfo" value="DomainUser"></add>
There are two possible values: NetworkService and DomainUser. To enable delegation, set the parameter to DomainUser.
This will need to be repeated for all workstations that will be using the RTC.
After confirming all items above and making the necessary changes, be sure to stop and start the NAV Server service before you attempt to reconnect using the RTC. If you still encounter the error message, remember that Kerberos tickets last for ten hours, so if you add/change the SPN, you may either have to wait for any existing tickets to expire or download KerbTray and attempt to expire any existing tickets. This is found in the Windows Server 2003 Resource Kit, which can be downloaded from here.
Check the SQL Service SPN (Optional)
SPN for SQL Server is composed of the following elements:
-
ServiceClass: This identifies the general class of service. This is always MSSQLSvc for SQL Server.
-
Host: This is the fully qualified domain name DNS of the computer that is running SQL Server.
-
Port: This is the port number that the service is listening on.
-
yourDomain\yourUser: This is the user which runs the service.
For example, a typical SPN for a computer that is running SQL Server is:
MSSQLSvc/SQLSERVER1.yourDomain.yourCompany:1433 yourDomain\yourUser
Use the following command to add this SPN:
setspn -A MSSQLSvc/ServerNameWhereSqlServerIsLocated.DomainName:1433 DomainName\UserNameWhoRunsSqlServerReplace server name, domain name and username with an appropriate values.
The format of SPN for a default instance and the format of SPN for a named instance are the same. The port number is what ties SPN to a particular instance.