Set Up AIF Web Service to Use SSL
Secure Sockets Layer (SSL) is a cryptographic protocol that helps provide security and data integrity for data communications over a network. By encrypting your Microsoft Dynamics AX Web service using SSL, you make your data and the network more secure and more reliable.
It is required to secure data transfer between the Sana web store and Microsoft Dynamics AX.
Prerequisites
-
The server which hosts the Microsoft Dynamics AX Web service must support TLS 1.2. TLS 1.2 is available on Windows Server 2008 R2 and higher. It is not available on Windows Server 2008 by default, but you can install an update to add support for TLS 1.2 on Windows Server 2008.
-
Before configuring the Web service to use SSL, you must obtain a security certificate for the Web service domain. The certificate is issued by a certificate authority (CA). If this is a test environment, you can create and use a self-signed SSL certificate. The self-signed SSL certificate can be used only for testing purposes.
-
Internet Information Services (IIS) Manager.
-
Service Configuration Editor. This editor allows to configure Web service using a graphical user interface. With this tool you can configure the Web service without having to directly edit the web.config file. For more information, see Configuration Editor Tool (SvcConfigEditor.exe) in the MSDN Library.
If you don't have the Configuration Editor Tool, you can make the necessary changes in the web.config file of the Microsoft Dynamics AX Web service.
Configure Internet Information Services (IIS) Manager to Listen to HTTPS
Step 1: Open IIS Manager.
Step 2: In the IIS Manager, select the web site where Microsoft Dynamics AX Web service is running.
Step 3: In the Actions pane on the right, click Bindings.
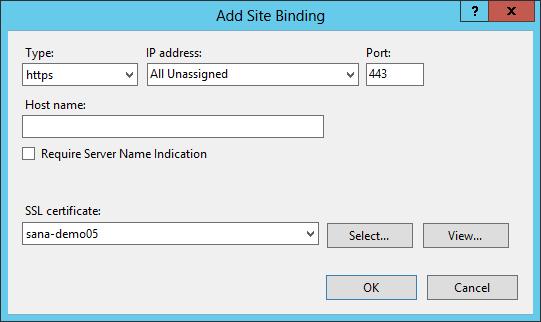
Step 4: In the Site Bindings window, click Add.
Step 5: Add site binding with https type and select the SSL certificate obtained from the certification authority.
Configure Microsoft Dynamics AX Web Service to Use SSL (Automatic Setup)
To make configuration of HTTPS for Microsoft Dynamics AX Web service easier, Sana provides a feature that allows to set up HTTPS automatically. You can set up HTTPS just with a single click directly in Microsoft Dynamics AX and Sana will do the rest.
In Microsoft Dynamics AX click: Webshop > Setup > Parameters. In the Parameters window, click Configure HTTPS.
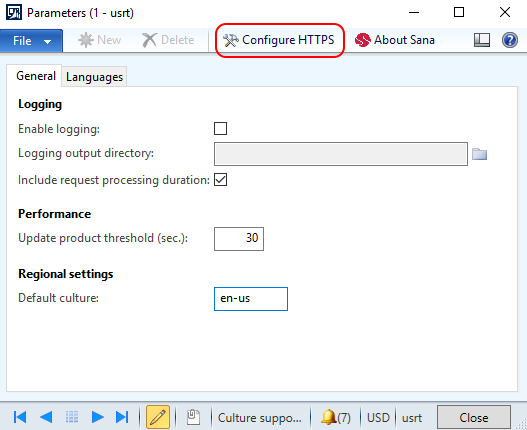
It will create the necessary binding and endpoint and set up the required settings.
If you encounter some issues with setting up HTTPS from the Parameters window, please configure it manually as described below.
Configure Microsoft Dynamics AX Web Service to Use SSL (Manual Setup Using Configuration Editor Tool)
Step 1: In Microsoft Dynamics AX go to: System administration > Setup > Services and Application Integration Framework > Inbound ports.
Step 2: Locate the Sana service created during installation and deactivate it, if it is activated.

Step 3: Click on the Configure button. Microsoft Service Configuration Editor will open where you can configure the Web service to use SSL.
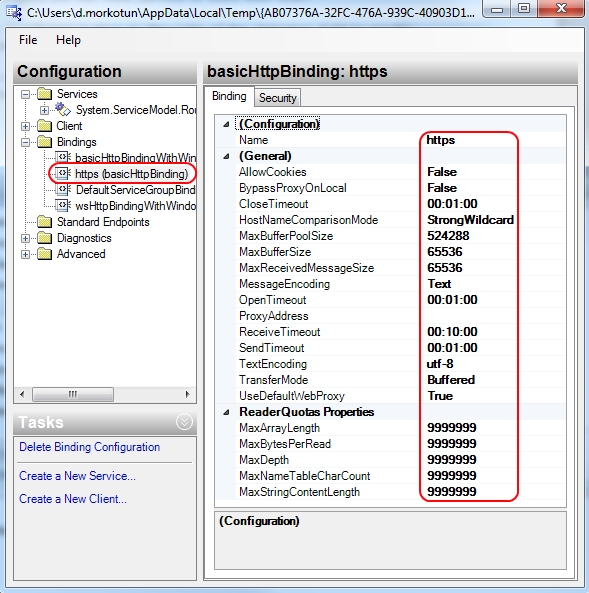
Step 4: Create a new service binding of a basicHttpBinding type and set the binding settings as shown on the screenshot below.
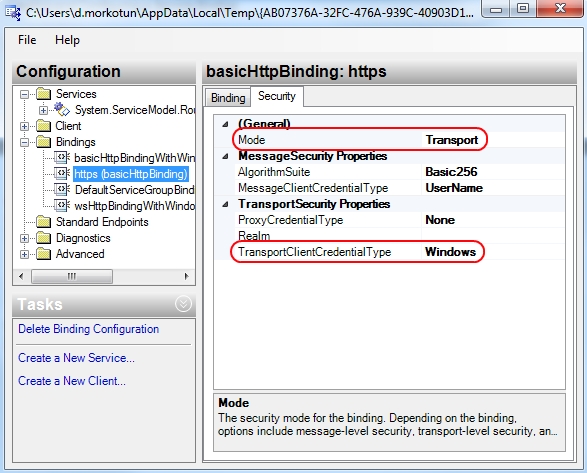
Step 5: On the Security tab, select the Transport mode and Windows TransportClientCredentialType.
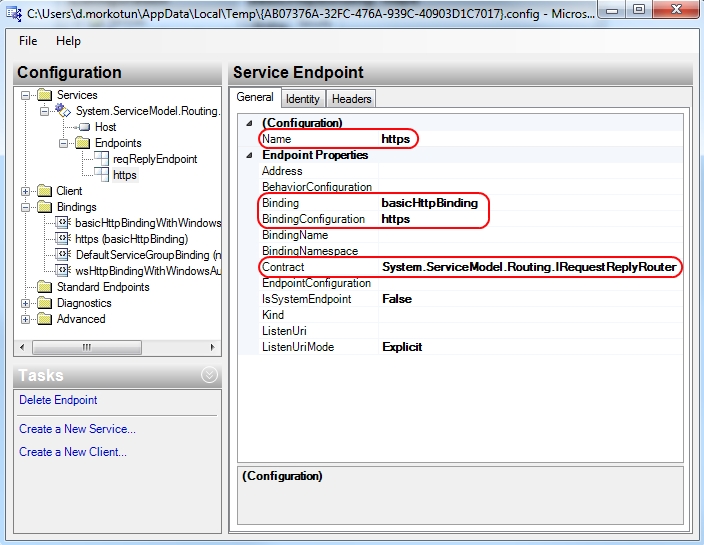
Step 6: Create endpoint and link it to the previously created binding.
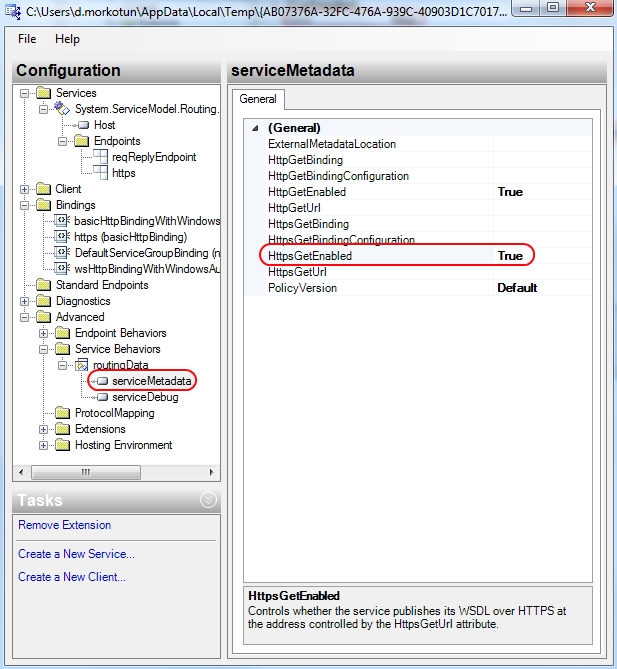
Step 7: On the Service Behaviors node, open serviceMetadata and set HttpsGetEnabled to True.
Step 8: When the Web service is configured to use SSL, activate it in the Inbound ports window.
Configure Microsoft Dynamics AX Web Service to Use SSL (Manual Setup in "web.config")
If you don't have the Configuration Editor Tool, you can make the necessary changes directly in the web.config file of the Microsoft Dynamics AX Web service on the server. You can open the web.config file in Notepad, for example and make the necessary changes as described below.
Step 1: Add the following binding:
<binding name="https" receiveTimeout="00:02:00" sendTimeout="00:02:00" maxBufferSize="6553600" maxBufferPoolSize="5242880" maxReceivedMessageSize="6553600">
<readerQuotas maxDepth="9999999" maxStringContentLength="9999999" maxArrayLength="9999999" maxBytesPerRead="9999999" maxNameTableCharCount="9999999" />
<security mode="Transport">
<transport clientCredentialType="Windows" />
</security>
</binding>Step 2: Add the following endpoint:
<endpoint binding="basicHttpBinding" bindingConfiguration="https" name="https" contract="System.ServiceModel.Routing.IRequestReplyRouter" />Step 3: Find the following line and make sure that the value of the parameter httpsGetEnabled is true.
<serviceMetada httpGetEnabled="true" httpsGetEnabled="true" />